

- Alan Truman
- Albert Harrison
- Ambrose O'Halloran
- Andrew Hall
- Bob Chapman
- Bob Neill
- Clive Brooks
- Colin Fishwick
- David Lowe
- David Springett
- Gary Rance
- George Bell
- Gerry Marlow
- Ian Clarkson
- Joe Laird
- Joey Richardson
- John Berkeley
- Ken Allen
- Les Thorne
- Margaret Garrard
- Mark & Lisa Raby
- Mark Baker
- Mark Hancock
- Martin Pidgen
- Mick Hanbury
- Nick Agar
- Nick Arnull
- Nikos Siragas
- Paul Jones
- Phil Irons
- Philip Greenwood
- Peter Berry
- Peter Wood
- Richard Findlay
- Robin Wood
- Russell Kebble
- Sarah Thirlwell
- Simon Hope
- Simon Whitehead
- Steve Wright
- Stuart King
- Sue Harker
- SWC Club Members
- Tony Wilson
- Tracy Owen
- Walt Claxton
- Walt Claxton & Tom Allison
Albert Harrison 14 August 2008
Albert treated us to a very entertaining evening, interspersing his
woodturning![]() demonstrations with plenty of jokes, humour and magic tricks.
For the first half of the evening he concentrated on turning scoops
in varying sizes – the first being a salt scoop in cedar. He turned
it from a
demonstrations with plenty of jokes, humour and magic tricks.
For the first half of the evening he concentrated on turning scoops
in varying sizes – the first being a salt scoop in cedar. He turned
it from a
 piece of wood approximately 2-3” long by 1” square with a
hole about an inch long drilled through it’s length to form the scoop
end of the piece, he also used this to mount it on a jam chuck. He had
also drilled a small hole through the handle end for threading a piece
of string through so the scoop can be hung up; he explained that this
hole needs to be drilled before the piece is turned in order to ensure
it is centred. After turning the handle he removed the work from the
lathe and turned a similar piece, but this one was much longer and was
in oak. He finished them both with finishing oil as they are to be used
with food then, to complete the projects, he used an electric scroll
saw to cut the bowls to shape. Albert explained that these scoops are
his ‘bread and butter’ work, he makes the small scoops by the hundred
for a company which sells them with packets of salt; the larger one
is for use in a salt safe.
piece of wood approximately 2-3” long by 1” square with a
hole about an inch long drilled through it’s length to form the scoop
end of the piece, he also used this to mount it on a jam chuck. He had
also drilled a small hole through the handle end for threading a piece
of string through so the scoop can be hung up; he explained that this
hole needs to be drilled before the piece is turned in order to ensure
it is centred. After turning the handle he removed the work from the
lathe and turned a similar piece, but this one was much longer and was
in oak. He finished them both with finishing oil as they are to be used
with food then, to complete the projects, he used an electric scroll
saw to cut the bowls to shape. Albert explained that these scoops are
his ‘bread and butter’ work, he makes the small scoops by the hundred
for a company which sells them with packets of salt; the larger one
is for use in a salt safe.
To end the first half of the evening Albert turned a coffee scoop in cherry; he makes these for Betty’s of Harrogate. He mounted a piece of wood approximately 2” square by 3-4” long between centres and turned it round. He then turned a deep spigot at one end so he could mount it securely in the chuck. Once it was mounted in the chuck he made a ‘v’ cut then turned a ball at the end, he turned one half of the ball with a ⅜” spindle gouge and the other with a skew chisel to demonstrate the different tooling techniques. To ensure the ball was perfectly round he scraped it with a holesaw – hence the reason for mounting it securely in the chuck. After turning the handle he parted the piece off then explained that the next step is to mount it in a home made mould, which he uses to hold it steady so he can cut it through the centre on a band saw, thus turning it into two scoops, then he uses a pillar drill to cut a hole in the bowl (the ball). At this point, in true ‘Blue Peter’ style, he produced one he had prepared earlier. The next step was to mount the scoop back on the lathe in some homemade jaws and hollow out the bowl using a ¼” spindle gouge which he has ground as a bowl gouge. Finally he sanded the handle to shape using a homemade “rotary sander” which was basically a cylinder of wood mounted on the lathe between centres with various grades of sandpaper wrapped round it. See photo AH01 for examples of the various scoops he makes.
After the break Albert turned a box in olive wood. He mounted a square
of wood between centres and turned it round with a spigot at each end
and then parted off one end to form a lid, using a thin parting tool
to keep the grain matching. He cut it off using the proportions of 2/5
for the lid and 3/5 for the base. He mounted the lid in the chuck and
used a spindle gouge to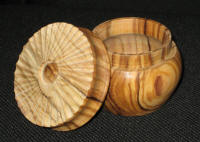 drill a hole into the middle so that he could
use this as a guide to hollow it to the desired depth. He finished the
internal sides with a box scraper to make sure they were parallel then
turned a small bead inside the centre of the lid to hide any imperfections.
He then mounted the base and started hollowing it out to release any
tension in the wood before starting to fit the lid. To fit the lid he
cut a lip in the end which he sloped slightly to allow room for error
then, once the lid fitted correctly he taped it onto the base, turned
off the spigot and turned it to shape, making it slightly domed. To
finish the lid he mounted a home made jig onto the bed of the lathe
onto which he mounted a small router with a cove bit. He used this to
carve a pattern into the surface of the lid by sliding it back and forth
across the timber from the edge to the centre and rotating the box by
hand between cuts. See photo AH02. Finally he turned a small
indent in the centre, tidied the outer edge to get rid of any breakout
and turned a groove and a bead on the edge to make it easier to remove
the lid from the base.
drill a hole into the middle so that he could
use this as a guide to hollow it to the desired depth. He finished the
internal sides with a box scraper to make sure they were parallel then
turned a small bead inside the centre of the lid to hide any imperfections.
He then mounted the base and started hollowing it out to release any
tension in the wood before starting to fit the lid. To fit the lid he
cut a lip in the end which he sloped slightly to allow room for error
then, once the lid fitted correctly he taped it onto the base, turned
off the spigot and turned it to shape, making it slightly domed. To
finish the lid he mounted a home made jig onto the bed of the lathe
onto which he mounted a small router with a cove bit. He used this to
carve a pattern into the surface of the lid by sliding it back and forth
across the timber from the edge to the centre and rotating the box by
hand between cuts. See photo AH02. Finally he turned a small
indent in the centre, tidied the outer edge to get rid of any breakout
and turned a groove and a bead on the edge to make it easier to remove
the lid from the base.
Albert turned the outside of the base then hollowed the inside, undercutting the top using a hooked scraper See photo AH03. Finally he parted it off, making the final cut a little way away from the base, leaving a small dimple, to ensure the wood didn’t tear out. He mounted it onto a jam chuck to finish the underneath which he hollowed slightly and decorated with some rings. See photos AH04 and AH05.
This was a very entertaining evening and I still have no idea how he performed those magic tricks.
Lorrie Flannery
![]()
SWC club member