

- Alan Truman
- Albert Harrison
- Ambrose O'Halloran
- Andrew Hall
- Bob Chapman
- Bob Neill
- Clive Brooks
- Colin Fishwick
- David Lowe
- David Springett
- Gary Rance
- George Bell
- Gerry Marlow
- Ian Clarkson
- Joe Laird
- Joey Richardson
- John Berkeley
- Ken Allen
- Les Thorne
- Margaret Garrard
- Mark & Lisa Raby
- Mark Baker
- Mark Hancock
- Martin Pidgen
- Mick Hanbury
- Nick Agar
- Nick Arnull
- Nikos Siragas
- Paul Jones
- Phil Irons
- Philip Greenwood
- Peter Berry
- Peter Wood
- Richard Findlay
- Robin Wood
- Russell Kebble
- Sarah Thirlwell
- Simon Hope
- Simon Whitehead
- Steve Wright
- Stuart King
- Sue Harker
- SWC Club Members
- Tony Wilson
- Tracy Owen
- Walt Claxton
- Walt Claxton & Tom Allison
Andrew Hall 12 June 2008
Andrew came down from
County Durham with his friend John, who regularly travels![]() with him to
his woodturning demonstrations. Before starting the turning he gave
us a brief history of his background – he first started turning when
he was 14 and went into joinery on leaving school. In his early twenties
he went on to teach woodworking in schools and only started turning
hats four years ago. His interest in the hats was inspired by an article
in the Woodturning magazine written by Johannes Michelson; after reading
this he tried his hand at turning hats but had many failures. It all
changed when he went to see Johannes demonstrating at a seminar in Ireland
where he attended every one of the demonstrations that Johannes gave.
with him to
his woodturning demonstrations. Before starting the turning he gave
us a brief history of his background – he first started turning when
he was 14 and went into joinery on leaving school. In his early twenties
he went on to teach woodworking in schools and only started turning
hats four years ago. His interest in the hats was inspired by an article
in the Woodturning magazine written by Johannes Michelson; after reading
this he tried his hand at turning hats but had many failures. It all
changed when he went to see Johannes demonstrating at a seminar in Ireland
where he attended every one of the demonstrations that Johannes gave.
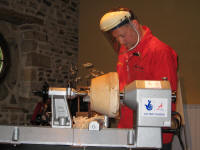 Andrew
started by mounting a large sycamore log on the lathe which he
turned round and then into a cone shape. He then concentrated
on the underside of the hat (at the headstock end) but had problems
with
Andrew
started by mounting a large sycamore log on the lathe which he
turned round and then into a cone shape. He then concentrated
on the underside of the hat (at the headstock end) but had problems
with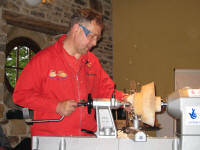 a couple of bark inclusions which fortunately he was eventually
able to turn away, although it was touch and go for a while as it started
to look as if they were going to go too far into the wood. Naturally,
Andrew had come prepared for this with another piece of wood already
turned to a cone.
a couple of bark inclusions which fortunately he was eventually
able to turn away, although it was touch and go for a while as it started
to look as if they were going to go too far into the wood. Naturally,
Andrew had come prepared for this with another piece of wood already
turned to a cone.
Andrew’s attention was then turned to the top of the hat (at the tailstock end). He removed a ring of wood, so he could get the general shape of the hat without wasting too much wood. He did this with a parting tool by first cutting in from the end then came in from the side to meet the first cut. He donated this ring to the raffle for someone to turn into a mirror.
 The next stage
was to measure the size of the hat using a flexible curve to measure
the head of the person it is being made for; he takes three measurements
and uses the average of these three. He used the flexible curve to draw
the shape of the head onto a piece of card then added ⅝” to this for
the outside measurement. After turning a spigot on the top of the hat
to hold it in the chuck, he turned the top of the hat down to the correct
size then put some shape into the brim in order to get a curve in it,
making it into a sort of ogee shape. He finished shaping the crown,
turning an indentation into the edge of the top of the hat and leaving
a flat strip above the brim for the hat band which he coloured using
artists colouring pencils. Before turning it round on the lathe Andrew
removed the core from the inside of the hat.
The next stage
was to measure the size of the hat using a flexible curve to measure
the head of the person it is being made for; he takes three measurements
and uses the average of these three. He used the flexible curve to draw
the shape of the head onto a piece of card then added ⅝” to this for
the outside measurement. After turning a spigot on the top of the hat
to hold it in the chuck, he turned the top of the hat down to the correct
size then put some shape into the brim in order to get a curve in it,
making it into a sort of ogee shape. He finished shaping the crown,
turning an indentation into the edge of the top of the hat and leaving
a flat strip above the brim for the hat band which he coloured using
artists colouring pencils. Before turning it round on the lathe Andrew
removed the core from the inside of the hat.
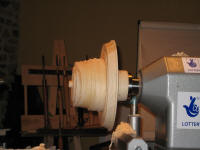
 To finish the brim Andrew
shone a light behind it so he could gauge the thickness of the brim
and kept it sprayed with water to stop it distorting; the eventual thickness
was approximately 1½mm. He then removed the wood from the inside, again
using a light to gauge the thickness. Andrew sanded the brim
of the hat holding a piece of sandpaper on each side using equal but
light pressure, he usually starts with 40 grit and works up to 180.
The rest of the sanding is done off the lathe.
To finish the brim Andrew
shone a light behind it so he could gauge the thickness of the brim
and kept it sprayed with water to stop it distorting; the eventual thickness
was approximately 1½mm. He then removed the wood from the inside, again
using a light to gauge the thickness. Andrew sanded the brim
of the hat holding a piece of sandpaper on each side using equal but
light pressure, he usually starts with 40 grit and works up to 180.
The rest of the sanding is done off the lathe.
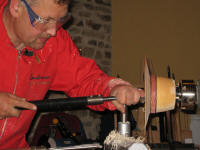
Andrew removed the hat from the lathe and mounted a home made
light box onto it, this was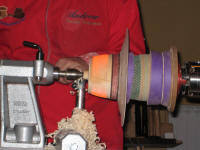 made from green mdf with foam wrapped round it. A light on a long
copper tube was then threaded into this box and through the
headstock. The hat was put onto the light box and lightly held in
place by the tailstock. Finally Andrew turned the top of the hat
using the light inside it to judge the thickness.
made from green mdf with foam wrapped round it. A light on a long
copper tube was then threaded into this box and through the
headstock. The hat was put onto the light box and lightly held in
place by the tailstock. Finally Andrew turned the top of the hat
using the light inside it to judge the thickness.
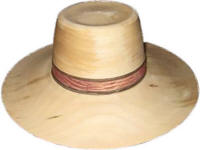 Andrew ended the evening by explaining
that he would normally leave the hat to dry for about three hours and
then put it into specially designed benders to shape the brim. The time
the hat remains in the benders depends on the temperature, humidity
etc. This was a very interesting project; quite different from the usual
bowls and boxes one tends to see, and Andrew is a very professional
and accomplished demonstrator.
Andrew ended the evening by explaining
that he would normally leave the hat to dry for about three hours and
then put it into specially designed benders to shape the brim. The time
the hat remains in the benders depends on the temperature, humidity
etc. This was a very interesting project; quite different from the usual
bowls and boxes one tends to see, and Andrew is a very professional
and accomplished demonstrator.
Lorrie Flannery![]()
SWC Club Member