

- Alan Truman
- Albert Harrison
- Ambrose O'Halloran
- Andrew Hall
- Bob Chapman
- Bob Neill
- Clive Brooks
- Colin Fishwick
- David Lowe
- David Springett
- Gary Rance
- George Bell
- Gerry Marlow
- Ian Clarkson
- Joe Laird
- Joey Richardson
- John Berkeley
- Ken Allen
- Les Thorne
- Margaret Garrard
- Mark & Lisa Raby
- Mark Baker
- Mark Hancock
- Martin Pidgen
- Mick Hanbury
- Nick Agar
- Nick Arnull
- Nikos Siragas
- Paul Jones
- Phil Irons
- Philip Greenwood
- Peter Berry
- Peter Wood
- Richard Findlay
- Robin Wood
- Russell Kebble
- Sarah Thirlwell
- Simon Hope
- Simon Whitehead
- Steve Wright
- Stuart King
- Sue Harker
- SWC Club Members
- Tony Wilson
- Tracy Owen
- Walt Claxton
- Walt Claxton & Tom Allison
John Berkeley 9 October 2008
This evening’s demonstration should have been given by Bill Jones but he felt
![]() that the journey would be too much for him as he is in his eighties and lives on Canvey Island in Essex. However, we were fortunate to have John Berkeley step into the breach and he started by telling us that he is a good friend of Bill’s and that it was Bill who taught him everything he knows in the world of woodturning; clearly the perfect substitute!
that the journey would be too much for him as he is in his eighties and lives on Canvey Island in Essex. However, we were fortunate to have John Berkeley step into the breach and he started by telling us that he is a good friend of Bill’s and that it was Bill who taught him everything he knows in the world of woodturning; clearly the perfect substitute!
John started by turning a small box from an Indian wood called anjam. He turned the outside of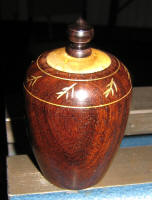 the box to the rough shape he planned to make, drilled a hole down the middle, hollowed out the inside and cut a recess behind where the thread was to go using a Danish box scraper, a tool which will cut in both directions. He used an offcut of abrasive held in a pair of forceps to sand the inside, then waxed it using another pair of forceps holding a piece of cloth.
Once the inside was finished he turned his attention to thread chasing and talked about the relative merits of individual left/right handed thread turning tools versus the new single tool that will turn both the threads. He cut a female thread inside the top of the box with the lathe running at 450rpm. Once the thread was done he finished the outside of the top portion of the box with a point tool and made a small recess next to the thread. After sanding the top of the outside he turned a couple of rings on it and removed it from the jaws, taking care to mark its position in the jaws in order that he could remount it later. He then replaced
 the chuck with another one which held his patent cutting tool (an old 6” nail, the head of which had been sharpened and had teeth cut round it!). He used this to cut a pattern between the two lines then remounted the box back on the lathe to sand the carving with fine grade paper. He finished it with a thin layer of melamine lacquer which he buffed, followed by a thin layer of Liberon Gilt Cream which he then polished off. The effect of this was to fill the lines and carving with a gold finish.
He removed the box from the lathe and mounted a small piece of boxwood which he turned to the correct diameter to fit inside the box; he then turned a tapered spigot and used the inside of the box to mark where the thread would go. After turning a pattern on the end of the piece of wood (i.e. the inside of the lid) he turned a male thread on the outside edge. Once he was happy with the thread he screwed the box onto it, marked where he needed to part the lid off, brought in the tailstock, parted off the bottom part of the base, turned a couple of rings on it and finished it with melamine lacquer. He removed the bottom of the box, waxed the lid then parted it off, angling the parting tool towards the headstock so it was slightly domed. He turned a hole in the small piece of wood left on the lathe with, a thread on the inside, to hold the box lid thus enabling him to finish the outside. John mounted the lid on this and made a small hole in the middle of it. After finishing the top he turned a left hand thread in the hole then sanded and lacquered it and put some wax on the thread.
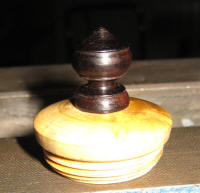
For the knob he changed chucks and mounted a thin piece of black wood in pin jaws. He turned a spigot the right size for the thread in the top of the lid, turned the rest of it to the desired diameter then turned a thread on the spigot. Finally he turned the knob to shape using his point tool and a jeweller’s/engraver’s tool called a scorper to turn small coves. After parting off he reversed it in the chuck and sanded and lacquered it. (See photos 1,2,3 & 4).
The turning of this box sounds quite fiddly and complicated but John manages to make it seem so easy. I feel sure if I were to try making one it would be much harder than he makes it appear.
After the break John turned his attention to a small pill box, turned from ‘alternative briar’ which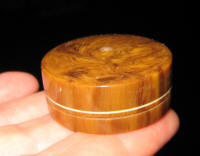 is, in fact, a resin. John explained that when turning alternatives he doesn’t use gouges, instead he uses a square tool, a point tool, a combination tool, a thin parting tool and, of course, his trusty thread chasers. He also explained that when turning resin you shouldn’t run the lathe too quickly or the heat will melt the resin. First he parted off the ‘wood’ he didn’t need then he parted off the ‘wood’ for the base, leaving the piece he planned to use for the lid in the chuck. He turned the inside of the lid, put a pattern in it then chased a thread on the inside edge. John said that you can use T-Cut, Brasso or burnishing cream to finish resin; he prefers T-Cut but you need to take care to ensure you don’t take off the side of the thread with it. He mounted the base in jaws and turned a spigot on it to take the thread that the lid would screw onto. He hollowed the inside slightly then turned the thread on the spigot; he explained that it is quite difficult to turn a thread on a short spigot like the one he was working on, so he slowed the lathe right down to make it easier. When the thread was finished he screwed the top on and finished turning the outside of the top and the base together then sanded them, starting with 240 grit and working
 down to 1200 grit and burnished it with T-Cut. Having finished the top he turned his attention to the inside of the base, turning it to a nice smooth curve so it’s easy to get pills out. After removing the box from the chuck he turned a piece of wood into a threaded jam chuck which he used to finish the bottom of the box with a curve to match the inside. (See photos
5 & 6).
down to 1200 grit and burnished it with T-Cut. Having finished the top he turned his attention to the inside of the base, turning it to a nice smooth curve so it’s easy to get pills out. After removing the box from the chuck he turned a piece of wood into a threaded jam chuck which he used to finish the bottom of the box with a curve to match the inside. (See photos
5 & 6).
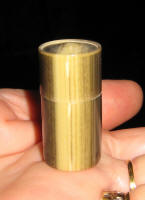
John finished the evening by turning a long, narrow pill box from a piece of alternative horn using the techniques I have described earlier. He went to great pains to make sure the grain matched by extending the size of the thread by as little as half a revolution; this is difficult to describe here but let me ensure you that it was very impressive. (See photos
7 & 8).
It seems to me that there is a lot of chucking and re-chucking when you make boxes with screw threads but the results are stunning and, in my view, well worth the effort. (See photo 9 for a selection of the boxes John makes).
![]()
Lorrie Flannery
SWC club member