

- Alan Truman
- Albert Harrison
- Ambrose O'Halloran
- Andrew Hall
- Bob Chapman
- Bob Neill
- Clive Brooks
- Colin Fishwick
- David Lowe
- David Springett
- Gary Rance
- George Bell
- Gerry Marlow
- Ian Clarkson
- Joe Laird
- Joey Richardson
- John Berkeley
- Ken Allen
- Les Thorne
- Margaret Garrard
- Mark & Lisa Raby
- Mark Baker
- Mark Hancock
- Martin Pidgen
- Mick Hanbury
- Nick Agar
- Nick Arnull
- Nikos Siragas
- Paul Jones
- Phil Irons
- Philip Greenwood
- Peter Berry
- Peter Wood
- Richard Findlay
- Robin Wood
- Russell Kebble
- Sarah Thirlwell
- Simon Hope
- Simon Whitehead
- Steve Wright
- Stuart King
- Sue Harker
- SWC Club Members
- Tony Wilson
- Tracy Owen
- Walt Claxton
- Walt Claxton & Tom Allison
Tony Wilson 13 November 2008
Tony started by explaining that for the first part of the evening he was going
![]() to briefly demonstrate the way most people turn a natural edged bowl, usually producing a piece which is not symmetrical, and then he would show the way he turns them, which will always produce a symmetrical piece.
to briefly demonstrate the way most people turn a natural edged bowl, usually producing a piece which is not symmetrical, and then he would show the way he turns them, which will always produce a symmetrical piece.
He mounted half a sycamore log, taken from a tree he felled a couple of weeks ago, onto the chuck, using a hole cut with a 2” forstner bit, in the bark side of the log. Whilst he quickly shaped the outside of the bowl he got one of the members to pass round a log he had cut in various ways to demonstrate the correct way to cut a log, the wrong way to cut one and the way many wood yards would cut it, which is incorrect. He finished turning the outside of the bowl with a 2” spigot then took it off the lathe and showed how it was not symmetrical. He re-mounted it on the lathe using the spigot and started to hollow the inside, giving tips on how to stop the bowl gouge skating across the surface when first starting work on the inside. When he had taken the hollowing to below the bark line he took the bowl off the lathe and passed it round so members could see the problems with it – the sides were not balanced and the natural edge was not an even thickness.
To demonstrate the correct way to turn a natural edged bowl he mounted the other half of the log between centres using a couple of steb centres. He turned the sides to make it cylindrical until both the ‘lower’ sides were even. It is quite difficult to describe here what Tony did, but basically he made marks on the wood at the edge of the bark on the two ‘higher’ sides and transferred these to the tool rest. He then moved the log off centre to find the point between the two lines and turned it a little before repeating the process until the work was symmetrical. He cleaned off the base, turned a spigot and turned the shape of the outside. He then took it off the lathe, turned it round, mounted it on the spigot and turned the inside until it was quite thin. Tony’s tip on getting a piece of wet wood thin is to keep wetting it as you are working on it. To turn off the spigot Tony mounted a jam chuck on the lathe which consisted of a piece of wood which had a spigot on one side and had been turned to a dome shape on the other; on the domed side he had stuck an old piece of towelling with double sided tape. He explained that the towelling is very good at stopping the work from slipping. The bowl was pushed onto this and held in place with the tailstock and he turned most of the base away ready to power sand it. The result was a natural edge bowl which was symmetrical with all the bark edges an even thickness. (See photos TW02/03/04).
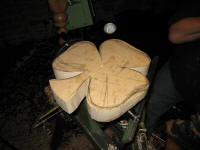 After the break Tony started to turn a shamrock shaped bowl in ash. He explained that he starts with a large, 2” thick bowl blank which he cuts to a shamrock shape with a scroll saw and mounts on the lathe with a screw chuck. The first thing he did after mounting it was to make a mark on the toolrest to show where the edge of the bowl is then he tidied the face of the wood, made a spigot, turned the outside to a curve shape until the rim was about ⅜” thick and turned it into an ogee shape. He power sanded the work, explaining that you cannot sand this shape by hand without losing a finger or two!
(See photos TW05/06/07/08 ).
After the break Tony started to turn a shamrock shaped bowl in ash. He explained that he starts with a large, 2” thick bowl blank which he cuts to a shamrock shape with a scroll saw and mounts on the lathe with a screw chuck. The first thing he did after mounting it was to make a mark on the toolrest to show where the edge of the bowl is then he tidied the face of the wood, made a spigot, turned the outside to a curve shape until the rim was about ⅜” thick and turned it into an ogee shape. He power sanded the work, explaining that you cannot sand this shape by hand without losing a finger or two!
(See photos TW05/06/07/08 ).
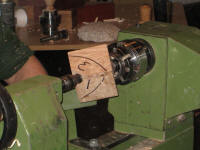
Tony took the piece off the lathe and passed it round the room for everyone to look at and, whilst it was going round, he mounted a diamond shaped piece of ash on the screw chuck and made a mark on the toolrest to show where the points come to. He faced it up, starting on the ‘solid’ part and working back to the tip. Once he had turned a spigot he drew the shape he was planning to turn on the edges and roughly turned it to this shape before doing the finer cutting, taking care to slow the travel of the tool down when moving from the ‘solid’ part of the timber to the ‘gaps’. He power sanded the tips with the lathe stationary and the headstock locked then did the solid part with the lathe running. (See photos TW09/10/11/12/13).
Tony passed this round the room and re-mounted the shamrock bowl on its spigot. He faced up the front, working slowly to get the feel for it, then started to turn the inside shape explaining that “whatever you do, don’t try and judge the wall thickness with the lathe running!” Using a pencil he drew guidelines on the wood to mark any unevenness then did the final cutting. This is a delightful shape which looks very impressive, but which Tony made 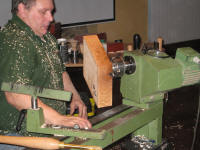 look very easy – the mark of a professional I guess.
(See photos TW14/15).
look very easy – the mark of a professional I guess.
(See photos TW14/15).
He then turned his attention back to the diamond bowl which he mounted in the chuck and faced up the inside, again starting on the solid part of the timber. He started by turning the tips, explaining that you should resist the temptation to turn them too thin or they could snap off. He gradually turned the shape from the middle to the edge and demonstrated that at this stage it could be turned into three different projects:
- A candle holder for a 3” round candle from Ikea, held in a 3” diameter shallow pyrex dish which stands in the centre of the work (See photo TW17).
- A shallow jewellery box with a tall lid, ideally made from a different coloured wood, with a very long finial.
- A simple bowl, which is what he made it into. He finished it by sanding the edges with a power sander, again with the headstock locked in a stationary position, sanding the tips last. He finished the underneath using the same techniques he used for the natural edged bowl. (See photos TW16/18/19/20).
 Tony finished the evening by turning a three cornered bowl from a perfect cube of ash. He sanded off two opposite corners to triangle shapes then mounted it between centres on the sanded corners, using steb centres. When he started the lathe you could see two peaks. First he turned the point away from the peak nearest the headstock, checking after a few cuts to ensure it was cutting each point evenly and adjusting the steb centres until it was cutting evenly then, once he was happy with it he turned the final shape for the outside of the piece and made a chucking point. Before taking it off the lathe and mounting it on the spigot he took some of the bulk out of the inside then parted off into the middle of the bowl. As with the diamond shaped bowl this can be turned into either a candle holder, a box or a bowl. After mounting it on the spigot Tony turned the inside, taking care not to make it too thin. He explained that to finish it you would sand the sides and finish the base in the same way as he had described for the diamond shaped bowl.
(See photos TW21/22/23/25/25).
Tony finished the evening by turning a three cornered bowl from a perfect cube of ash. He sanded off two opposite corners to triangle shapes then mounted it between centres on the sanded corners, using steb centres. When he started the lathe you could see two peaks. First he turned the point away from the peak nearest the headstock, checking after a few cuts to ensure it was cutting each point evenly and adjusting the steb centres until it was cutting evenly then, once he was happy with it he turned the final shape for the outside of the piece and made a chucking point. Before taking it off the lathe and mounting it on the spigot he took some of the bulk out of the inside then parted off into the middle of the bowl. As with the diamond shaped bowl this can be turned into either a candle holder, a box or a bowl. After mounting it on the spigot Tony turned the inside, taking care not to make it too thin. He explained that to finish it you would sand the sides and finish the base in the same way as he had described for the diamond shaped bowl.
(See photos TW21/22/23/25/25).
Tony didn’t finish any of the pieces he made this evening; instead he donated them to the club for members to finish, which is what he does at all his demonstrations. I found this to be a very inspirational demonstration and came away keen to try some of the things Tony had demonstrated.
If you are interested in seeing more of Tony’s work he runs woodcraft clinics at his home in Thorne on the 3rd Sunday of every month. His address is:
Tony Wilson
7 Cedar Cottage
Queen Street
Thorne
DN8 5AA
and he can be contacted on 01405 818130.
![]()
Lorrie Flannery
SWC club member