

- Alan Truman
- Albert Harrison
- Ambrose O'Halloran
- Andrew Hall
- Bob Chapman
- Bob Neill
- Clive Brooks
- Colin Fishwick
- David Lowe
- David Springett
- Gary Rance
- George Bell
- Gerry Marlow
- Ian Clarkson
- Joe Laird
- Joey Richardson
- John Berkeley
- Ken Allen
- Les Thorne
- Margaret Garrard
- Mark & Lisa Raby
- Mark Baker
- Mark Hancock
- Martin Pidgen
- Mick Hanbury
- Nick Agar
- Nick Arnull
- Nikos Siragas
- Paul Jones
- Phil Irons
- Philip Greenwood
- Peter Berry
- Peter Wood
- Richard Findlay
- Robin Wood
- Russell Kebble
- Sarah Thirlwell
- Simon Hope
- Simon Whitehead
- Steve Wright
- Stuart King
- Sue Harker
- SWC Club Members
- Tony Wilson
- Tracy Owen
- Walt Claxton
- Walt Claxton & Tom Allison
Walt Claxton 11 December 2008
The main focus of this evening’s demonstration by Walt Claxton,
our Chairman, was
![]() his trademark Christmas decorations and he was
accompanied for the demonstration by his wife, Jan who painted a
decoration whilst Walt was turning one. (See Pictures 01,02).
his trademark Christmas decorations and he was
accompanied for the demonstration by his wife, Jan who painted a
decoration whilst Walt was turning one. (See Pictures 01,02).
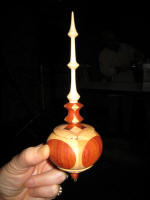
Walt started with a piece of sycamore about 6” long and approximately 2” in diameter mounted in the chuck. This was to make the icicle that hangs at the bottom of the decoration. He turned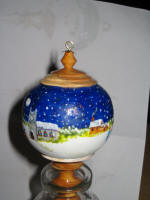 it to a cone shape then turned the end to a fine point and sanded it with grit 400, accompanied by the usual jokes about needing to start with grit 60! He then gradually worked backwards towards the headstock, sanding as he went along and making each piece of the icicle slightly longer than the previous one. He turned a slightly thicker piece at the top to act as a spigot to fix into the bottom of the bauble then, after finishing it with melamine laqueur, he parted it off with a hacksaw. (See
Pictures 03,04,05).
it to a cone shape then turned the end to a fine point and sanded it with grit 400, accompanied by the usual jokes about needing to start with grit 60! He then gradually worked backwards towards the headstock, sanding as he went along and making each piece of the icicle slightly longer than the previous one. He turned a slightly thicker piece at the top to act as a spigot to fix into the bottom of the bauble then, after finishing it with melamine laqueur, he parted it off with a hacksaw. (See
Pictures 03,04,05).
The next piece Walt mounted on the lathe was a glue-up approximately 5” long by 2” diameter, made by Keith Siddall, another club member. It was made up of ash on the outside and padauk on the inside with pieces of veneer between them. He turned the end of this to a bead and drilled a hole in it to take the icicle. Once he had drilled it he turned the bead to a cove shape then sanded it. Above this he turned a thin disk which had a slight curve on it, to fit onto the main bauble, undercutting it to ensure it would sit well when fitted to the bauble, then he turned a spigot of about 1” in diameter to fit into a hole in the bauble. After tidying it up, sanding and finishing it with melamine laqueur he turned if off with a parting tool and made the final cut with a hacksaw, cutting through the middle of the spigot he had turned so he could use the other half of it to fit into the top of the main bauble. Above this spigot he turned another disk; a mirror image of the first, to fit onto the top of the bauble, with a finial on top of it. Again he sanded it, taking care not to round over the sharp edges, finished it with melamine laqueur and turned it off with a spindle gouge. (See Picture 06).
 Now Walt mounted another of Keith’s glue-ups; this one had padauk on the outside and in the middle with thin strips of veneer and pieces of ripple maple between them. This was approximately 3” in diameter by 4” long. He turned the ends so they were fairly flat, so the bottom and top pieces he made earlier would fit onto it, explaining that once they have been attached it will look round. He left a thick shank on the headstock end to give it strength when he drilled it, then he drilled right through the middle with a 1” saw toothed forstner bit mounted in the tailstock. He chamfered the edge of the hole so the spigot on the bottom piece fitted snugly then, after sanding the outside, he hollowed the inside using a box scraper held in a mole wrench. Walt doesn’t advocate using home made tools but on this occasion it served his purpose as he has arthritis in his hands and cannot grip the tool tightly enough. When Walt drilled the hole he took care not to go all the way through the bauble so he would be left with a reference point to hollow to. He then hollowed it out is thinly as he could without making a hole in the side, the idea being that he wanted it as light in weight as possible for hanging on a Christmas tree. After finishing the outside with melamine laqueur he finished drilling the hole with a smaller sized drill, then turned it off with a spindle gouge and tidied up the top, off the lathe, with a skew chisel and spindle gouge. (See
Picture 07).
Now Walt mounted another of Keith’s glue-ups; this one had padauk on the outside and in the middle with thin strips of veneer and pieces of ripple maple between them. This was approximately 3” in diameter by 4” long. He turned the ends so they were fairly flat, so the bottom and top pieces he made earlier would fit onto it, explaining that once they have been attached it will look round. He left a thick shank on the headstock end to give it strength when he drilled it, then he drilled right through the middle with a 1” saw toothed forstner bit mounted in the tailstock. He chamfered the edge of the hole so the spigot on the bottom piece fitted snugly then, after sanding the outside, he hollowed the inside using a box scraper held in a mole wrench. Walt doesn’t advocate using home made tools but on this occasion it served his purpose as he has arthritis in his hands and cannot grip the tool tightly enough. When Walt drilled the hole he took care not to go all the way through the bauble so he would be left with a reference point to hollow to. He then hollowed it out is thinly as he could without making a hole in the side, the idea being that he wanted it as light in weight as possible for hanging on a Christmas tree. After finishing the outside with melamine laqueur he finished drilling the hole with a smaller sized drill, then turned it off with a spindle gouge and tidied up the top, off the lathe, with a skew chisel and spindle gouge. (See
Picture 07).
Finally Walt glued the four pieces together using woodworkers glue and drilled a small hole in the top to take a small eye hook which he screwed in with a gold star to act as a collar. He polished the finished decoration with carnuba wax, using a polishing wheel mounted in the lathe. (See Picture 08).
As we still had an hour left Walt mounted a fairly large yew log between centres which he slowly turned round at the headstock end to make a spigot – he needed to do it slowly as the log had a big knot on the side which was giving him all sorts of problems. He started with a roughing out gouge but changed to a parting tool, turning small sections at a time, nibbling away at it slowly.
Eventually he was able to mount it in the chuck jaws using the tailstock to hold it steady, then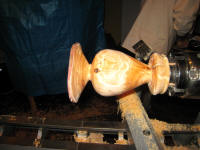 he continued turning it with a heavy duty spindle gouge. It took a lot of hard work and tenacity but Walt finally turned it to a vase shape. He then turned his attention to the top (tailstock end) which he made fairly thin. Then he want back to the main body of the vase, turning a narrow neck and aiming to make the bottom the same diameter as the neck, although he didn’t go all the way to the bottom at this stage as he left the bulk of the timber in place to give it strength.
Walt now moved the tailstock away and turned his attention to the inside, first drilling a hole down the middle, taking care not to use too big a drill so he didn’t take the top off. He then proceeded to hollow it out using the Roly Munroe hollowing tool, regularly removing the shavings from inside to prevent them from clogging the tool, although the wood was so wet that it was tending to stick to the tool. As expected, we ran out of time whilst Walt was doing the hollowing out so he packed the inside of the vase with wet shavings and took it home to finish on his own lathe; hopefully we’ll see the finished article at next weeks Christmas social (See Pictures 09,10).
Walt brought the finished article to the next meeting.
Thank you Walt and Jan for a very interesting evening. I have often wondered how you made your decorations so I found the evening very informative and as for Jan’s painting, I am totally in awe of her as I know I could never do anything as beautiful and delicate as that. My only request is – please don’t paint the one you turned this evening as the wood is too good to cover up.
![]()
Lorrie Flannery
SWC club member