

- Alan Truman
- Albert Harrison
- Ambrose O'Halloran
- Andrew Hall
- Bob Chapman
- Bob Neill
- Clive Brooks
- Colin Fishwick
- David Lowe
- David Springett
- Gary Rance
- George Bell
- Gerry Marlow
- Ian Clarkson
- Joe Laird
- Joey Richardson
- John Berkeley
- Ken Allen
- Les Thorne
- Margaret Garrard
- Mark & Lisa Raby
- Mark Baker
- Mark Hancock
- Martin Pidgen
- Mick Hanbury
- Nick Agar
- Nick Arnull
- Nikos Siragas
- Paul Jones
- Phil Irons
- Philip Greenwood
- Peter Berry
- Peter Wood
- Richard Findlay
- Robin Wood
- Russell Kebble
- Sarah Thirlwell
- Simon Hope
- Simon Whitehead
- Steve Wright
- Stuart King
- Sue Harker
- SWC Club Members
- Tony Wilson
- Tracy Owen
- Walt Claxton
- Walt Claxton & Tom Allison
Bob Chapman 9 April 2009
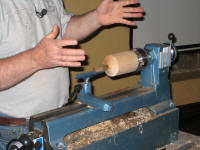
There was a good turnout for Bob’s
demonstration this evening; in addition to
![]() the usual crowd there
were several prospective new members and some visitors from
Huddersfield Woodturning Club. Bob turned two projects during the
evening which were so interesting that virtually the whole audience
was still there when he finished shortly after 10 o’clock.
the usual crowd there
were several prospective new members and some visitors from
Huddersfield Woodturning Club. Bob turned two projects during the
evening which were so interesting that virtually the whole audience
was still there when he finished shortly after 10 o’clock.
Bob started the evening by making an acorn shaped box using holly wood (no not the Los Angeles variety!) for the nut part and ziracote for the shell. He mounted a square piece of holly in the chuck and turned a spigot on the end, then turned it round and mounted the spigot in the chuck. He trued up the front face and hollowed it, using a template to get the correct shape. Bob explained that he uses a template to turn the inside first as he cannot turn the outside until he has done the inside because it would be held by too small a piece of wood. He used a spindle gouge to ‘drill’ out the middle to the correct depth then, with the flute angled at about 2 o’clock, he opened out the hole and quickly turned it to shape, using a round nosed scraper to finish it. He sanded it down to 400 grit and finished it with cellulose sanding sealer as this dries more quickly than spirit sanding sealer. Bob explained that he always uses this curved shape inside his boxes regardless of the outside shape because it makes it a lot easier to get things out of the box. In general he tends to make his boxes with loose fitting lids so the lid can be removed with one hand without having to use undue force, however for the acorn box the lid needs to be tighter as the box doesn’t have a base to stand on. Having turned the inside, he measured the depth of the outside and cut in a little way with a parting tool to mark it. Using a bowl gouge with a long grind he turned the outside to shape and turned a lip at the top, parallel to the side, using a parting tool. He made the final cuts with a round nosed scraper then parted it off.
Bob now turned his attention to the lid; he
mounted a square piece of ziracote in the jaws and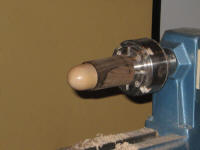 turned a dovetail
spigot, which he used to mount it in the chuck. He squared off the
end, made a shallow recess to use as a jam chuck to hold the base
then, once he was happy it was the correct size, he turned away some
of the wood from the inside. At this stage he mounted the base onto
it, finished turning the curve at the bottom and sanded and finished
the outside to match the inside. Before removing the base from the
lid he turned the bottom edge of the lid to make it curve down into
the base. Bob measured the lid to be approximately two thirds of the
size of the base, he cut into it with a parting tool then finished
hollowing the inside, taking care to ensure he didn’t cut away any
wood on the lip as he didn’t want it to have a sloppy fit when he
attached it to the base. He turned the outside of the lid to match
the curve on the inside, taking care to ensure he had a good curve
without any flat spots. He parted it off then turned a spigot on the
waste wood to mount it onto to finish the top. After sanding and
finishing it with sanding sealer he marked a hole in the centre with
a skew chisel and drilled a hole approximately 3-3½mm diameter part
way into it to locate a stalk. For the stalk he mounted a small
piece of ebony in pin jaws and turned a trumpet shaped stalk, using
a round nosed scraper, then parted it off and finished the shape on
a sanding disk, sanding diagonally across the end, then glued it
into the lid. (See photos BC_03,04,05,06,07 and 08).
turned a dovetail
spigot, which he used to mount it in the chuck. He squared off the
end, made a shallow recess to use as a jam chuck to hold the base
then, once he was happy it was the correct size, he turned away some
of the wood from the inside. At this stage he mounted the base onto
it, finished turning the curve at the bottom and sanded and finished
the outside to match the inside. Before removing the base from the
lid he turned the bottom edge of the lid to make it curve down into
the base. Bob measured the lid to be approximately two thirds of the
size of the base, he cut into it with a parting tool then finished
hollowing the inside, taking care to ensure he didn’t cut away any
wood on the lip as he didn’t want it to have a sloppy fit when he
attached it to the base. He turned the outside of the lid to match
the curve on the inside, taking care to ensure he had a good curve
without any flat spots. He parted it off then turned a spigot on the
waste wood to mount it onto to finish the top. After sanding and
finishing it with sanding sealer he marked a hole in the centre with
a skew chisel and drilled a hole approximately 3-3½mm diameter part
way into it to locate a stalk. For the stalk he mounted a small
piece of ebony in pin jaws and turned a trumpet shaped stalk, using
a round nosed scraper, then parted it off and finished the shape on
a sanding disk, sanding diagonally across the end, then glued it
into the lid. (See photos BC_03,04,05,06,07 and 08).
 Bob’s second project of the evening was an
earring stand which he turned from two pieces of wood – a cylinder
of sycamore for the main part, approximately 3½ inches in diameter
by 6-7 inches long with a spigot already turned on one end and a
small piece of laburnum to act as a ‘spire’ on the top of the stand
to hold rings. He also turns a tray on the bottom of his earring
holders to hold other pieces of jewellery, making it a very
versatile jewellery stand. First he mounted the sycamore in the jaws
with the tailstock at the other end for a little bit of added
security. He trued it with a spindle gouge then used a ½” bowl gouge
to turn the ‘umbrella’ top and drilled a 10mm hole, 3/16” deep in
the top, using a drill mounted in the tailstock. He then took the
chuck off the lathe with the piece of wood still mounted in it and
replaced it with another one with pin jaws, in which he mounted the
piece of laburnum. He squared off the end and turned the first inch
round then turned a spigot to fit in the hole he had drilled in the
‘umbrella’ and chamfered the end of it to fit the bottom of the
hole. He then removed the chuck from the lathe, remounted the one
holding the base and glued the spire into the hole, putting
superglue on the spire and spraying accelerator into the hole. He
used the tailstock, without its centre, to hold the two pieces
together whilst the glue set then remounted the centre into the
tailstock and used it to put light pressure on the work to ensure it
ran true. Using a spindle gouge he turned the spire to shape and
used a round nosed scraper to blend the curves together across the
glued joint. He cut the spire to length with a skew chisel and
curved the end with the round nosed scraper. Bob sanded and finished
the top, using sanding sealer and suggested that if there is a small
gap in the glued joint you could use a skew chisel to cut it into a
‘v’ shape and make a feature of it. (See photos BC_09,10,11 and 12).
Bob’s second project of the evening was an
earring stand which he turned from two pieces of wood – a cylinder
of sycamore for the main part, approximately 3½ inches in diameter
by 6-7 inches long with a spigot already turned on one end and a
small piece of laburnum to act as a ‘spire’ on the top of the stand
to hold rings. He also turns a tray on the bottom of his earring
holders to hold other pieces of jewellery, making it a very
versatile jewellery stand. First he mounted the sycamore in the jaws
with the tailstock at the other end for a little bit of added
security. He trued it with a spindle gouge then used a ½” bowl gouge
to turn the ‘umbrella’ top and drilled a 10mm hole, 3/16” deep in
the top, using a drill mounted in the tailstock. He then took the
chuck off the lathe with the piece of wood still mounted in it and
replaced it with another one with pin jaws, in which he mounted the
piece of laburnum. He squared off the end and turned the first inch
round then turned a spigot to fit in the hole he had drilled in the
‘umbrella’ and chamfered the end of it to fit the bottom of the
hole. He then removed the chuck from the lathe, remounted the one
holding the base and glued the spire into the hole, putting
superglue on the spire and spraying accelerator into the hole. He
used the tailstock, without its centre, to hold the two pieces
together whilst the glue set then remounted the centre into the
tailstock and used it to put light pressure on the work to ensure it
ran true. Using a spindle gouge he turned the spire to shape and
used a round nosed scraper to blend the curves together across the
glued joint. He cut the spire to length with a skew chisel and
curved the end with the round nosed scraper. Bob sanded and finished
the top, using sanding sealer and suggested that if there is a small
gap in the glued joint you could use a skew chisel to cut it into a
‘v’ shape and make a feature of it. (See photos BC_09,10,11 and 12).
The next job was to drill the holes in the top
to hold the earrings. For this Bob mounted a specially designed post
he had made himself into the tool rest holder, this had a piece of
wood on it with a pilot hole drilled through one end. He lined this
up with the work then using a 3-3½mm drill bit in a hand held drill,
he manually turned the work clockwise and used the indexing on the
chuck to position the 24 holes. He sanded over the holes lightly
with 400 grit then worked through the grades to sand the outside
edge and finished the top and edge with sanding sealer. He then
applied beeswax, followed by carnuba wax to the top and outside
edge, applying each of them lightly in a single layer and polished
it with a cloth, pressing hard to melt the waxes. Finally he gave it
a light buff with a clean piece of cloth. (See photo BC_13).
specially designed post
he had made himself into the tool rest holder, this had a piece of
wood on it with a pilot hole drilled through one end. He lined this
up with the work then using a 3-3½mm drill bit in a hand held drill,
he manually turned the work clockwise and used the indexing on the
chuck to position the 24 holes. He sanded over the holes lightly
with 400 grit then worked through the grades to sand the outside
edge and finished the top and edge with sanding sealer. He then
applied beeswax, followed by carnuba wax to the top and outside
edge, applying each of them lightly in a single layer and polished
it with a cloth, pressing hard to melt the waxes. Finally he gave it
a light buff with a clean piece of cloth. (See photo BC_13).
 Bob makes the distance between the top of the
stand and the bottom tray 4” to allow room for long dangly earrings;
he measured and marked this quite carefully. Using a sharp parting
tool he cut in under the top, angling up into it until he had cut
past the holes, then he used a small round nosed scraper to cut
under the top, using it like a parting tool, keeping it flat on the
centre line, to cut in then angling up under the umbrella. He cut
the top of the stem to around 5mm thick then continued cutting down
the stem, using a bowl gouge to take out the bulk of the wood and a
round nosed scraper to finish it, working on lengths of about ½” at
a time, gradually making it thicker as he got closer to the base.
Using a round nosed scraper he broadened out the base of the stem
and turned the tray at the bottom, angling the lip on the edge of
the tray. There was a bit of a blemish in the wood on the outside
edge of the tray so Bob used the small round nosed scraper to cut a
decorative cove to remove it. He parted part way through the
underneath then sanded, sealed and polished it to match the top. He
finished parting it off, making it slightly concave so it will sit
properly, then sanded the underneath using a sanding disk mounted on
the lathe. (See photos BC_14,15,16,17 and 19).
Bob makes the distance between the top of the
stand and the bottom tray 4” to allow room for long dangly earrings;
he measured and marked this quite carefully. Using a sharp parting
tool he cut in under the top, angling up into it until he had cut
past the holes, then he used a small round nosed scraper to cut
under the top, using it like a parting tool, keeping it flat on the
centre line, to cut in then angling up under the umbrella. He cut
the top of the stem to around 5mm thick then continued cutting down
the stem, using a bowl gouge to take out the bulk of the wood and a
round nosed scraper to finish it, working on lengths of about ½” at
a time, gradually making it thicker as he got closer to the base.
Using a round nosed scraper he broadened out the base of the stem
and turned the tray at the bottom, angling the lip on the edge of
the tray. There was a bit of a blemish in the wood on the outside
edge of the tray so Bob used the small round nosed scraper to cut a
decorative cove to remove it. He parted part way through the
underneath then sanded, sealed and polished it to match the top. He
finished parting it off, making it slightly concave so it will sit
properly, then sanded the underneath using a sanding disk mounted on
the lathe. (See photos BC_14,15,16,17 and 19).
Finally Bob polished the acorn box using the buffing system that Gerry Marlow uses. Phil and I use this at home and find it gives a super finish to our work. (See photo BC_21).
I thoroughly enjoyed this evening’s
demonstration, Bob turned two items I have never seen turned before
and which I thought were very interesting – the acorn box was quite
different from any boxes I’ve seen before and the earring stand is a
super all purpose jewellery stand that holds earrings and so much
more. Thank you Bob for yet another great evening, I always enjoy
watching your demonstrations, I just wish I could have been there
when you turned the spiky ball a couple of years ago, I still don’t
know how it’s done.![]()
Lorrie Flannery
SWC club member