

- Alan Truman
- Albert Harrison
- Ambrose O'Halloran
- Andrew Hall
- Bob Chapman
- Bob Neill
- Clive Brooks
- Colin Fishwick
- David Lowe
- David Springett
- Gary Rance
- George Bell
- Gerry Marlow
- Ian Clarkson
- Joe Laird
- Joey Richardson
- John Berkeley
- Ken Allen
- Les Thorne
- Margaret Garrard
- Mark & Lisa Raby
- Mark Baker
- Mark Hancock
- Martin Pidgen
- Mick Hanbury
- Nick Agar
- Nick Arnull
- Nikos Siragas
- Paul Jones
- Phil Irons
- Philip Greenwood
- Peter Berry
- Peter Wood
- Richard Findlay
- Robin Wood
- Russell Kebble
- Sarah Thirlwell
- Simon Hope
- Simon Whitehead
- Steve Wright
- Stuart King
- Sue Harker
- SWC Club Members
- Tony Wilson
- Tracy Owen
- Walt Claxton
- Walt Claxton & Tom Allison
Joey Richardson 13 August 2009
Introduction
Joey demonstrated so many different wood
finishing ideas and techniques that![]() it is impossible for me to
detail them all here so this report gives a flavour of the things
she showed us.
it is impossible for me to
detail them all here so this report gives a flavour of the things
she showed us.
She started by explaining that she takes inspiration for her designs from places and nature and each design tells a story which may be relevant to her or the place it is based on. She said that she started by turning simple platters and gradually built on the design to include leaves and eventually moved onto flowers, spheres etc. She then handed round some photos to show how her work has developed and how it tells a story.
Painting
Joey showed how to transfer a photo to a piece of work by placing a clear acetate film on the photo and drawing round the outline. She then either enlarges or reduces this to the desired size on a photocopier. Using a photocopied image she had produced earlier she cut out the image, placed it face down on a board and used cellulose thinners to transfer the image to the board. She used a brush to apply a very small amount of the thinners all over the back of it then pressed it on with the end of a pencil; the image was now ready to be either coloured or pierced. Joey explained that you can also use xylene marker pens or acetone to do this. The image Joey had transferred was a flower and she went on to colour it with oil coloured pencils using 2-3 colours and blending them with a cotton bud. She also did some colouring using prisma colour marker pens and an airbrush, using ‘Golden’ colours; the airbrush featured a lot during this demonstration and Joey ran it with a compressor that ran very quietly.
Joey sands the wood she is painting to around
320 or 400 grit, ensuring all scratches are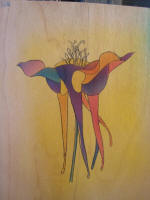 removed as the paint
will highlight them; she then paints onto the bare wood. For the
airbrushing she masked the image with Frisket, clear, low tack,
sticky backed plastic to stop the colours ‘bleeding’. She then cut
around the plastic on the areas she wanted to paint and starting
with the darkest colour first, removed the plastic and painted them
with the airbrush. Joey explained that the paints are transparent so
you don’t need to re-mask areas you have already painted but just
work through the colours, starting with the darkest and working
through to the lightest. Joey gradually coloured the whole flower,
revealing different areas of the wood as she progressed. (See photo
JR 1).
removed as the paint
will highlight them; she then paints onto the bare wood. For the
airbrushing she masked the image with Frisket, clear, low tack,
sticky backed plastic to stop the colours ‘bleeding’. She then cut
around the plastic on the areas she wanted to paint and starting
with the darkest colour first, removed the plastic and painted them
with the airbrush. Joey explained that the paints are transparent so
you don’t need to re-mask areas you have already painted but just
work through the colours, starting with the darkest and working
through to the lightest. Joey gradually coloured the whole flower,
revealing different areas of the wood as she progressed. (See photo
JR 1).
Next Joey demonstrated different ways of blending colours, first by putting two colours together in the airbrush and then by adding one colour to another in the airbrush as she was spraying. Once the paint was dry she sprayed it with an acrylic lacquer which she left to dry before sanding it with a ‘microfinishing’ pad (from 3m); she only sanded one half of the picture to show the before and after effects.
Piercing
 Joey then moved onto piercing, explaining that
she used to use a Dremel but now uses an air powered NSK Preston
which runs at between 350,000 and 400,000 rpm. She prefers to use
sycamore for work she is going to pierce as it is tight grained and
pierces well. She pierced a small picture of a horse and explained
that it is important to hold the tool vertically, start and finish
in a corner and cut out in a clockwise direction. To remove scratch
marks and any burn marks she gave it a light sanding then finished
with an air driven bristle brush. She then used Golden interference
colours to colour the burn marks left by the drill, these only
colour the burn marks and leave the white wood white. (See photos JR
2 and 3).
Joey then moved onto piercing, explaining that
she used to use a Dremel but now uses an air powered NSK Preston
which runs at between 350,000 and 400,000 rpm. She prefers to use
sycamore for work she is going to pierce as it is tight grained and
pierces well. She pierced a small picture of a horse and explained
that it is important to hold the tool vertically, start and finish
in a corner and cut out in a clockwise direction. To remove scratch
marks and any burn marks she gave it a light sanding then finished
with an air driven bristle brush. She then used Golden interference
colours to colour the burn marks left by the drill, these only
colour the burn marks and leave the white wood white. (See photos JR
2 and 3).
Pyrography
Joey uses a pyrography kit to mark all her work with her own brand which she made using a wire that she bent to shape and sharpened. When using pyrography she said you should ensure your hand is moving as you apply the tip to the wood and work with an even pressure and speed. For straight lines you need a knife tip and for fine writing or texturing you need a fine ball. The lower the temperature, the lighter the texture – Joey suggested starting with a higher temperature and fading out to the edges. If you don’t want the burnt effect that pyrography leaves she suggested colouring with interference colours, as described earlier.
Flowers
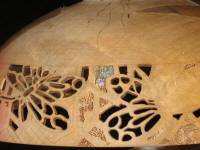
Having shown us the various design techniques
she uses Joey then showed us how her work has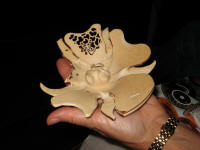 developed from ‘nice
designs’ to ‘fine art’ by paying more attention to detail and making
edges thinner and finer. She also showed us how she builds up her
flower pieces, using a fine parting tool to make layers and using
piercing and carving to get the flowing shapes and patterns. She
then passed round some pieces she has started and a finished flower
to show the various techniques she uses. (See photos JR 4 and 5).
developed from ‘nice
designs’ to ‘fine art’ by paying more attention to detail and making
edges thinner and finer. She also showed us how she builds up her
flower pieces, using a fine parting tool to make layers and using
piercing and carving to get the flowing shapes and patterns. She
then passed round some pieces she has started and a finished flower
to show the various techniques she uses. (See photos JR 4 and 5).
Texturing
 Joey demonstrated a variety of methods of
texturing wood. First using a hammer and a nail ground to the shape
she wanted, then with a variety of shaped bits in her NSK piercing
tool. If you don’t want to use a nail you can get a selection of
punches from Henry Taylor Tools that you can use to put patterns
onto your work. She then did some texturing with a needle scaler,
explaining that this should be done on the outside of a bowl whilst
it is still on the lathe, before turning the inside. She then
painted this with her airbrush and sanded it back to take the colour
off the top but leave it in the grooves, then went over it with
another, lighter colour to get a two tone effect. (See photos JR 6
and 7).
Joey demonstrated a variety of methods of
texturing wood. First using a hammer and a nail ground to the shape
she wanted, then with a variety of shaped bits in her NSK piercing
tool. If you don’t want to use a nail you can get a selection of
punches from Henry Taylor Tools that you can use to put patterns
onto your work. She then did some texturing with a needle scaler,
explaining that this should be done on the outside of a bowl whilst
it is still on the lathe, before turning the inside. She then
painted this with her airbrush and sanded it back to take the colour
off the top but leave it in the grooves, then went over it with
another, lighter colour to get a two tone effect. (See photos JR 6
and 7).
You Don’t Need Fancy Equipment
To prove that you don’t need fancy, expensive equipment Joey used a paint brush with solid colours to colour some texturing she had done with a hammer and nail. For a different effect again Joey made some holes in a solid piece of timber, using a shaped bit on her Dremel, and filled them with epoxy resin mixed with a small amount of green pigment powder. She ensured she had pressed this well into the timber and explained that this should be left overnight to dry and if there are any air bubbles then more resin can be added.
And Finally
To finish, Joey cut some heart shapes out of a piece of acetate which she used as a stencil. She painted through them with her air brush, this time using the lightest colours first and gradually going over them with darker colours, moving the stencil slightly so they overlayed onto each other and finished with sparkling gold. (See photo JR 8).
Thank you Joey for a very interesting
demonstration, you certainly gave us some food for thought.![]()
Lorrie Flannery
SWC club member