

- Alan Truman
- Albert Harrison
- Ambrose O'Halloran
- Andrew Hall
- Bob Chapman
- Bob Neill
- Clive Brooks
- Colin Fishwick
- David Lowe
- David Springett
- Gary Rance
- George Bell
- Gerry Marlow
- Ian Clarkson
- Joe Laird
- Joey Richardson
- John Berkeley
- Ken Allen
- Les Thorne
- Margaret Garrard
- Mark & Lisa Raby
- Mark Baker
- Mark Hancock
- Martin Pidgen
- Mick Hanbury
- Nick Agar
- Nick Arnull
- Nikos Siragas
- Paul Jones
- Phil Irons
- Philip Greenwood
- Peter Berry
- Peter Wood
- Richard Findlay
- Robin Wood
- Russell Kebble
- Sarah Thirlwell
- Simon Hope
- Simon Whitehead
- Steve Wright
- Stuart King
- Sue Harker
- SWC Club Members
- Tony Wilson
- Tracy Owen
- Walt Claxton
- Walt Claxton & Tom Allison
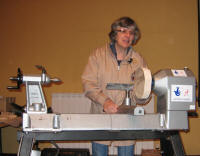
Margaret Garrard 8 October 2009
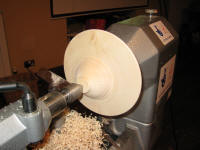
Margaret started the evening by mounting a sycamore bowl blank measuring![]() approximately 8” by 2” on a faceplate, onto the lathe and told us she
would be turning it into an off-centre bowl
approximately 8” by 2” on a faceplate, onto the lathe and told us she
would be turning it into an off-centre bowl
 (See photo MG01). Before
screwing the faceplate to the surface Margaret had put it through her
planer to ensure the surface was
(See photo MG01). Before
screwing the faceplate to the surface Margaret had put it through her
planer to ensure the surface was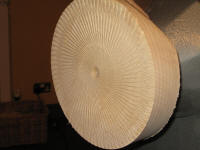 absolutely flat. She turned the edge
until it was round then faced it off until it was flat, taking very
light, scraping cuts with a swept back bowl gouge to finish it, then
turned a dimple in the centre and sanded it. Next she used an Arbortech
to texture the surface, drawing it slowly across the surface a couple
of times from the dimple in the centre to the edge (See photos MG02
& 03). Then she used a wire brush and
absolutely flat. She turned the edge
until it was round then faced it off until it was flat, taking very
light, scraping cuts with a swept back bowl gouge to finish it, then
turned a dimple in the centre and sanded it. Next she used an Arbortech
to texture the surface, drawing it slowly across the surface a couple
of times from the dimple in the centre to the edge (See photos MG02
& 03). Then she used a wire brush and
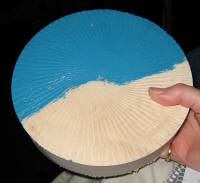 sandpaper to tidy up any torn
out grain and applied a coat of water based acrylic paint to the surface
(See photo MG04). At this stage Margaret removed the timber from the
lathe and mounted another blank she had prepared earlier; she said it
would be better than watching paint dry! The one she had started today
will be used at her next demonstration.
sandpaper to tidy up any torn
out grain and applied a coat of water based acrylic paint to the surface
(See photo MG04). At this stage Margaret removed the timber from the
lathe and mounted another blank she had prepared earlier; she said it
would be better than watching paint dry! The one she had started today
will be used at her next demonstration.
Margaret marked a rim about ¼” deep on the edge of the blank and
turned away some of the timber behind it. Using a skew chisel she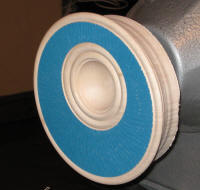 marked
the position for a bead towards the edge then turned the bead using
a swept back bowl gouge. Next she took it off the lathe and remounted
the faceplate 15mm off centre and remounted it onto the lathe. She marked
the size of the bowl she wanted to turn then started turning it with
a spindle gouge and made a recess in the edge of the bowl with a parting
tool. The size of the bowl was determined by the size of the jaws she
was going to use to mount it on the lathe when she turned the underneath.
Next she marked and turned a couple more beads, one on the edge of the
bowl and the other one next to it. These finished, Margaret turned her
attention to the bowl, making a recess behind the bead where she intended
the jaws to go. After finishing the bowl she tidied the beads then sanded
the bowl with Vitex hand held sanding pads and sanded the beads with
sandpaper, taking care not to catch the painted surface. (See photos
MG05, 06 & 07).
marked
the position for a bead towards the edge then turned the bead using
a swept back bowl gouge. Next she took it off the lathe and remounted
the faceplate 15mm off centre and remounted it onto the lathe. She marked
the size of the bowl she wanted to turn then started turning it with
a spindle gouge and made a recess in the edge of the bowl with a parting
tool. The size of the bowl was determined by the size of the jaws she
was going to use to mount it on the lathe when she turned the underneath.
Next she marked and turned a couple more beads, one on the edge of the
bowl and the other one next to it. These finished, Margaret turned her
attention to the bowl, making a recess behind the bead where she intended
the jaws to go. After finishing the bowl she tidied the beads then sanded
the bowl with Vitex hand held sanding pads and sanded the beads with
sandpaper, taking care not to catch the painted surface. (See photos
MG05, 06 & 07).
After removing it from the lathe Margaret mounted the jaws into the
inside of the bowl, taking care to ensure she tightened them enough
to hold it, but not too much, to ensure they didn’t damage the bead
and, as an extra precaution she held it in place with the tailstock.
She started by turning away the bulk of the material on the back, taking
care not to turn into the bowl and working very carefully near the rim
(See photo MG08). Then, working in from the outside edge, she gradually
turned a nice flat surface under the rim with an even thickness, stopping
frequently to check her progress and the thickness and turning away
more of the bulk of the
 timber as she got further in from the edge.
She used a swept back bowl gouge turned on its side to make a fine scraping
cut and get a nice smooth finish to the surface. Margaret left a ridge
under the bead on the edge of the bowl which she turned into another
bead with a nice crisp edge (See photo MG09). Having moved the tailstock
away Margaret used a small bowl gouge to turn away the waste wood under
the bowl and refine the outside of the bowl, making sure she didn’t
have a point on the bottom as she wanted it to rock on the bowl (See
photos MG10 & 11). This part of the project was now complete and Margaret
removed it from the lathe. (See photos MG12 & 13).
timber as she got further in from the edge.
She used a swept back bowl gouge turned on its side to make a fine scraping
cut and get a nice smooth finish to the surface. Margaret left a ridge
under the bead on the edge of the bowl which she turned into another
bead with a nice crisp edge (See photo MG09). Having moved the tailstock
away Margaret used a small bowl gouge to turn away the waste wood under
the bowl and refine the outside of the bowl, making sure she didn’t
have a point on the bottom as she wanted it to rock on the bowl (See
photos MG10 & 11). This part of the project was now complete and Margaret
removed it from the lathe. (See photos MG12 & 13).
For the second part of the project Margaret turned an involuted flower;
she mounts two or three flowers on the narrower edge of her off-centre
bowls making them the right weight to balance the bowl when she stands
it on a table. Before leaving home she had prepared the timber by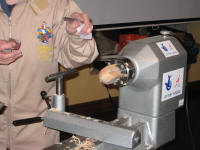 gluing
together 4 lengths of wood which were approximately ½” square, using
PVA wood glue and gluing strips of newspaper between them so she would
be able to separate them later. She had tacked thin strips of wood onto
the outside of the joints and then clamped them together with G clamps.
Once the glue had set she cut them into approximately 2” lengths. She
then went on to explain that if she were going to mount them between
steb centres she would tack a thin square of wood on one end and a small
block of wood on the other end and then find the centre on each one.
However, for this project Margaret mounted it in the chuck and, using
a spindle gouge, she turned the inside shape of the flower and took
it off the lathe (See photo MG14). Next she scraped the paper and glue
off the edges, numbered the bottom of each of the four pieces, put a
mark on them to show which corner had been in the middle, separated
them using a hammer and chisel then turned them round and matched them
up with the aid of the marks. At this point she would re-glue them,
but without putting the newspaper between the joints. (See photo MG15)
gluing
together 4 lengths of wood which were approximately ½” square, using
PVA wood glue and gluing strips of newspaper between them so she would
be able to separate them later. She had tacked thin strips of wood onto
the outside of the joints and then clamped them together with G clamps.
Once the glue had set she cut them into approximately 2” lengths. She
then went on to explain that if she were going to mount them between
steb centres she would tack a thin square of wood on one end and a small
block of wood on the other end and then find the centre on each one.
However, for this project Margaret mounted it in the chuck and, using
a spindle gouge, she turned the inside shape of the flower and took
it off the lathe (See photo MG14). Next she scraped the paper and glue
off the edges, numbered the bottom of each of the four pieces, put a
mark on them to show which corner had been in the middle, separated
them using a hammer and chisel then turned them round and matched them
up with the aid of the marks. At this point she would re-glue them,
but without putting the newspaper between the joints. (See photo MG15)
 Margaret mounted one she had prepared earlier onto the lathe with
a steb centre in the headstock and a live centre in the tailstock with
a piece of leather placed over the point to protect the timber (See
photo MG16). Once she was happy it was running true she used a spindle
gouge with a straight grind to turn away the corners, starting at the
tips of the petals and working down to the base, gradually refining
the shape of the flower as she went (See photo MG17). She sanded the
edges of the petals to blend the curves and get rid of any remaining
paper then continued turning with a smaller spindle gouge tapering it
into the base of the flower and leaving a small groove which she used
to cut it off the lathe (See photos MG18 & 19).
Margaret mounted one she had prepared earlier onto the lathe with
a steb centre in the headstock and a live centre in the tailstock with
a piece of leather placed over the point to protect the timber (See
photo MG16). Once she was happy it was running true she used a spindle
gouge with a straight grind to turn away the corners, starting at the
tips of the petals and working down to the base, gradually refining
the shape of the flower as she went (See photo MG17). She sanded the
edges of the petals to blend the curves and get rid of any remaining
paper then continued turning with a smaller spindle gouge tapering it
into the base of the flower and leaving a small groove which she used
to cut it off the lathe (See photos MG18 & 19).
Finally Margaret mounted a piece of timber measuring approximately ½” square by 3” in the chuck which she turned into a stamen to fit in the flower. She turned it with a long grind spindle gouge and tapered it to a fine point then used a bradawl to make a hole and the centre of the flower and glued the stamen into it.
See photo MG20 for an example of Margaret’s finished flowers and photos MG21 & 22 for an example of the finished bowl.
Thank you Margaret for a very interesting and artistic project, it
reminded me that I must finish the involuted tulip vase I started turning
some months ago!![]()
Lorrie Flannery
SWC club member