

- Alan Truman
- Albert Harrison
- Ambrose O'Halloran
- Andrew Hall
- Bob Chapman
- Bob Neill
- Clive Brooks
- Colin Fishwick
- David Lowe
- David Springett
- Gary Rance
- George Bell
- Gerry Marlow
- Ian Clarkson
- Joe Laird
- Joey Richardson
- John Berkeley
- Ken Allen
- Les Thorne
- Margaret Garrard
- Mark & Lisa Raby
- Mark Baker
- Mark Hancock
- Martin Pidgen
- Mick Hanbury
- Nick Agar
- Nick Arnull
- Nikos Siragas
- Paul Jones
- Phil Irons
- Philip Greenwood
- Peter Berry
- Peter Wood
- Richard Findlay
- Robin Wood
- Russell Kebble
- Sarah Thirlwell
- Simon Hope
- Simon Whitehead
- Steve Wright
- Stuart King
- Sue Harker
- SWC Club Members
- Tony Wilson
- Tracy Owen
- Walt Claxton
- Walt Claxton & Tom Allison
Sue Harker 10 September 2009
Sue’s project for this visit was a ‘multi-centre faceplate turned
bowl’;![]() quite different to the segmented project she turned last time
she visited us, but equally
quite different to the segmented project she turned last time
she visited us, but equally
 complicated. She turned it from a sycamore
bowl blank approximately 9” by 3” which she had put through her planer
thicknesser at home to ensure it was parallel. Having found the centre
she mounted the faceplate onto the block then used a cardboard template
which fitted round the faceplate to draw two lines through the centre,
at right angles to each other, dividing the bowl into four equal quarters.
She then marked a hole on each of these lines approximately 2” from
the centre which she would use to position the faceplate off centre,
explaining that the amount you put it off-centre will dictate the shape
of the arcs you produce.
complicated. She turned it from a sycamore
bowl blank approximately 9” by 3” which she had put through her planer
thicknesser at home to ensure it was parallel. Having found the centre
she mounted the faceplate onto the block then used a cardboard template
which fitted round the faceplate to draw two lines through the centre,
at right angles to each other, dividing the bowl into four equal quarters.
She then marked a hole on each of these lines approximately 2” from
the centre which she would use to position the faceplate off centre,
explaining that the amount you put it off-centre will dictate the shape
of the arcs you produce.
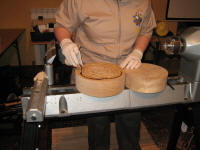
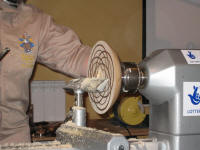
Next Sue mounted the blank onto the lathe,
trued the edge and marked a couple of reference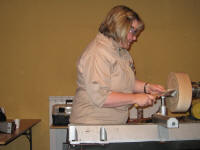 circles on the flat
surface, one about ½” from the edge and the other about 1½” from the
edge, then took it off the lathe. She removed the faceplate from the
block and remounted it with one screw in the centre hole and the opposite
one in one of the holes she had made earlier, then mounted it back onto
the lathe. (See photos SH 1 and 2). She set the tool rest on the centre
line then turned the blank a quarter turn anti-clockwise, positioned
her pencil point where the first reference circle she marked earlier
met the tool rest and drew a circle from here, then did the same with
the second reference circle; once the lathe was running this gave two
distinct circles she could work on.
circles on the flat
surface, one about ½” from the edge and the other about 1½” from the
edge, then took it off the lathe. She removed the faceplate from the
block and remounted it with one screw in the centre hole and the opposite
one in one of the holes she had made earlier, then mounted it back onto
the lathe. (See photos SH 1 and 2). She set the tool rest on the centre
line then turned the blank a quarter turn anti-clockwise, positioned
her pencil point where the first reference circle she marked earlier
met the tool rest and drew a circle from here, then did the same with
the second reference circle; once the lathe was running this gave two
distinct circles she could work on.
 Using a fluted parting tool to ensure
the sides were as sharp as possible Sue cut a groove in each of the
Using a fluted parting tool to ensure
the sides were as sharp as possible Sue cut a groove in each of the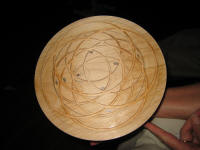 circles, making the outside one approx. 1½ chisel widths and the inner
one approx. 1¼ widths; these were approx. 3-4mm deep to ensure they
would hold the resin she was going to fill them with. (See photo SH
3). She now dismounted the bowl and repeated the process on the other
three lines, giving the grooves a light sanding as she went along to
ensure the edges were sharp. At this point it all looked very confusing
but Sue assured us that all would be revealed in due course. (See photos
SH 4 and 5).
circles, making the outside one approx. 1½ chisel widths and the inner
one approx. 1¼ widths; these were approx. 3-4mm deep to ensure they
would hold the resin she was going to fill them with. (See photo SH
3). She now dismounted the bowl and repeated the process on the other
three lines, giving the grooves a light sanding as she went along to
ensure the edges were sharp. At this point it all looked very confusing
but Sue assured us that all would be revealed in due course. (See photos
SH 4 and 5).
Before filling the grooves with resin Sue sprayed the surface
with cellulose sanding sealer to seal the end grain. To fill the grooves
she mixed 60ml of Fastglass resin with coloured glitter,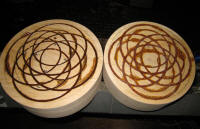 adding enough
glitter to achieve the desired depth of colour, explaining that you
need to keep adding it until you can no longer see
adding enough
glitter to achieve the desired depth of colour, explaining that you
need to keep adding it until you can no longer see
 the mixing stick
through the resin. She then added 12cm of hardener to the mix (i.e.
2cm per 10ml of resin) and mixed it thoroughly to ensure the colour
was evenly distributed. Sue did this mixing in a cardboard cup because
if you use a plastic cup the plastic accelerates the hardening process.
Once she was happy with the mix Sue poured it into the grooves, ensuring
it was distributed evenly over the blank. (See photos SH6, 7 and 8).
the mixing stick
through the resin. She then added 12cm of hardener to the mix (i.e.
2cm per 10ml of resin) and mixed it thoroughly to ensure the colour
was evenly distributed. Sue did this mixing in a cardboard cup because
if you use a plastic cup the plastic accelerates the hardening process.
Once she was happy with the mix Sue poured it into the grooves, ensuring
it was distributed evenly over the blank. (See photos SH6, 7 and 8).
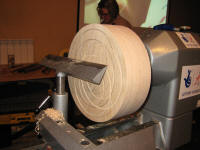
As the resin needs time to set hard Sue mounted a blank she had prepared
earlier onto the lathe, using the faceplate to mount the outside of
the blank and turn a spigot on the resin side,
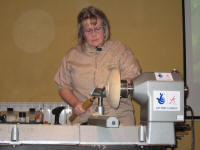 so she could then turn
it round on the lathe to turn the outside of the bowl. She turned the
outside using a long grind bowl gouge, ensuring she had turned away
all the screw holes she made earlier – she
so she could then turn
it round on the lathe to turn the outside of the bowl. She turned the
outside using a long grind bowl gouge, ensuring she had turned away
all the screw holes she made earlier – she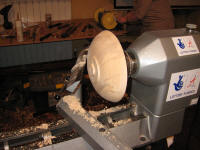 suggested that you could
glue a piece of sacrificial timber to the blank before starting to avoid
wasting too much wood for the screw holes. Having turned the rough shape,
she then turned a foot with a spigot in the middle which she would use
to mount it on the lathe. She then refined the shape, ensuring she got
a good, even curve with no flat spots. To turn away the bulk of the
timber Sue used the gouge with the flute open, cutting with the area
just left of the centre of the tip then, to make the finishing cuts
and get rid of any tear out, she closed the flute and made shearing
cuts using the bottom of the grind to get a nice, clean finish. After
tidying the foot and making a small hole in the centre of the spigot
Sue sanded it using a Robert Sorby Sandmaster, coated it with cellulose
sanding sealer and rubbed the sanding sealer in with paper. (See photos
SH 10 and 11).
suggested that you could
glue a piece of sacrificial timber to the blank before starting to avoid
wasting too much wood for the screw holes. Having turned the rough shape,
she then turned a foot with a spigot in the middle which she would use
to mount it on the lathe. She then refined the shape, ensuring she got
a good, even curve with no flat spots. To turn away the bulk of the
timber Sue used the gouge with the flute open, cutting with the area
just left of the centre of the tip then, to make the finishing cuts
and get rid of any tear out, she closed the flute and made shearing
cuts using the bottom of the grind to get a nice, clean finish. After
tidying the foot and making a small hole in the centre of the spigot
Sue sanded it using a Robert Sorby Sandmaster, coated it with cellulose
sanding sealer and rubbed the sanding sealer in with paper. (See photos
SH 10 and 11).
 Sue then turned it round on the lathe; using the spigot
she cut earlier to mount it. She turned the top with a bowl gouge to
get a nice crisp surface then finished it with a scraper to ensure it
was flat, taking care not to cut too deep and lose the resin. Using
a standard grind
Sue then turned it round on the lathe; using the spigot
she cut earlier to mount it. She turned the top with a bowl gouge to
get a nice crisp surface then finished it with a scraper to ensure it
was flat, taking care not to cut too deep and lose the resin. Using
a standard grind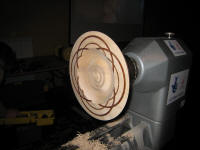 bowl gouge Sue turned the middle of the bowl, gradually
working towards the edge until she had the desired pattern on the rim.
As she was turning the bowl a split revealed itself in the wood and
it became apparent that she wouldn’t be able to turn it away so she
filled it with superglue mixed with wood dust. Finally Sue sanded the
rim and the bowl with a power sander but she didn’t add any finish to
it at this stage. (See photos SH 12 and 13).
bowl gouge Sue turned the middle of the bowl, gradually
working towards the edge until she had the desired pattern on the rim.
As she was turning the bowl a split revealed itself in the wood and
it became apparent that she wouldn’t be able to turn it away so she
filled it with superglue mixed with wood dust. Finally Sue sanded the
rim and the bowl with a power sander but she didn’t add any finish to
it at this stage. (See photos SH 12 and 13).
To finish the underneath, Sue mounted an Air Press vacuum chuck on the lathe, ensuring first that the headstock was properly centred. She then offered the resin side of the bowl up to the vacuum chuck, used tailstock in the small hole she had turned in the foot to centre it and turned on the vacuum chuck. When she was happy it was gripped properly Sue moved the tailstock away and finished turning the foot, with a few rings in it, sanded it and sealed it with sanding sealer. After removing it from the vacuum chuck she sealed the rim and the inside of the bowl with sanding sealer. To finish it she said she will apply 2-3 coats of finishing oil and buff it up on her buffing system at home. (See photos SH 14, 15, 16 and 17).
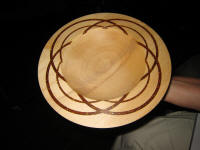
For a selection of the work Sue brought along to show us, see photos
SH 18 to SH22. This was a fascinating and, to me, really inspirational
project which I definitely plan to try myself; so thank you Sue for
a very enjoyable evening.
![]()
Lorrie Flannery
SWC club member