

- Alan Truman
- Albert Harrison
- Ambrose O'Halloran
- Andrew Hall
- Bob Chapman
- Bob Neill
- Clive Brooks
- Colin Fishwick
- David Lowe
- David Springett
- Gary Rance
- George Bell
- Gerry Marlow
- Ian Clarkson
- Joe Laird
- Joey Richardson
- John Berkeley
- Ken Allen
- Les Thorne
- Margaret Garrard
- Mark & Lisa Raby
- Mark Baker
- Mark Hancock
- Martin Pidgen
- Mick Hanbury
- Nick Agar
- Nick Arnull
- Nikos Siragas
- Paul Jones
- Phil Irons
- Philip Greenwood
- Peter Berry
- Peter Wood
- Richard Findlay
- Robin Wood
- Russell Kebble
- Sarah Thirlwell
- Simon Hope
- Simon Whitehead
- Steve Wright
- Stuart King
- Sue Harker
- SWC Club Members
- Tony Wilson
- Tracy Owen
- Walt Claxton
- Walt Claxton & Tom Allison
Walt Claxton & Tom Allison 11 June 2009
Tonight there was a break with tradition. Walt Claxton, our chairman and Tom Allison, our treasurer, took the stage and entertained us with their turning skill.
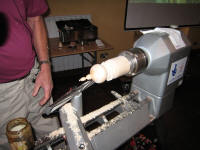
Walt started the evening by mounting a cylinder
in the chuck to make a goblet.
![]() This was one of Keith Siddall’s
glue-ups which was made up from sycamore, padauk and ebony with a
ring of ebony glued on at one end and a hole drilled at the other.
(See photo ‘Walt 1’).
This was one of Keith Siddall’s
glue-ups which was made up from sycamore, padauk and ebony with a
ring of ebony glued on at one end and a hole drilled at the other.
(See photo ‘Walt 1’).
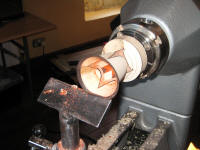
He started by turning the ebony ring to a thin
rim then turned two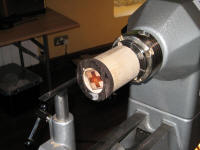 thirds of the cylinder to a goblet shape, as he
did this the inner timbers started to show through as it tapered.
After sanding the outside he turned up the speed and hollowed out
the inside, revealing the glue-up as he progressed. After a light
sanding he tidied the bottom of the inside using a tear drop scraper
then finished sanding it. (See photo ‘Walt 2’).
thirds of the cylinder to a goblet shape, as he
did this the inner timbers started to show through as it tapered.
After sanding the outside he turned up the speed and hollowed out
the inside, revealing the glue-up as he progressed. After a light
sanding he tidied the bottom of the inside using a tear drop scraper
then finished sanding it. (See photo ‘Walt 2’).
 Walt then turned his attention to the outside
of the bottom of the ‘cup’, he had left it thick so he wouldn’t have
any problems with it flexing when he did the hollowing. He tapered
it down to a narrow ‘neck’ which he then sanded. Finally he finished
it with melamine lacquer and parted it off.
Walt then turned his attention to the outside
of the bottom of the ‘cup’, he had left it thick so he wouldn’t have
any problems with it flexing when he did the hollowing. He tapered
it down to a narrow ‘neck’ which he then sanded. Finally he finished
it with melamine lacquer and parted it off.
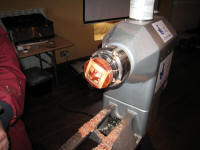
Next Walt mounted another short piece of
glue-up which had a hole drilled in the middle. He turned this to
form the base of the goblet, coming to a point where the hole was.
(See photo ‘Walt 3’).
 After sanding and finishing it he parted it
off, making it slightly concave underneath to ensure it would stand
flat. Unfortunately, when he was almost all the way through he
caught the edge and took a piece out of it which meant he had to
re-cut it to a smaller size. This was a very precarious operation as
he had already parted most of the way through and consequently it
broke off before he had finished so he made a jam chuck from the
piece of wood left in the chuck, attached to work to it, brought up
the tailstock to hold it steady and finally managed to sort it out.
After sanding and finishing it he parted it
off, making it slightly concave underneath to ensure it would stand
flat. Unfortunately, when he was almost all the way through he
caught the edge and took a piece out of it which meant he had to
re-cut it to a smaller size. This was a very precarious operation as
he had already parted most of the way through and consequently it
broke off before he had finished so he made a jam chuck from the
piece of wood left in the chuck, attached to work to it, brought up
the tailstock to hold it steady and finally managed to sort it out.
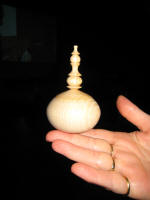
Finally Walt mounted a long, thin piece of ebony between centres and worked along this with a spiralling tool. He spent some time working on this, gradually going deeper and deeper, until he finally reached the desired depth. He ran the lathe at 400 rpm for this, explaining that if you have it any faster the tool tends to judder. When he had finished spiralling he used a point tool to turn a couple of rings at each end of the spiral then turned a bead and a tenon on each end with a spindle gouge. After finishing it with melamine lacquer he parted each end off using a skew chisel and glued the three pieces together. (See photos ‘Walt 4, 5 and 6’).
After the break Tom stepped up to the lathe and
mounted a cylinder of what I think might
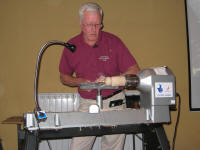 have been ash, measuring
approx. 8” x 3”, in the chuck, to turn a finial box. He turned it to
a point and then gradually turned this into a finial using a spindle
gouge and skew chisel. Once he had finished the finial he sanded it
and treated it with cellulose sanding sealer, cut it back with wire
wool and finished it with carnuba wax. Next he turned a round bowl
beneath the finial, leaving plenty of wood beneath it to give it
strength when he hollowed it. He turned the lid shape and parted it
off with a narrow parting took, leaving a small lip to use as a
guide for where the lid should fit. (See photo ‘Tom 1’).
have been ash, measuring
approx. 8” x 3”, in the chuck, to turn a finial box. He turned it to
a point and then gradually turned this into a finial using a spindle
gouge and skew chisel. Once he had finished the finial he sanded it
and treated it with cellulose sanding sealer, cut it back with wire
wool and finished it with carnuba wax. Next he turned a round bowl
beneath the finial, leaving plenty of wood beneath it to give it
strength when he hollowed it. He turned the lid shape and parted it
off with a narrow parting took, leaving a small lip to use as a
guide for where the lid should fit. (See photo ‘Tom 1’).
 Tom hollowed the bowl out with a spindle gouge,
making sure he didn’t go beyond the lip and cut a small lip inside
with a skew chisel. He finished hollowing it out with a box scraper
and a teardrop scraper then adjusted the top with a parting tool
until the lid fitted. When he was happy the lid fitted properly he
turned the outside of the top of the box round to meet the lid. (See
photo ‘Tom 2’).
Tom hollowed the bowl out with a spindle gouge,
making sure he didn’t go beyond the lip and cut a small lip inside
with a skew chisel. He finished hollowing it out with a box scraper
and a teardrop scraper then adjusted the top with a parting tool
until the lid fitted. When he was happy the lid fitted properly he
turned the outside of the top of the box round to meet the lid. (See
photo ‘Tom 2’).
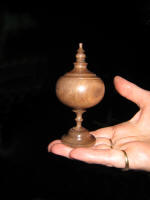
After sanding the bowl inside and out he worked
on the stem,
 making it roughly the same length as the finial on the
top, with some bead detail in the middle, using a spindle gouge and
a skew chisel to make the edges crisp. Unfortunately, whilst he was
turning the stem Tom had a dig in which snapped it; this was such a
shame because it was looking really good. (See photos ‘Tom 3’ for
the finished bowl and ‘Tom 4’ for a sample he had passed round the
audience at the beginning of his demonstration, of one he had made
before).
making it roughly the same length as the finial on the
top, with some bead detail in the middle, using a spindle gouge and
a skew chisel to make the edges crisp. Unfortunately, whilst he was
turning the stem Tom had a dig in which snapped it; this was such a
shame because it was looking really good. (See photos ‘Tom 3’ for
the finished bowl and ‘Tom 4’ for a sample he had passed round the
audience at the beginning of his demonstration, of one he had made
before).
 I would like to thank Walt and Tom for giving
this demonstration because I know I couldn’t have done it. It’s bad
enough standing up and demonstrating to a group of people at the
best of times, but when those people are your fellow club members
who you know jolly well will take every opportunity to pull your leg
it’s doubly difficult, so you two have my full admiration. Thank
you.
I would like to thank Walt and Tom for giving
this demonstration because I know I couldn’t have done it. It’s bad
enough standing up and demonstrating to a group of people at the
best of times, but when those people are your fellow club members
who you know jolly well will take every opportunity to pull your leg
it’s doubly difficult, so you two have my full admiration. Thank
you.![]()
Lorrie Flannery/p>
SWC club member