

- Alan Truman
- Albert Harrison
- Ambrose O'Halloran
- Andrew Hall
- Bob Chapman
- Bob Neill
- Clive Brooks
- Colin Fishwick
- David Lowe
- David Springett
- Gary Rance
- George Bell
- Gerry Marlow
- Ian Clarkson
- Joe Laird
- Joey Richardson
- John Berkeley
- Ken Allen
- Les Thorne
- Margaret Garrard
- Mark & Lisa Raby
- Mark Baker
- Mark Hancock
- Martin Pidgen
- Mick Hanbury
- Nick Agar
- Nick Arnull
- Nikos Siragas
- Paul Jones
- Phil Irons
- Philip Greenwood
- Peter Berry
- Peter Wood
- Richard Findlay
- Robin Wood
- Russell Kebble
- Sarah Thirlwell
- Simon Hope
- Simon Whitehead
- Steve Wright
- Stuart King
- Sue Harker
- SWC Club Members
- Tony Wilson
- Tracy Owen
- Walt Claxton
- Walt Claxton & Tom Allison
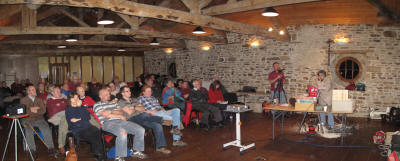
Margaret Garrard 28 January 2010
This evening Margaret treated us to an evening of turning, colouring and piercing.
![]()
Turning
She started by turning a bowl from a sycamore
blank measuring approximately 7”-8” by 1½”, which she mounted in the
chuck using a faceplate. First she turned the edge to make it round
then she turned the outside of the bowl into a smooth, gentle, round
shape with a small foot, using a standard bowl gouge. (See photos MG01
& 02). She then changed to a swept back bowl gouge with the flute closed,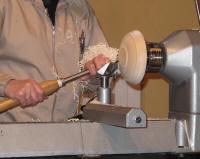 u
u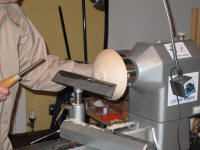 sing the bottom edge of the bevel and taking fine, shearing cuts to
tidy it up. (See photos MG03 & 04). After doing this there was still
a small area of torn grain near the foot so she sprayed it with sanding
sealer to stiffen up the fibres and give a better cut. Once she was
happy with this she used a gadget which was designed by a member of
Thirsk Woodturning club to help with involuted turning; she held this
over the tailstock and wound it into the bowl to make an impression
in the foot which she then turned into a bead.
sing the bottom edge of the bevel and taking fine, shearing cuts to
tidy it up. (See photos MG03 & 04). After doing this there was still
a small area of torn grain near the foot so she sprayed it with sanding
sealer to stiffen up the fibres and give a better cut. Once she was
happy with this she used a gadget which was designed by a member of
Thirsk Woodturning club to help with involuted turning; she held this
over the tailstock and wound it into the bowl to make an impression
in the foot which she then turned into a bead.
At this point Margaret
turned the bowl round on the lathe and mounted the foot in the chuck.
She started to hollow it out using a standard grind bowl gouge, leaving
a bulk of wood in the centre to keep it stable. She turned it to approximately
2mm thick as she was planning to use it
 later in the evening to demonstrate
piercing. She took nice, flowing cuts round the curve to ensure she
got an even thickness and measured the thickness regularly with callipers.
She placed a mark on the rim at the thinnest part which she used as
a guide for where she should measure for the rest of the piece to ensure
she didn’t turn it too thin. Once she was happy with the thickness of
the first inch of the bowl she stopped and sanded it and rounded the
rim. Then she carefully turned away more of the timber using a smaller
bowl gouge and taking fine cuts when working near the edge. As she got
closer to the middle she sanded it again, this time using Vitex foam
backed sanding pads which are nice and flexible. As she got further
into the bowl it started flexing and you could see it wobbling on the
video screen but it needed to be thin right to the foot for the design
she was planning to put on it. (See photos MG05/06/07 & 08).
later in the evening to demonstrate
piercing. She took nice, flowing cuts round the curve to ensure she
got an even thickness and measured the thickness regularly with callipers.
She placed a mark on the rim at the thinnest part which she used as
a guide for where she should measure for the rest of the piece to ensure
she didn’t turn it too thin. Once she was happy with the thickness of
the first inch of the bowl she stopped and sanded it and rounded the
rim. Then she carefully turned away more of the timber using a smaller
bowl gouge and taking fine cuts when working near the edge. As she got
closer to the middle she sanded it again, this time using Vitex foam
backed sanding pads which are nice and flexible. As she got further
into the bowl it started flexing and you could see it wobbling on the
video screen but it needed to be thin right to the foot for the design
she was planning to put on it. (See photos MG05/06/07 & 08).
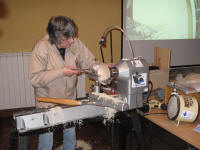
Once she
had finished the inside Margaret mounted a small disk of timber in the
chuck and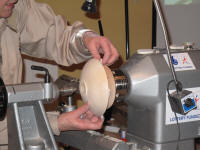 pushed the inside of the bowl against this with a piece of
paper between them to stop it slipping, then used the gadget referred
to earlier to hold it in place, pushing it into the groove she had turned
earlier. This held it very true and enabled her to turn away the dents
the chuck had made in the spigot. (See photos MG09/10/11 &12).
pushed the inside of the bowl against this with a piece of
paper between them to stop it slipping, then used the gadget referred
to earlier to hold it in place, pushing it into the groove she had turned
earlier. This held it very true and enabled her to turn away the dents
the chuck had made in the spigot. (See photos MG09/10/11 &12).
Colouring
Margaret started the second half by showing us the various designs she
has developed using leaves and flowers and explained how she has developed
them. (See
 photos MG 13 & 14). She makes templates to apply her designs
to her work using paper, a compass, transfer paper and ‘Frisket’ film
(made by West Design Products - www.westdesignproducts.co.uk).
photos MG 13 & 14). She makes templates to apply her designs
to her work using paper, a compass, transfer paper and ‘Frisket’ film
(made by West Design Products - www.westdesignproducts.co.uk).
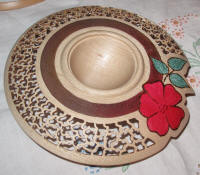
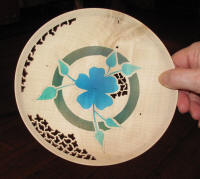
She then
turned to a shallow bowl she had prepared at home by applying areas
of piercing and drawing on a pattern which consisted of a ring, some
leaves and a flower in the centre. The pattern was applied using ‘Frisket’
which she had prepared by cutting round each part of the pattern so
she could peel them off individually. First she took the ‘Frisket’ off
the ring which she painted brown, using ‘Golden’ acrylic paint in an
airbrush. (See photo MG 15). Then she uncovered the leaves and stalks
and painted them green; because the paints Margaret uses are translucent
she starts with the darkest colour first as the dark colours shouldn’t
show through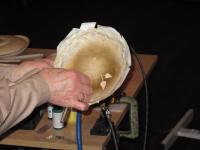 the lighter colours that are airbrushed on top of them.
Finally she peeled the ‘Frisket’ off the flower and painted it blue,
applying more paint in the middle than the edges to give the flower
some depth. When she had finished painting she removed the remaining
‘Frisket’ from the rest of the bowl to reveal the finished pattern.
(See photos MG16/17 & 18).
the lighter colours that are airbrushed on top of them.
Finally she peeled the ‘Frisket’ off the flower and painted it blue,
applying more paint in the middle than the edges to give the flower
some depth. When she had finished painting she removed the remaining
‘Frisket’ from the rest of the bowl to reveal the finished pattern.
(See photos MG16/17 & 18).
After applying each colour Margaret cleaned the air brush with water and when she had finished painting she cleaned it with a cleaning fluid.
Piercing
Finally Margaret turned her attention
to piercing and explained that her preferred wood for piercing is sycamore
as it is close grained and has a bit of spring in it. She prefers it
to ash or elm as it can be turned thinner than them and sycamore doesn’t
tend to have too much pattern in it. To do the piercing she uses an
‘NSK’ dentist’s drill, fitted with cutters which she buys from a company
called ‘Dental Sky’, but she says cutters are also available from Turner’s
Retreat. She applied some piercing to the bowl she decorated earlier,
working in the area between the ring,
 leaves and flower. She used a
tooth brush to remove any loose burnt bits from the holes then checked
the pattern from the back to make sure she had pierced all the way through;
if there are any stray bits left Margaret uses a little diamond file
to remove them. (See photo MG19).
leaves and flower. She used a
tooth brush to remove any loose burnt bits from the holes then checked
the pattern from the back to make sure she had pierced all the way through;
if there are any stray bits left Margaret uses a little diamond file
to remove them. (See photo MG19).
Next she turned her attention to another piece of work, to which she had already applied a pyrography pattern. This time she used the drill, fitted with a ball cutter, to apply a stippled pattern, taking care to ensure the pattern was random and did not have any regimented lines. As before, she cleaned it with a tooth brush then checked it for flat spots which would need further attention. (See photo MG20).
Finally, working on the bowl she turned at the beginning of the evening, Margaret showed us how she cuts out designs round the edge of her work using the drill. She explained that once she has cut out the pattern she uses a file to make it level.
In Conclusion
In some respects this was an experimental evening for Margaret as she is still fairly new to colouring and piercing and at times it seemed like a bit of a voyage of discovery, which I felt was just great because it left me feeling as if we, her audience, were very much involved in the evolution of her designs. Once again this was a very enjoyable evening which held my attention from start to finish.
Thank you Margaret.
Lorrie Flannery![]()
SWC club member