

- Alan Truman
- Albert Harrison
- Ambrose O'Halloran
- Andrew Hall
- Bob Chapman
- Bob Neill
- Clive Brooks
- Colin Fishwick
- David Lowe
- David Springett
- Gary Rance
- George Bell
- Gerry Marlow
- Ian Clarkson
- Joe Laird
- Joey Richardson
- John Berkeley
- Ken Allen
- Les Thorne
- Margaret Garrard
- Mark & Lisa Raby
- Mark Baker
- Mark Hancock
- Martin Pidgen
- Mick Hanbury
- Nick Agar
- Nick Arnull
- Nikos Siragas
- Paul Jones
- Phil Irons
- Philip Greenwood
- Peter Berry
- Peter Wood
- Richard Findlay
- Robin Wood
- Russell Kebble
- Sarah Thirlwell
- Simon Hope
- Simon Whitehead
- Steve Wright
- Stuart King
- Sue Harker
- SWC Club Members
- Tony Wilson
- Tracy Owen
- Walt Claxton
- Walt Claxton & Tom Allison
Tracy Owen 12 August 2010
I have not seen Tracy turn before so was looking
forward to this evening and I wasn’t![]() disappointed. He turned two projects
that I thought were interesting but were easily achievable by an amateur
turner, such as myself.
disappointed. He turned two projects
that I thought were interesting but were easily achievable by an amateur
turner, such as myself.
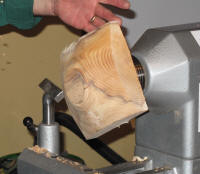
1. Wavy Edged Square Bowl
Tracy started with a nice clean piece of yew which had no splits
or faults; it measured 7½” square (10⅜” across the diagonals) and had
been cut from the side of a log with the bark removed. He mounted this
on the lathe with a screw chuck, screwed into the flat side i.e. the
inside of the tree. (See photo TO_01). First he turned a chucking point
on the base and marked the centre, then he turned away the bulk of the
wood using a long grind bowl gouge, pulling the tool towards him with
a shear cut. He turned an ogee shape then closed
 the flute right up
and took very fine cuts to refine the shape. To finish he used one of
the new round scrapers he has developed with Henry Taylor Tools; this
is a heavy duty, half round scraper with a round bar (see Woodturning
Magazine, issue 216, page 76 for a review of it). Phil and I bought
one from him and I have to say I am very impressed with it, I found
it very easy to use. After power sanding it he turned the bowl round
on the lathe and remounted it in the jaws. (See photos TO_02, 03, 04
& 05).
the flute right up
and took very fine cuts to refine the shape. To finish he used one of
the new round scrapers he has developed with Henry Taylor Tools; this
is a heavy duty, half round scraper with a round bar (see Woodturning
Magazine, issue 216, page 76 for a review of it). Phil and I bought
one from him and I have to say I am very impressed with it, I found
it very easy to use. After power sanding it he turned the bowl round
on the lathe and remounted it in the jaws. (See photos TO_02, 03, 04
& 05).
Next he started turning away the inside, taking great care at the
edges not to catch the corners. He spent quite a bit of time working
on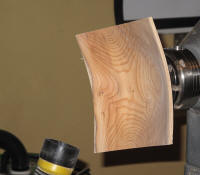 the edges to make sure they were even, using both the swept back
bowl gouge and the round scraper. As he worked his way to the middle
he changed to a conventional ½” bowl gouge and refined the shape with
the round scraper, taking very fine cuts. Once he was happy with the
shape he power sanded it, being careful not to heat the wood in case
it split. He used 120 grit to tidy any minor problems then went quickly
through the grits. (See photos TO_06, 07, 08 & 09).
the edges to make sure they were even, using both the swept back
bowl gouge and the round scraper. As he worked his way to the middle
he changed to a conventional ½” bowl gouge and refined the shape with
the round scraper, taking very fine cuts. Once he was happy with the
shape he power sanded it, being careful not to heat the wood in case
it split. He used 120 grit to tidy any minor problems then went quickly
through the grits. (See photos TO_06, 07, 08 & 09).
Tracy used a bobbin sander fitted on a mains operated drill to make the wavy edges, using the indexing on the lathe to hold the bowl still. Then he used a pyrography kit to burn a simple pattern on the edges. (See photo TO_10).
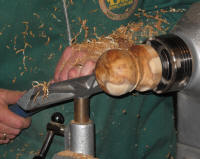
To finish the underneath he mounted a scrap disk of wood in the chuck
then pushed the inside of the bowl against it, with a piece of router
matting between them, and held it in place with the tailstock, using
the centre mark he made earlier. He turned the foot,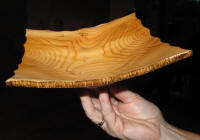 tapering it inwards
so it was quite narrow at the bottom then slightly undercut it. He turned
a small V back into the bowl at the top of the foot and burnt a line
into it with the edge of a piece of formica. After parting it off he
chiselled away the pimple on the base then sanded it and signed it with
his pyrography pen. Finally he finished it with a coat of ‘Osmo Oil’,
which is a non toxic oil the consistency of runny honey. Since the demonstration
we have bought a can from Finney’s and I have used it on a couple of
bowls; I am very impressed with the results. It’s quite expensive but
you don’t need to use a lot so you could share a tin with a friend.
There are several oils in the Osmo range but I think the one Tracy used
is called ‘Osmo Polyx Oil’. (See photos TO_11, 12, 13 & 14).
tapering it inwards
so it was quite narrow at the bottom then slightly undercut it. He turned
a small V back into the bowl at the top of the foot and burnt a line
into it with the edge of a piece of formica. After parting it off he
chiselled away the pimple on the base then sanded it and signed it with
his pyrography pen. Finally he finished it with a coat of ‘Osmo Oil’,
which is a non toxic oil the consistency of runny honey. Since the demonstration
we have bought a can from Finney’s and I have used it on a couple of
bowls; I am very impressed with the results. It’s quite expensive but
you don’t need to use a lot so you could share a tin with a friend.
There are several oils in the Osmo range but I think the one Tracy used
is called ‘Osmo Polyx Oil’. (See photos TO_11, 12, 13 & 14).
2. Round Box
For the second project Tracy mounted a block of yew measuring approx. 3” square by 8” long between centres and used a long grind bowl gouge to turn it to a cylinder and cut a spigot on the end. He used this spigot to remount it on the lathe then turned another one at the other end. Using a thin parting tool he cut the piece of wood in half.
He used a bowl gouge to turn the bottom of the box to an apple shape,
cutting from the big diameter down to the small one as you would normally
do with a bead when spindle turning. To hollow it he started by ‘drilling’
a hole into it with a spindle gouge, having first marked the depth
 he
wanted on the shaft of the spindle gouge, then used a ‘Kelton’ hollowing
tool to turn the inner curves and finished it with a tear drop scraper.
He tidied the inside edge of the neck with a spindle gouge then sanded
the inside. There was a small fault in the timber at the neck so he
applied superglue to it to stabilise it then, when the glue was dry,
he widened the neck to lose the fault. (See photos TO_15, 16 & 17).
he
wanted on the shaft of the spindle gouge, then used a ‘Kelton’ hollowing
tool to turn the inner curves and finished it with a tear drop scraper.
He tidied the inside edge of the neck with a spindle gouge then sanded
the inside. There was a small fault in the timber at the neck so he
applied superglue to it to stabilise it then, when the glue was dry,
he widened the neck to lose the fault. (See photos TO_15, 16 & 17).
When turning these boxes Tracy normally uses two chucks, one for the top and one for the base, to eliminate the problem of trying to remount the base. But as we only had one available he removed the base from the chuck and replaced it with the other half of the log. After tidying the end he measured the inside of the neck of the base using Vernier calipers and transferred this measurement to the end of the lid. He turned a spigot to this size then gradually tapered it to fit the base, regularly checking the fit. When it was almost to size he sanded off the last bit until it was a good fit. (See photo TO_18).
Next he turned a shallow curve on the inside of the lid and, after
sandin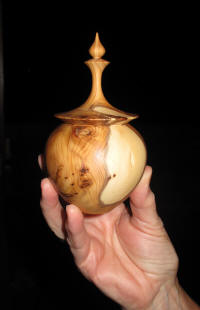 g it, he started to turn the underneath of the ‘shoulder’ of the
lid then turned away some of the bulk of the timber. Before going too
much further he completely finished the underneath parts of the lid
then roughly shaped the top, making sure he always cut downhill. He
parted it off then remounted the base in the chuck and fitted the lid
onto it to finish it, holding it in place with the tailstock. Using
a spindle gouge he carefully turned a finial on the top of the spindle
then went back and refined the shape of the spindle, working with the
tool on top of the work and taking care to ensure he got a good curve
with no straight bits. He sanded the spindle then refined the shape
of the finial, gradually turning away the top until the centre pulled
away. After sanding the finial he treated it with ‘Osmo Oil’ then refined
the shape of the bottom half of the base and started the parting cut
before sanding it. After parting it off he made a jam chuck from the
waste wood and mounted the bottom of the box onto it to finish the underneath.
Finally he finished it with ‘Osmo Oil’. (See photos TO_19, 20, 21 &
22).
g it, he started to turn the underneath of the ‘shoulder’ of the
lid then turned away some of the bulk of the timber. Before going too
much further he completely finished the underneath parts of the lid
then roughly shaped the top, making sure he always cut downhill. He
parted it off then remounted the base in the chuck and fitted the lid
onto it to finish it, holding it in place with the tailstock. Using
a spindle gouge he carefully turned a finial on the top of the spindle
then went back and refined the shape of the spindle, working with the
tool on top of the work and taking care to ensure he got a good curve
with no straight bits. He sanded the spindle then refined the shape
of the finial, gradually turning away the top until the centre pulled
away. After sanding the finial he treated it with ‘Osmo Oil’ then refined
the shape of the bottom half of the base and started the parting cut
before sanding it. After parting it off he made a jam chuck from the
waste wood and mounted the bottom of the box onto it to finish the underneath.
Finally he finished it with ‘Osmo Oil’. (See photos TO_19, 20, 21 &
22).
Tracy said that he usually applies a couple of coats of sanding sealer before applying the oil then applies 2-3 coats of oil off the lathe. He has turned twenty of these boxes now, all from part seasoned timber, and all the lids have kept their nice tight fit.
Lorrie Flannery
![]()
SWC club member