

- Alan Truman
- Albert Harrison
- Ambrose O'Halloran
- Andrew Hall
- Bob Chapman
- Bob Neill
- Clive Brooks
- Colin Fishwick
- David Lowe
- David Springett
- Gary Rance
- George Bell
- Gerry Marlow
- Ian Clarkson
- Joe Laird
- Joey Richardson
- John Berkeley
- Ken Allen
- Les Thorne
- Margaret Garrard
- Mark & Lisa Raby
- Mark Baker
- Mark Hancock
- Martin Pidgen
- Mick Hanbury
- Nick Agar
- Nick Arnull
- Nikos Siragas
- Paul Jones
- Phil Irons
- Philip Greenwood
- Peter Berry
- Peter Wood
- Richard Findlay
- Robin Wood
- Russell Kebble
- Sarah Thirlwell
- Simon Hope
- Simon Whitehead
- Steve Wright
- Stuart King
- Sue Harker
- SWC Club Members
- Tony Wilson
- Tracy Owen
- Walt Claxton
- Walt Claxton & Tom Allison
Andrew Hall 11 August
![]() I always look forward to Andrew’s
demonstrations. As well as being informative and educational they
are very entertaining and today’s demo lived up to my expectations.
He turned two quite different projects, the first was very
decorative and the second a real novelty.
I always look forward to Andrew’s
demonstrations. As well as being informative and educational they
are very entertaining and today’s demo lived up to my expectations.
He turned two quite different projects, the first was very
decorative and the second a real novelty.
1. Wall Plaque with Oval Clock
This was made from a piece of oak measuring approx. 1½” thick by 8” square, which had a circle drilled in the middle of each side. It had been air seasoned for 6 years and had a moisture content of 12%. Andrew used a faceplate to mount it on the lathe.
Using a swept back bowl gouge he made a ‘v’ cut
about 1½” from
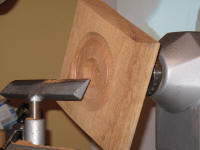 the hole then tidied the area between the ‘v’ and the
middle, undercutting it slightly. He the made another ‘v’ cut about
1” from the first and turned the area between the two to a downward
curved. He made a pattern on this curve with a texturing tool and
then tidied it by pressing a hogs hair brush hard onto it with the
lathe running. He warned against using a nylon brush to do this as
it could melt the bristles. He used a point tool to turn a
definition groove on the two edges of the textured area then cleaned
the grooves with the hogs hair brush. (See photo AH11_01).
the hole then tidied the area between the ‘v’ and the
middle, undercutting it slightly. He the made another ‘v’ cut about
1” from the first and turned the area between the two to a downward
curved. He made a pattern on this curve with a texturing tool and
then tidied it by pressing a hogs hair brush hard onto it with the
lathe running. He warned against using a nylon brush to do this as
it could melt the bristles. He used a point tool to turn a
definition groove on the two edges of the textured area then cleaned
the grooves with the hogs hair brush. (See photo AH11_01).
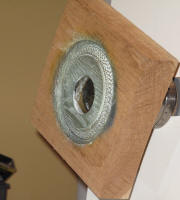 Before turning the rest of the plaque he
coloured this centre area. With the lathe turned off he sprayed it
with dark blue spirit stain, using an atomiser bottle, then applied
a coat of yellow on top to give a green finish. To finish this area
he applied a coat of liming wax to it; putting it on with his finger
(wearing a latex glove). He cleaned the excess off with a piece of
paper then wiped it over with finishing oil on a fresh piece of
paper. (See photos AH11_02 to 04).
Before turning the rest of the plaque he
coloured this centre area. With the lathe turned off he sprayed it
with dark blue spirit stain, using an atomiser bottle, then applied
a coat of yellow on top to give a green finish. To finish this area
he applied a coat of liming wax to it; putting it on with his finger
(wearing a latex glove). He cleaned the excess off with a piece of
paper then wiped it over with finishing oil on a fresh piece of
paper. (See photos AH11_02 to 04).
Using a bowl gouge he turned the outer area to
a
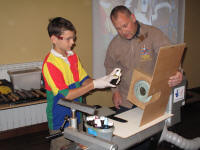 gentle curve then concentrated his attention on the four edges,
using a Proxxon cutter with a chain saw blade to carve patterns on
them. He started to carve diagonal lines on the first edge then
invited David, one of our junior members, to do it for him. David
quickly got into the swing of it and when he had finished carving
the first side he coloured it with light blue, yellow and red,
overlapping each colour slightly to give a rainbow effect. Andrew
then went on to carve the other three sides, making a random cross
hatch pattern on one, an adze effect on the next and a random, free
hand pattern on the last one. He then went on to colour them all.
(See photos AH11_05 to 07).
gentle curve then concentrated his attention on the four edges,
using a Proxxon cutter with a chain saw blade to carve patterns on
them. He started to carve diagonal lines on the first edge then
invited David, one of our junior members, to do it for him. David
quickly got into the swing of it and when he had finished carving
the first side he coloured it with light blue, yellow and red,
overlapping each colour slightly to give a rainbow effect. Andrew
then went on to carve the other three sides, making a random cross
hatch pattern on one, an adze effect on the next and a random, free
hand pattern on the last one. He then went on to colour them all.
(See photos AH11_05 to 07).
Next Andrew took it off the chuck,
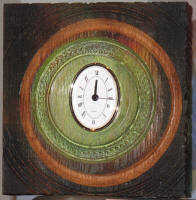 removed all
but one of the screws from the faceplate then twisted is slightly to
put it a little off centre and re-mounted it on the lathe. Using a
⅜” bowl gouge he turned some eccentric grooves in the outer area
then coloured it. He sprayed it with light blue first then added red
on top to give purple, next he sprayed dark blue onto the corners
and finished by spraying yellow all over. Once it was dry he turned
a cove in the flat area to reveal the natural colour of the wood,
then added a pattern using the ‘decorating elf’ and defined the
edges with a point tool. Again he cleaned the texturing with the
hogs hair brush. Finally, he sprayed the whole thing with a coat of
melamine lacquer to bring out the natural colour of the wood. (See
photos AH11_08 to 10).
removed all
but one of the screws from the faceplate then twisted is slightly to
put it a little off centre and re-mounted it on the lathe. Using a
⅜” bowl gouge he turned some eccentric grooves in the outer area
then coloured it. He sprayed it with light blue first then added red
on top to give purple, next he sprayed dark blue onto the corners
and finished by spraying yellow all over. Once it was dry he turned
a cove in the flat area to reveal the natural colour of the wood,
then added a pattern using the ‘decorating elf’ and defined the
edges with a point tool. Again he cleaned the texturing with the
hogs hair brush. Finally, he sprayed the whole thing with a coat of
melamine lacquer to bring out the natural colour of the wood. (See
photos AH11_08 to 10).
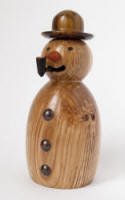
2. Smoking Snowman
Andrew mounted a rough sawn block of olive ash,
measuring approx.
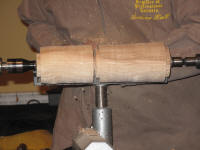 3½” square by 12”, between steb centres and used a
roughing gouge to turn it to a rough cylinder. He turned a chucking
point at each end then turned a groove about 4” from the tailstock,
with a parting tool, then turned another deep groove next to this
and cut it off with a saw. Andrew then very kindly gave the piece of
waste wood to David to turn into a box. (See photos AH11_11 to 13).
3½” square by 12”, between steb centres and used a
roughing gouge to turn it to a rough cylinder. He turned a chucking
point at each end then turned a groove about 4” from the tailstock,
with a parting tool, then turned another deep groove next to this
and cut it off with a saw. Andrew then very kindly gave the piece of
waste wood to David to turn into a box. (See photos AH11_11 to 13).
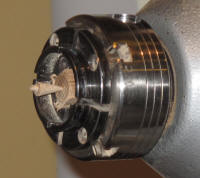
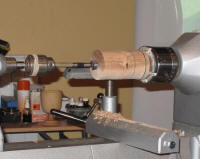 He mounted the remaining piece in the chuck,
then trued it up with a roughing gouge and tidied the end with a
bowl gouge. He marked two lines to show the top and bottom of the
snowman’s head then drilled a hole down the middle, using a 1”
forstner bit in a jacob’s chuck, with the lathe running at 500rpm,
drilling as far as the first of the marked lines. After cutting a
recess in the end to fit the chuck he hollowed the piece out to the
diameter of the chucking point, coning it out and making a slight
‘v’ at the edge to grip the chuck. (See photos AH11_14 and 15).
He mounted the remaining piece in the chuck,
then trued it up with a roughing gouge and tidied the end with a
bowl gouge. He marked two lines to show the top and bottom of the
snowman’s head then drilled a hole down the middle, using a 1”
forstner bit in a jacob’s chuck, with the lathe running at 500rpm,
drilling as far as the first of the marked lines. After cutting a
recess in the end to fit the chuck he hollowed the piece out to the
diameter of the chucking point, coning it out and making a slight
‘v’ at the edge to grip the chuck. (See photos AH11_14 and 15).
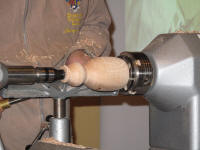 Next Andrew turned it round on the lathe but
left a small gap between the bottom of the piece and the jaws so he
could turn a slight curve. This done he secured it properly on the
chuck then drilled a 10mm hole in the end, to meet up with the hole
he had drilled from the other end. He used the tailstock to support
it and turned the body area to a basic snowman shape then turned the
head. After working out the best part of the grain to use for the
centre front he locked the lathe with this part on top then marked
three buttons on the body plus two eyes a nose and a smiley mouth on the head. He used
a dremel to drill the holes for the nose and buttons, then carved
out the mouth with a conventional drill, drilling all the way
through to the centre, and drilled a long hole for the nose. He
hammered three brass studs into the button holes and burnt the eyes
in with a pyrography kit then moved the tailstock away and carefully
tidied up the top of the head. (See photos AH11_16 and 17).
Next Andrew turned it round on the lathe but
left a small gap between the bottom of the piece and the jaws so he
could turn a slight curve. This done he secured it properly on the
chuck then drilled a 10mm hole in the end, to meet up with the hole
he had drilled from the other end. He used the tailstock to support
it and turned the body area to a basic snowman shape then turned the
head. After working out the best part of the grain to use for the
centre front he locked the lathe with this part on top then marked
three buttons on the body plus two eyes a nose and a smiley mouth on the head. He used
a dremel to drill the holes for the nose and buttons, then carved
out the mouth with a conventional drill, drilling all the way
through to the centre, and drilled a long hole for the nose. He
hammered three brass studs into the button holes and burnt the eyes
in with a pyrography kit then moved the tailstock away and carefully
tidied up the top of the head. (See photos AH11_16 and 17).
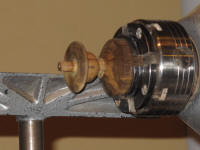 To make the snowman’s hat Andrew mounted a
small cylinder of a darker wood in the jaws and turned a tapered
dowel on the end to fit into the hole on the top of the snowman’s
head. He turned a slight curve away from the dowel, to form the
underneath of the brim, then turned the top of the brim and turned a
bowler hat shape, gradually turning the top of it with a spindle
gouge until it finally parted away. (See photos AH11_18 and 19).
To make the snowman’s hat Andrew mounted a
small cylinder of a darker wood in the jaws and turned a tapered
dowel on the end to fit into the hole on the top of the snowman’s
head. He turned a slight curve away from the dowel, to form the
underneath of the brim, then turned the top of the brim and turned a
bowler hat shape, gradually turning the top of it with a spindle
gouge until it finally parted away. (See photos AH11_18 and 19).
Andrew made the pipe in two parts. To make the bowl he mounted a block of oak approx. ½” square by 4” long into the inner part of the jaws and cut a thin ‘v’ shaped cylinder in the middle of it then drilled a hole into the narrow end of this. He cut the waste timber off the end then sanded it and coloured it with a black pen before cutting it off. To make the stem he remounted the piece of oak he had cut off the bowl into the jaws and turned a small cylinder in the end to fit into the hole he drilled in the side of the bowl. Once he was happy with the fit he turned it to a length of about ¾”, coloured it black and parted it off with a skew chisel. He assembled the pipe and painted the top of the bowl red then fitted it into the snowman’s mouth. (See photos AH11_20 and 21).
 For the nose he turned a small dowel at the end
of the timber left in the chuck then turned a long cone shape which
he painted orange, to look like a carrot. He snapped this off and
fitted it into the hole he had drilled for the nose. (See photos
AH11_22 and 23).
For the nose he turned a small dowel at the end
of the timber left in the chuck then turned a long cone shape which
he painted orange, to look like a carrot. He snapped this off and
fitted it into the hole he had drilled for the nose. (See photos
AH11_22 and 23).
Finally, Andrew remounted the snowman in the chuck and drilled a 10mm hole in the back of the body, close to the bottom, to act as a ventilation hole. Now for the acid test – would it actually smoke? Andrew put an incense cone onto a burner, lit it, then put the snowman over the top. After a brief pause, smoke started to come out of the snowman’s mouth. Brilliant!
 There
wasn't time during the evening for Andrew to sand and polish the
snowman so a club member took the piece home, sanded, polished and
glued all the bits together.
There
wasn't time during the evening for Andrew to sand and polish the
snowman so a club member took the piece home, sanded, polished and
glued all the bits together.
As usual Andrew gave a very entertaining and interesting demonstration with lots of banter between him and the audience. He held the attention of all present right up to the end and was rewarded with a standing ovation. Thank you Andrew for a great evening, I am already looking forward to the next one.
Before leaving Andrew donated both of these projects to the club for us to sell for our charity of the year, Bluebell Wood Children’s Hospice. I feel sure they will both make a lot of money for us.
Lorrie Flannery
SWC club member