

- Alan Truman
- Albert Harrison
- Ambrose O'Halloran
- Andrew Hall
- Bob Chapman
- Bob Neill
- Clive Brooks
- Colin Fishwick
- David Lowe
- David Springett
- Gary Rance
- George Bell
- Gerry Marlow
- Ian Clarkson
- Joe Laird
- Joey Richardson
- John Berkeley
- Ken Allen
- Les Thorne
- Margaret Garrard
- Mark & Lisa Raby
- Mark Baker
- Mark Hancock
- Martin Pidgen
- Mick Hanbury
- Nick Agar
- Nick Arnull
- Nikos Siragas
- Paul Jones
- Phil Irons
- Philip Greenwood
- Peter Berry
- Peter Wood
- Richard Findlay
- Robin Wood
- Russell Kebble
- Sarah Thirlwell
- Simon Hope
- Simon Whitehead
- Steve Wright
- Stuart King
- Sue Harker
- SWC Club Members
- Tony Wilson
- Tracy Owen
- Walt Claxton
- Walt Claxton & Tom Allison
Mark & Lisa Raby 13 January
I make no apologies for this report being
much longer than usual - hence the menu below this paragraph. I was
only at the demonstration for a short time, so this has been written
by looking back at the film footage taken on the night. Phil wasn’t
there at all that evening so the photographs have been extracted from
the video film.![]()
This evening we were entertained by Mark and Lisa Raby. Lisa had set up a pyrography table up at the side of the room where members were invited to have a go at burning wood. Mark gave the main demonstration which was purely about finishing and didn’t involve any turning as, in his own words, he is to woodturning what Larry Grayson was to rugby league. He started by saying how often he sees some lovely turned work ruined by bad finishing, he cannot understand why it is that having spent a lot of time and effort on the turning and good money on the timber many turners will skimp on the finishing. He explained what he considers to be the three rules of finishing. These are:
- When you are sanding never jump by more than 100 grit at a time. By following this rule you can finish at a much lower grit than if you jump too much between grits.
- If you find your fingers are getting hot when you are sanding or applying a finish then stop, you are doing it wrong.
- Don’t apply too much finish – most people put too much on.
- Colouring can be used to turn a bland piece of wood, or one that wasn’t turned quite as well as you might have hoped, into something special.
- Tight grained woods such as laburnum, yew and most fruit woods are good for colouring.
- Colours can be applied to open grained woods, such as Ash, but they won’t flow the way they do on tight grain.
- When colouring be prepared to experiment and be prepared to have disasters but bear in mind that you can always sand it back and start again if it goes wrong.
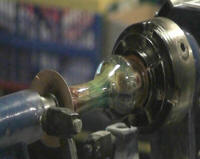
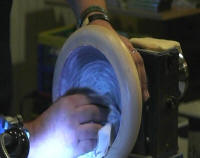
- Mark had a small turned vase mounted on the lathe which had been sanded to 600 grit. He finished sanding it with ‘Webrax’ sanding pads, working through to 1,000/1200 grit (grey). He said that at this point we should resist the temptation to run your hands over the work as this will affect it, instead, run over it with a tack cloth, with the lathe switched off so it does not catch in the lathe and drag you in.
-
Spirit based stains are very fast drying.
-
The stain must go onto bare wood which hasn’t been sealed first.
-
Apply the colour with a safety cloth. Don’t use kitchen roll as it will absorb some of the colour and leave ring marks etc. whereas safety cloth will transfer the finish to the wood without breaking down and leaving lint.
-
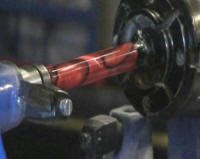
The slower the lathe is turning, the heavier the stain will take – Mark ran it at 700rpm for the vase. He applied several colours to it, leaving a feathered edge after each one, gradually working along and blending them into each other.
-
If, when you have finished, you don’t like the colours you have done you can apply more colour on top, even if it has been left for some weeks, so long as you haven’t sealed it.
-
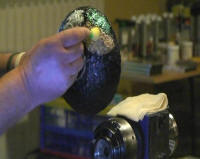
Iridescent colours should be applied to wood that has been coated with ebonising lacquer as they need a dark background for them to give their effect. If you put them on plain wood they have nothing to reflect off so you can hardly see them.
-
You must seal the wood with sanding sealer before applying ebonising lacquer.
-
As the iridescent paints are acrylic based you need to use them with other acrylic products i.e. acrylic sealer and gloss.
-
When you put the iridescent colours onto a palette they all look the same (white) so you need to ensure you know which is which if you have more than one colour on a palette.
-
They can be applied with a brush, a sponge or with your fingertips.

-
They need to be applied fairly quickly as they will start to go off quite quickly, but you can soften them again with water which acts as a thinners for them.
-
Mark applied purple to the underneath of a bowl, using his fingertips and holding the work in his hand; you don’t need to apply it on the lathe.
-
These colours are dry enough to coat in an hour.
-
You won’t see the full effect until you have applied a gloss, because the gloss gives it the light to bounce back from.
-
Once you have finished the colouring you need to seal it with acrylic sealer which you should de-nib once it is dry.
-
Finally apply 2-3 coats of acrylic gloss and burnish.
-
Metallic colours don’t need a dark background
-
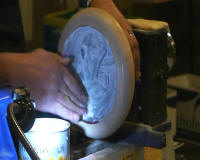
Mark coloured a bowl that had been coated in liquid paper – you apply the liquid paper to the timber with a palette knife then leave it overnight to dry – this gives a textured effect to the timber. He applied pearlescent colours, dabbing them on with a sponge brush.
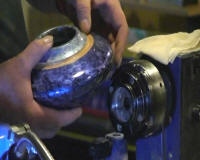
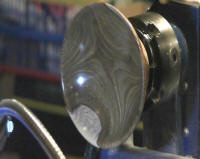
Mark mounted a bowl on the lathe and, with the lathe running, he applied a variety of colours, one on top of the other, to the inside of the bowl, using safety cloth. He started at the centre of the bowl and dragged the colour to the edge. Then he applied small areas of colour to give a layered effect. Once he was happy with the colour he limed it, using liming wax.
-
Liming wax should be applied with the lathe turned off, otherwise it goes everywhere.
-
You need to apply an even coat, with a safety cloth, then use a thin oil on kitchen paper to wipe off the excess wax.
-
To seal it apply a coat of citrus oil with a safety cloth, taking care not to press too hard as this will pull the wax out of the wood.
-
If you don’t want the colours to go pastel, you should seal the work before applying the liming wax.

-
Liming wax can be coloured by adding spirit stains to it but it Mark suggests you only colour enough for the project you are working on.
-
When buying a tin of paste wax, store it upside down for a while so that any solvents that may have sunk to the bottom can fall back through again.
-
Gilt cream should be applied on top of ebonising lacquer
-
Work needs to be sealed before applying gilt cream to stop the cream
 seeping into the ebonising lacquer.
-
To get the best effect it should be used on open grained wood so that it will stay in the grain.
-
Apply a small amount of the cream to your work, using a safety cloth, and try to get a nice even coat, then let it dry and wipe off the excess using thin oil on kitchen paper.
-
Once you have finished the colouring, it must be sealed. Mark uses sanding sealer, but explained that you must not use shellac sanding sealer for work you have coloured.
-
Sanding sealer should be applied using an aerosol because if you try to do it from a tin you will pull the colours, unless you are very experienced as it acts as a thinner for colours.
-
Sanding sealer can be applied on or off the lathe but he suggests you don’t have the lathe running.
-
Cellulose sanding sealer is a universal sealer and you can put whatever you like on top of it.
-
Many people thin cellulose sanding sealer 50/50 he advises not doing this, he uses it neat and would never thin more than 20%. If you do want to thin it use a ‘virgin’ thinner that doesn’t have a water content. Inferior thinners will cause a bloom on your work caused by the water in it. With neat sealer you only need a single coat.
-
Acrylic sanding sealer is similar to cellulose sealer and will take most finishes but melamine doesn’t work well with it, that is best used with cellulose sealer.
-
Once you have sealed the work you can apply any topcoat you like to this but you must de-nib (lightly sand) it first using fine grade (grey) Webrax, to remove any dust and to form a key for your next coat, then wipe with a tack cloth.
-
You only need to de-nib between coats of finish if they have been allowed to dry, unless you have picked up dust on it.
-
Always de-nib after sealing.
-
Build up three or four coats of gloss finish then apply burnishing cream, which is a mild abrasive, with the lathe running at high speed and not pressing too hard, just follow the contour of the work, working it until you see your finish come back (it dulls the finish when first applied) then buff it with a clean cloth.
As for colouring, Mark suggests you sand to 600 grit, finish with the three grades of Webrax then buff the wood with the white Webrax pad.
-
The main types of oil used in woodturning are ‘Wood Finishing Oil, ‘Danish Oil’ and ‘Tung Oil’.
-
Wood Finishing Oil will always keep the wood’s natural patina whereas Danish Oil will darken the wood.
-
Danish Oil is a slightly heavier oil but it is good for bland woods such as holly as it will bring a bit of character to them.
-
When applying oil don’t rush it, get the first coat on then wipe of any excess after about five minutes. It is important that you wipe of the excess because if you don’t you will get heavy spots and when it’s finished you will see patches in your work.
-
Depending on room temperature, after about 4 or 5 hours give it a light de-nib and put a second coat on, then wipe off any excess and leave it for a good 24 hours before de-nibbing and adding a third coat.
-
If you put a coat of oil on top of one that isn’t fully dry it will never dry out and you will always see fingerprints in it because the damp oil has got nowhere to dry to.
-
You mustn’t rush an oil finish, if you do you will spoil your work.
-
Don’t try drying it artificially because all that will happen is it will skin over but still remain damp underneath.
-
Mark suggests you should never seal wood when using oil as you want the oil to soak into the wood.
-
All manufacturers oils can self combust if you leave a screwed up cloth containing the oil in your workshop. To prevent this happening you should leave the cloth opened out on a flat surface until it is dry, or put it in water or seal it in a screw top jar.
-
A lot of people have problems using Friction Polish.
 Mark says it should be applied with the lathe running
and you should apply a little and often, rather than too much at
once.
Mark says it should be applied with the lathe running
and you should apply a little and often, rather than too much at
once. -
Take care not to press too hard.
-
Shellac sanding sealer is a fantastic sealer but you are limited to what you can put on top of it
-
It should be your sealer of choice if you want to put friction polish or wax over it.
-
You cannot put melamine or acrylic on top of shellac sanding sealer.
-
There are three main types of waxes used on wood – stick wax, paste wax and liquid wax.
-
Liquid wax tends to be used by cabinet makers rather than turners.
-
There are two types of stick waxes – blended stick and carnuba stick.
-
Carnuba wax gives a hard, durable finish and will give a greater lustre to your work.
-
Take care when applying carnuba not to press too hard as it is a very hard wax and could scratch your work.
-
Don’t apply too much as it could cause rings to form. Buff with a safety cloth, watching for any rings which you should buff out. Leave the work to cool for a while otherwise you could put finger prints on it.
-
With Paste wax it’s down to personal preference whether you seal the wood before applying it, if you don’t seal it the wax will feed into the wood.
-
With paste wax you tend to go for a warm finish rather than a high gloss.
-
Mark uses a grey Webrax with paste wax on it for the final sanding of a piece of work. This gives a silky finish which can be built up to whatever gloss level you want by buffing.
-
‘Food safe’ should not be confused with ‘toy safe’. Although, logically, you would expect something to be food safe if it is safe for a child to suck, this is not the case.
-
If the manufacturer states something is food safe then that is OK.
-
‘Tung Oil’, ‘Food Safe Oil’ and ‘Chestnut’s Food Safe Finish’ (liquid paraffin) are food safe but, generally speaking, ‘Danish Oil’ and ‘Finishing Oil’ are not. However, Rustins have got food safe approval for their Danish and Wood Finishing oil. So if it says food safe on the tin then that is fine.
-
Beware when using cooking oils, whilst olive oil is food safe, it goes rancid and Walnut is not food safe for people with nut allergies.
-
Waxes do not have food safe approval as they are not manufactured under the correct chemical conditions.
-
Food safe products will not give a high gloss finish, with the exception of ‘Tung Oil’ which you can buff.
-
Don’t shake melamine lacquer, just invert it as shaking causes it to foam up and can give the effect of orange peel. If you do shake it by mistake then leave for a few hours to settle. However, do give it a good shake after you have finished using it.
-
If an item is going to be handled a lot, such as key fobs or light pulls, the best finish is cellulose sanding sealer and melamine lacquer. Melamine lacquer has got very good heat and water resistance.
-
Melamine lacquer takes 10 to 14 days to fully cure, so leave it for a couple of weeks before handling it too much.
-
Melamine doesn’t need de-nibbing between coats if you put the coats on fairly quickly, however if you leave a while between coats then you should de-nib.
-
Mark suggests that to save having to sand acrylic down to a very fine grade (e.g. 5,000 grit and beyond), you should sand to 320
 grit then put some oil (any type will do
– Mark used citrus oil) on the 320 grit and re-sand it, then work
through to 500 grit with oil on the abrasive.
grit then put some oil (any type will do
– Mark used citrus oil) on the 320 grit and re-sand it, then work
through to 500 grit with oil on the abrasive. -
Mark finishes acrylics with a product he has developed himself, called BGF (Bloody Good Finish). The first part is a water based cutting compound and the second a high build protective wax.
This was an excellent demonstration which gave a lot of very useful information. I just wish I’d been there to see it “live”.
Lorrie Flannery
SWC club member