

- Alan Truman
- Albert Harrison
- Ambrose O'Halloran
- Andrew Hall
- Bob Chapman
- Bob Neill
- Clive Brooks
- Colin Fishwick
- David Lowe
- David Springett
- Gary Rance
- George Bell
- Gerry Marlow
- Ian Clarkson
- Joe Laird
- Joey Richardson
- John Berkeley
- Ken Allen
- Les Thorne
- Margaret Garrard
- Mark & Lisa Raby
- Mark Baker
- Mark Hancock
- Martin Pidgen
- Mick Hanbury
- Nick Agar
- Nick Arnull
- Nikos Siragas
- Paul Jones
- Phil Irons
- Philip Greenwood
- Peter Berry
- Peter Wood
- Richard Findlay
- Robin Wood
- Russell Kebble
- Sarah Thirlwell
- Simon Hope
- Simon Whitehead
- Steve Wright
- Stuart King
- Sue Harker
- SWC Club Members
- Tony Wilson
- Tracy Owen
- Walt Claxton
- Walt Claxton & Tom Allison
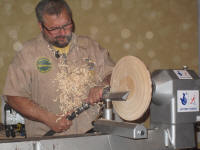
Mick Hanbury 9 June 2011
You always know when Mick comes along he will
turn a project that is
![]() artistic and intricate. Today was no
exception; he turned a shallow bowl that had a lot of decoration on
both the underneath and the top. Unless otherwise stated, all the
tools Mick used this evening are from
Simon Hope.
artistic and intricate. Today was no
exception; he turned a shallow bowl that had a lot of decoration on
both the underneath and the top. Unless otherwise stated, all the
tools Mick used this evening are from
Simon Hope.
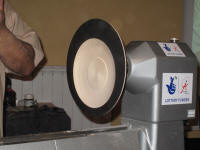
He mounted a sycamore blank measuring 12” by 2”
onto the lathe
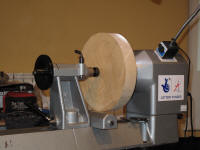 using a screw chuck and held it steady with the
tailstock. He turned this down to a diameter of 11¾ to fit into a
jiglater in the demonstration, then trued up the face and
using a screw chuck and held it steady with the
tailstock. He turned this down to a diameter of 11¾ to fit into a
jiglater in the demonstration, then trued up the face and
 moved the
tailstock away. He marked a point on the edge 35mm from the top
surface, which was where he planned to turn the top of the bowl to,
then marked a spigot. He turned the underneath to a smooth curve
from the foot to close to the pencil line then turned the foot with
a 3mm recess to mount it onto expanding jaws. To finish turning this
side he used a short handled bowl gouge to make a shearing cut,
working from the middle to the edge, then he used a Tracy Owen
scraper to make another shearing cut. (See photos MH11_01 to 03).
moved the
tailstock away. He marked a point on the edge 35mm from the top
surface, which was where he planned to turn the top of the bowl to,
then marked a spigot. He turned the underneath to a smooth curve
from the foot to close to the pencil line then turned the foot with
a 3mm recess to mount it onto expanding jaws. To finish turning this
side he used a short handled bowl gouge to make a shearing cut,
working from the middle to the edge, then he used a Tracy Owen
scraper to make another shearing cut. (See photos MH11_01 to 03).
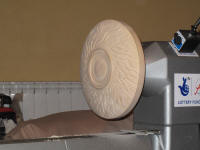
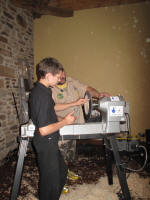
To decorate this side he first coated the
surface with a compound
 which fills the pores and keeps the dust to
a minimum when sanding. This compound is made from liquid paraffin
or Chestnut food safe oil and beeswax – first he melts the beeswax
on the stove then adds the paraffin/oil and heats it in the
microwave for three minutes on ‘high’. As it cools it sets to a
paste. Once he had sanded the work he used an arbortech to carve a
freehand design all across the curved surface. To do this he locked
the lathe head and gradually worked his way round. Once this was
done he ran a piece of sandpaper over it to take of any sharp edges,
followed by a piece of paper to remove the dust. (See photos MH11_04
to 06).
which fills the pores and keeps the dust to
a minimum when sanding. This compound is made from liquid paraffin
or Chestnut food safe oil and beeswax – first he melts the beeswax
on the stove then adds the paraffin/oil and heats it in the
microwave for three minutes on ‘high’. As it cools it sets to a
paste. Once he had sanded the work he used an arbortech to carve a
freehand design all across the curved surface. To do this he locked
the lathe head and gradually worked his way round. Once this was
done he ran a piece of sandpaper over it to take of any sharp edges,
followed by a piece of paper to remove the dust. (See photos MH11_04
to 06).
 Mick used a diffuser to apply a selection of
dyes chosen by the audience, to the surface. He started with purple
at the centre then worked towards the edge with royal blue; he
applied yellow to random areas to blend the blue and purple then
finished with white on the outside edge, taking care not to get any
on the middle. Next he tidied the foot – he dovetailed the inner
edge, turned a bead on the outer edge of the foot and textured the
inner surfaces. Then, using a sponge brush, he painted black acrylic
paint, from WH Smith, over the coloured surface but didn’t take it
all the way to the middle. (See photos MH11_07 to 11).
Mick used a diffuser to apply a selection of
dyes chosen by the audience, to the surface. He started with purple
at the centre then worked towards the edge with royal blue; he
applied yellow to random areas to blend the blue and purple then
finished with white on the outside edge, taking care not to get any
on the middle. Next he tidied the foot – he dovetailed the inner
edge, turned a bead on the outer edge of the foot and textured the
inner surfaces. Then, using a sponge brush, he painted black acrylic
paint, from WH Smith, over the coloured surface but didn’t take it
all the way to the middle. (See photos MH11_07 to 11).
Mick mounted the foot onto expanding jaws to
turn the
 inside of the bowl. First he faced it off then turned a
slight curve from the middle to the edge, taking it to the line he
drew earlier, this gave a lovely thin rim; then he made a shearing
cut using a small bowl gouge which he pushed from the middle to the
edge. As before, he coated it with compound then sanded it, only
going to 240 grit as he was going to paint it. Mick suggests
painting before you turn the middle away if you don’t want to get
any paint in the bowl area. (See photos MH11_12 and 13).
inside of the bowl. First he faced it off then turned a
slight curve from the middle to the edge, taking it to the line he
drew earlier, this gave a lovely thin rim; then he made a shearing
cut using a small bowl gouge which he pushed from the middle to the
edge. As before, he coated it with compound then sanded it, only
going to 240 grit as he was going to paint it. Mick suggests
painting before you turn the middle away if you don’t want to get
any paint in the bowl area. (See photos MH11_12 and 13).
 After applying a coat of black paint to the
surface using a sponge brush, Mick mounted it into a set of cole
jaws. He mounted it an inch off centre, with a counter weight on the
edge to balance it up, then started the lathe at a very slow speed
and gradually turned it up until the lathe started to vibrate. He
turned a shallow bowl, working to the depth of the hole he had
drilled for the screw chuck then he finished by turning a raised
surface in the middle which he textured with a spiralling tool and
sanded the area between the rim and the textured area in the middle.
(See photos MH11_14 to 19).
After applying a coat of black paint to the
surface using a sponge brush, Mick mounted it into a set of cole
jaws. He mounted it an inch off centre, with a counter weight on the
edge to balance it up, then started the lathe at a very slow speed
and gradually turned it up until the lathe started to vibrate. He
turned a shallow bowl, working to the depth of the hole he had
drilled for the screw chuck then he finished by turning a raised
surface in the middle which he textured with a spiralling tool and
sanded the area between the rim and the textured area in the middle.
(See photos MH11_14 to 19).
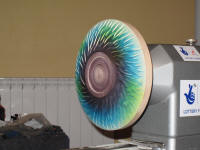
To finish decorating the rim Mick remounted it
in the expanding jaws and
 sanded the outer edge to give a crisp,
white finish. He cleaned the painted area with Webrax and a shoe
brush then started to decorate it with iridescent paints in violet
and blue to match the colours on the back. He applied them together
with the
sanded the outer edge to give a crisp,
white finish. He cleaned the painted area with Webrax and a shoe
brush then started to decorate it with iridescent paints in violet
and blue to match the colours on the back. He applied them together
with the
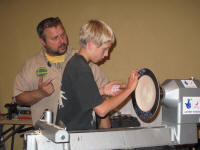 tip of his finger, applying them in random, swirly patterns
then, after he had done a small area, he invited David and Dominic,
two of our junior members, to do some colouring. Once the decoration
was finished he ran the lathe at 500rpm to make the paints drift and
move slightly and to dry it out. The colours Mick used need to be
applied to a dark background and if you don’t want to apply them
with your finger you can use an artists rounded paintbrush. (See
photos MH11_20 to 23).
tip of his finger, applying them in random, swirly patterns
then, after he had done a small area, he invited David and Dominic,
two of our junior members, to do some colouring. Once the decoration
was finished he ran the lathe at 500rpm to make the paints drift and
move slightly and to dry it out. The colours Mick used need to be
applied to a dark background and if you don’t want to apply them
with your finger you can use an artists rounded paintbrush. (See
photos MH11_20 to 23).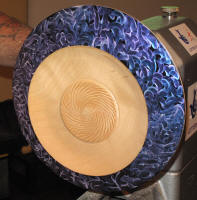
Once it was dry Mick sprayed it with several coats of clear lacquer, turning the lathe by hand as he applied it and running it slowly between coats to dry it. The action of applying the lacquer caused the black to appear darker and brought out the colours. To finish it he gave the inside of the bowl a light rub with Webrax then applied a coat of the compound he used earlier, but this time he used it to polish the work and he buffed it with a cloth. (See photo MH11_24).
The finished bowl looked beautiful and the techniques Mick used are suitable for woodturners of all abilities. I think the swirls of paint on a black background are beautiful and can be used to make an ordinary bowl look very expensive.
Lorrie Flannery
SWC club member