

- Alan Truman
- Albert Harrison
- Ambrose O'Halloran
- Andrew Hall
- Bob Chapman
- Bob Neill
- Clive Brooks
- Colin Fishwick
- David Lowe
- David Springett
- Gary Rance
- George Bell
- Gerry Marlow
- Ian Clarkson
- Joe Laird
- Joey Richardson
- John Berkeley
- Ken Allen
- Les Thorne
- Margaret Garrard
- Mark & Lisa Raby
- Mark Baker
- Mark Hancock
- Martin Pidgen
- Mick Hanbury
- Nick Agar
- Nick Arnull
- Nikos Siragas
- Paul Jones
- Phil Irons
- Philip Greenwood
- Peter Berry
- Peter Wood
- Richard Findlay
- Robin Wood
- Russell Kebble
- Sarah Thirlwell
- Simon Hope
- Simon Whitehead
- Steve Wright
- Stuart King
- Sue Harker
- SWC Club Members
- Tony Wilson
- Tracy Owen
- Walt Claxton
- Walt Claxton & Tom Allison
Nick Agar 10 February 2011
This is the first time Nick has been to our club and, as he lives
in Devon, very
![]() few of us have had the opportunity to see him demonstrate
before. He obviously has an excellent reputation as 76 people came along
to see him, which is a record attendance at one of our evening demos.
The main part of this evening’s demonstration wasn’t about turning a
project from start to finish, but concentrated on decorating techniques
which can turn an ordinary item into a work of art.
few of us have had the opportunity to see him demonstrate
before. He obviously has an excellent reputation as 76 people came along
to see him, which is a record attendance at one of our evening demos.
The main part of this evening’s demonstration wasn’t about turning a
project from start to finish, but concentrated on decorating techniques
which can turn an ordinary item into a work of art.
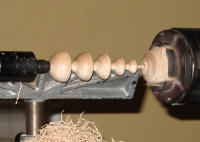
1. Charred and Coloured Bowl in Burr Elm
Nick started the evening by mounting a piece of burr elm that he
had already turned to a cone shape; holding it on the lathe with a screw
chuck and keeping it in place with the tailstock. First he trued it
up with a long grind bowl gouge, using a pull cut, then he used a standard
grind bowl gouge to refine the shape, working from the middle to the
edge. He had rounded the heel of the gouge, to stop it from bruising
the wood, he said this can be a particular problem when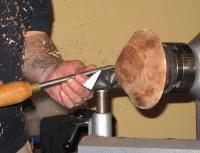 turning cherry.
Once the shape was refined he attacked it with a gouge, digging in and
getting catches, to make it look as if a beginner had been let loose
on it; this was to create a random pattern to work with. (See photos
NAg_01 & 02).
turning cherry.
Once the shape was refined he attacked it with a gouge, digging in and
getting catches, to make it look as if a beginner had been let loose
on it; this was to create a random pattern to work with. (See photos
NAg_01 & 02).
With the headstock locked he carved some lines in the bowl, using
an angle grinder, then he unlocked it and carved some curves. He then
deepened these grooves using a Proxxon mini grinder, mounted with a
carving disk. To help reduce the amount of dust he was making he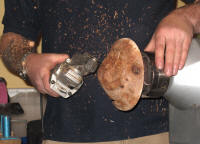 sprayed
the work with water, taking care to keep the water away from any electrical
areas. Finally he turned a foot and explained that he tends to make
the foot slightly oversized as the charring process will burn some of
it away. (See photo NAg_03).
sprayed
the work with water, taking care to keep the water away from any electrical
areas. Finally he turned a foot and explained that he tends to make
the foot slightly oversized as the charring process will burn some of
it away. (See photo NAg_03).
The next stage of the project would be to burn the work with a blowtorch and Nick would normally do this out of doors. So, as the weather was horrible and we didn’t want to set the fire alarms off, he mounted a fresh piece on the lathe that he had burnt earlier. With the lathe switched off he sprayed the piece with water, taking care not to splash any electrical areas, and brushed it with a natural bristle brush, working in the direction of the pattern, to remove any loose carbon. He then turned the lathe on and continued brushing, to burnish the work. He removed more of the carbon using a webrax scratchpad disc mounted on a drill then he pushed the bristle brush hard against the timber, with the lathe running, to heat it up before spraying it with ebonising lacquer.
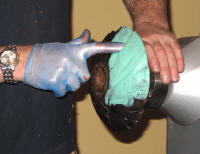 Now on to the colouring. First, wearing a vinyl glove to protect
his skin, Nick used his finger tips to rub some metallic copper craft
paint into the surface, slowly turning the lathe by hand as he worked
round the bowl. He buffed it with a cloth to remove the high spots then
applied some verdigris wax, again applying it with his finger tips and
rubbing the high spots off with a cloth. He brushed this into the pattern
with a toothbrush then applied a coat of ‘Goldfinger’ copper to the
surface with his fingertips to bring out the effect of the burr. (See
photos NAg_04 to 08).
Now on to the colouring. First, wearing a vinyl glove to protect
his skin, Nick used his finger tips to rub some metallic copper craft
paint into the surface, slowly turning the lathe by hand as he worked
round the bowl. He buffed it with a cloth to remove the high spots then
applied some verdigris wax, again applying it with his finger tips and
rubbing the high spots off with a cloth. He brushed this into the pattern
with a toothbrush then applied a coat of ‘Goldfinger’ copper to the
surface with his fingertips to bring out the effect of the burr. (See
photos NAg_04 to 08).
2. Christmas Decoration
For his second project Nick made and coloured a Christmas decoration
which looks equally effective whichever way up you hang it. He mounted
a piece of sycamore measuring approx. 2” square by 6” long in the jaws
and held it in place with a ring centre which had the point knocked
out, mounted in the tailstock. Using a spindle gouge with a swept back
grind he turned it to a cylinder then took some planing cuts with a
skew chisel to get a smooth finish.
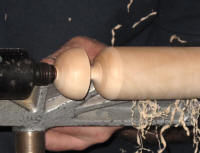 He rounded over the end with the
skew chisel, leaving a short piece right at the end which he turned
very thin, to fit inside the ring centre, taking care not to turn it
away by mistake. He turned a cove next to the rounded end then another
bead the other side of that. (See photos NAg_09 to 11).
He rounded over the end with the
skew chisel, leaving a short piece right at the end which he turned
very thin, to fit inside the ring centre, taking care not to turn it
away by mistake. He turned a cove next to the rounded end then another
bead the other side of that. (See photos NAg_09 to 11).
He continued making beads and coves as above, making each one slightly
smaller than its predecessor. Once he had turned his fifth bead/cove
he sanded the work, folding his piece of sandpaper into
 three so he
could curve it into the coves without getting a sharp edge, then moved
on to colouring. With the lathe slowed right down he applied spirit
based colour from a bottle with a diffuser on the top which he blew
through. He used red on the beads and green in the coves, then rubbed
a little ‘Goldfinger’ into the edges. To finish he applied wax to the
coloured surfaces, using a shard of stick wax, then buffed it with a
piece of kitchen paper. Finally, with the lathe speeded up again, he
turned a long point at the end which he painted red then turned it off
with the skew chisel. (See photos NAg_12 to 17).
three so he
could curve it into the coves without getting a sharp edge, then moved
on to colouring. With the lathe slowed right down he applied spirit
based colour from a bottle with a diffuser on the top which he blew
through. He used red on the beads and green in the coves, then rubbed
a little ‘Goldfinger’ into the edges. To finish he applied wax to the
coloured surfaces, using a shard of stick wax, then buffed it with a
piece of kitchen paper. Finally, with the lathe speeded up again, he
turned a long point at the end which he painted red then turned it off
with the skew chisel. (See photos NAg_12 to 17).
3. Bowl with Patchwork Quilt Decoration
Nick had already turned the outside of the bowl for this part of
the demonstration and had carved some geometric lines in it, using a
grinder with a cut off disk mounted on it. He mounted this on a screw
chuck then started to decorate the individual areas defined by the geometric
lines. (See photo NAg_18).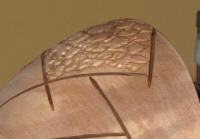
For the first section he used a reciprocating carver which he had attached to a Dremel drill which was hanging from the top of an old projector stand. This was to keep it out of the way and also to ensure the cable was kept reasonably straight and wasn’t curled up around the lathe (This setup can be seen in photo NAg_14). He had a nail in the carver and had wrapped the handle of it with some spongy covering to protect his hand from the vibration. He drew a random pattern which gave the appearance of bubble wrap. (See photos NAg_19 and 20).
In another section he made a pattern that had a ‘hammered’ appearance, then coloured this with a black spirit stain, which he applied with a brush. He applied some copper ‘Goldfinger’ on top of that which gave it an appearance of hammered copper. (See photo NAg_21).
He used a pyrography pen to draw ‘stitches’ on the geometric lines and to decorate another area with a cross-hatch pattern which looked a bit like a cobweb, going over the lines several times to ensure they were deep enough. Using a brush, he applied a blue iridescent stain to some of the blocks in this section. In another area he pyrographed dots then coloured the area with black ‘Gesso’ paint which he applied with a finger. (See photos NAg_22 and 23).
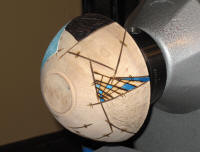 For the final section he used a couple of metal stamps which he hammered
into the wood, these were the letters S and W (for Sheffield Woodturning).
He applied a spirit stain to this section then he masked off the edges
and applied liming wax to it with his finger tips. He then wiped off
the excess with a cloth and brushed it into the indentations with a
toothbrush. (See photos 24 and 25).
For the final section he used a couple of metal stamps which he hammered
into the wood, these were the letters S and W (for Sheffield Woodturning).
He applied a spirit stain to this section then he masked off the edges
and applied liming wax to it with his finger tips. He then wiped off
the excess with a cloth and brushed it into the indentations with a
toothbrush. (See photos 24 and 25).
Nick is an excellent demonstrator with a quick and ready wit. The three projects he did today were very artistic but, at the same time, could be achieved by anyone who is artistic and who wants to have a go. A very enjoyable evening, thank you Nick.
Lorrie Flannery
SWC club member