

- Alan Truman
- Albert Harrison
- Ambrose O'Halloran
- Andrew Hall
- Bob Chapman
- Bob Neill
- Clive Brooks
- Colin Fishwick
- David Lowe
- David Springett
- Gary Rance
- George Bell
- Gerry Marlow
- Ian Clarkson
- Joe Laird
- Joey Richardson
- John Berkeley
- Ken Allen
- Les Thorne
- Margaret Garrard
- Mark & Lisa Raby
- Mark Baker
- Mark Hancock
- Martin Pidgen
- Mick Hanbury
- Nick Agar
- Nick Arnull
- Nikos Siragas
- Paul Jones
- Phil Irons
- Philip Greenwood
- Peter Berry
- Peter Wood
- Richard Findlay
- Robin Wood
- Russell Kebble
- Sarah Thirlwell
- Simon Hope
- Simon Whitehead
- Steve Wright
- Stuart King
- Sue Harker
- SWC Club Members
- Tony Wilson
- Tracy Owen
- Walt Claxton
- Walt Claxton & Tom Allison
Nikos Siragas 15 December 2011
Nikos and his wife, Frances, made a welcome
return to our club to give us another
![]() fascinating insight into the
techniques he uses to make his sculptural and very artistic work. He
turned three projects this evening – a bowl with a lip and indents
in the top, a genie goblet with a spiralling stem and a ring stand.
Because of the amount of time and effort he puts into finishing his
work Nikos didn’t take any of these projects to completion.
fascinating insight into the
techniques he uses to make his sculptural and very artistic work. He
turned three projects this evening – a bowl with a lip and indents
in the top, a genie goblet with a spiralling stem and a ring stand.
Because of the amount of time and effort he puts into finishing his
work Nikos didn’t take any of these projects to completion.
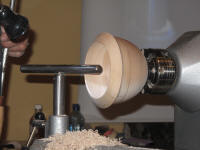
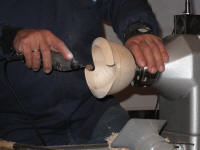
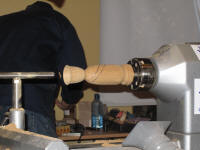
1. Bowl with a lip and indents in the top
Nikos mounted a block of sycamore measuring
approx 6” square by 4” thick 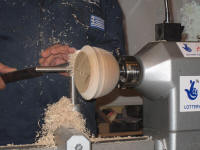 between centres. Using a bowl gouge he
turned the outside to a gentle curve which curved in again at the
top. He used a skew chisel to turn the foot then turned it round on
the lathe and mounted the foot in the chuck. He then refined the
shape of the outside, giving more definition to the lip at the top.
(See photos NS11_01 to 04).
between centres. Using a bowl gouge he
turned the outside to a gentle curve which curved in again at the
top. He used a skew chisel to turn the foot then turned it round on
the lathe and mounted the foot in the chuck. He then refined the
shape of the outside, giving more definition to the lip at the top.
(See photos NS11_01 to 04).
Next he turned his attention to the inside.
After facing off the top
 surface he drew a line round the outside, approx 1” below the lip then he drew another line right across the
top, taking it through the centre point and extending it on each
side down to the line on the outside . He hollowed the inside,
following the shape of the outside curve and taking out the bulk of
the timber as he worked. He used a scraper to refine the shape,
making it thin towards the top and thicker as he went further into
the bowl. To get rid of some tear out in the wood he ran the lathe
in reverse and cut in the opposite direction to normal. Once he was
happy with the shape he sanded the inside. (See photos NS11_05 to
07).
surface he drew a line round the outside, approx 1” below the lip then he drew another line right across the
top, taking it through the centre point and extending it on each
side down to the line on the outside . He hollowed the inside,
following the shape of the outside curve and taking out the bulk of
the timber as he worked. He used a scraper to refine the shape,
making it thin towards the top and thicker as he went further into
the bowl. To get rid of some tear out in the wood he ran the lathe
in reverse and cut in the opposite direction to normal. Once he was
happy with the shape he sanded the inside. (See photos NS11_05 to
07).
To carve the pattern on the lip Nikos used a
Proxxon to cut through the line he had drawn on one side then made
another, shallow cut a little way along from this. He gradually cut
away the timber between the two cuts, shaping the timber to a curve.
The first cut was taken right down to the line he
the line he had drawn on one side then made
another, shallow cut a little way along from this. He gradually cut
away the timber between the two cuts, shaping the timber to a curve.
The first cut was taken right down to the line he
 had drawn round
the outside then he cut a slope from this up to the second cut. He
repeated this on the other side then used a micro plane to refine
the shape – he used a flat one for the larger areas and a round one
to go into the curves. After rounding off the sharp edges he sanded
all the carved areas with a small sanding disk mounted in the
Proxxon for the large areas and a sanding disk in a Dremel to work
into the curves. Nikos suggested that to decorate this further you
could draw a line close to the edge on the flat part of the curved
rim, taking the line all round the shape, then burn a pattern onto
it with a pyrography pen or a hot nail. (See photos NS11_08 to 15).
had drawn round
the outside then he cut a slope from this up to the second cut. He
repeated this on the other side then used a micro plane to refine
the shape – he used a flat one for the larger areas and a round one
to go into the curves. After rounding off the sharp edges he sanded
all the carved areas with a small sanding disk mounted in the
Proxxon for the large areas and a sanding disk in a Dremel to work
into the curves. Nikos suggested that to decorate this further you
could draw a line close to the edge on the flat part of the curved
rim, taking the line all round the shape, then burn a pattern onto
it with a pyrography pen or a hot nail. (See photos NS11_08 to 15).
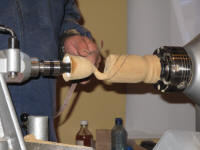
2. Genie Goblet
Nikos mounted a piece of iroko measuring
approx. 1½” square by 8”
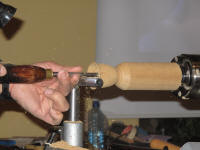 long between centres, turned it to a
cylinder, cut a spigot on one end and mounted it in the chuck. First
he turned the outside shape of the cup part of the goblet and turned
away some of the timber below it using a round skew chisel. Then he
used a spindle gouge to hollow it, first ‘drilling’ down the length
then turning away the remainder and curving over the upper lip.
Using a scraper he tidied up the torn grain then used a spindle
gouge to finish the shape on the outside. Before moving onto the
next step he sanded the cup. (See photos NS11_16 and 17).
long between centres, turned it to a
cylinder, cut a spigot on one end and mounted it in the chuck. First
he turned the outside shape of the cup part of the goblet and turned
away some of the timber below it using a round skew chisel. Then he
used a spindle gouge to hollow it, first ‘drilling’ down the length
then turning away the remainder and curving over the upper lip.
Using a scraper he tidied up the torn grain then used a spindle
gouge to finish the shape on the outside. Before moving onto the
next step he sanded the cup. (See photos NS11_16 and 17).
 Before starting to shape the stem Nikos used a
parting tool to turn away some of the bulk of the timber just above
where the foot would be. To mark the shape of the curved stem he
used a pencil,
Before starting to shape the stem Nikos used a
parting tool to turn away some of the bulk of the timber just above
where the foot would be. To mark the shape of the curved stem he
used a pencil,
 working freehand, to draw two parallel lines
spiralling round the stem from top to bottom. He filled the cup with
paper and brought the tailstock into this to support the work on the
lathe. Then, using the Proxxon, he cut away the excess timber on the
top part of the stem, first cutting along the lines, then cutting
grooves into it and breaking away the excess
working freehand, to draw two parallel lines
spiralling round the stem from top to bottom. He filled the cup with
paper and brought the tailstock into this to support the work on the
lathe. Then, using the Proxxon, he cut away the excess timber on the
top part of the stem, first cutting along the lines, then cutting
grooves into it and breaking away the excess
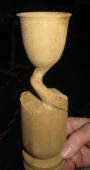 timber. Once he had got
the rough shape he used a rasp to refine it by turning the lathe by
hand and keeping the rasp moving until he had a smooth, flowing
shape. To sand it he used Velcro backed sandpaper attached to a
stick to work into the curves and long thin strips of cloth
sandpaper which he wrapped around the stem. He wasn’t able to finish
the stem due to time constraints but before removing it from the
lathe he showed how to part off the finished goblet. (See photos
NS11_18 to 21).
timber. Once he had got
the rough shape he used a rasp to refine it by turning the lathe by
hand and keeping the rasp moving until he had a smooth, flowing
shape. To sand it he used Velcro backed sandpaper attached to a
stick to work into the curves and long thin strips of cloth
sandpaper which he wrapped around the stem. He wasn’t able to finish
the stem due to time constraints but before removing it from the
lathe he showed how to part off the finished goblet. (See photos
NS11_18 to 21).
Nikos says this project needs to be turned from close grained woods such as sycamore, oak or laburnum; but not yew. It is best turned from branch wood that has close rings.
3. Ring Stand
For this project Nikos mounted a piece of
sycamore measuring approx 1¼” square by 4”
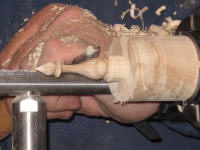 long between steb
centres. He turned this to a cylinder and mounted it in the jaws. To
centre it he had the lathe running at a very low speed and touched
it very lightly with a pencil. He then stopped the lathe and tapped
the pencil mark with a chisel until it was straight.
long between steb
centres. He turned this to a cylinder and mounted it in the jaws. To
centre it he had the lathe running at a very low speed and touched
it very lightly with a pencil. He then stopped the lathe and tapped
the pencil mark with a chisel until it was straight.
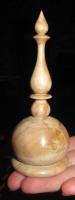 Using a spindle gouge he turned the end to a
cone then used a round skew chisel to turn a teardrop shape on the
end. Gradually he worked along the wood, turning a small ‘disk’
behind the teardrop and shaping the next area with the round skew
chisel. He turned another disk behind this, this time using a small
scraper, then turned a small ball behind it. For the base he turned
a large ball with a bead under it, which he turned with a parting
tool. (See photos NS11_22 to 28).
Using a spindle gouge he turned the end to a
cone then used a round skew chisel to turn a teardrop shape on the
end. Gradually he worked along the wood, turning a small ‘disk’
behind the teardrop and shaping the next area with the round skew
chisel. He turned another disk behind this, this time using a small
scraper, then turned a small ball behind it. For the base he turned
a large ball with a bead under it, which he turned with a parting
tool. (See photos NS11_22 to 28).
He sanded it, supporting it with his fingers when sanding the area near the top, then applied 2-3 coats of sanding sealer. He applied this with a brush, with the lathe turned off and rubbed it in with kitchen paper with the lathe running. When finished he parted it off under the bead, making it slightly concave. Nikos said he usually uses either carnuba wax or Briwax to finish his ring stands.
These were three very interesting projects which, with the right tools and a lot of patience, could be turned at home by many of our members. Thank you Nikos and Frances for another very enjoyable evening.
Lorrie Flannery
SWC club member