

- Alan Truman
- Albert Harrison
- Ambrose O'Halloran
- Andrew Hall
- Bob Chapman
- Bob Neill
- Clive Brooks
- Colin Fishwick
- David Lowe
- David Springett
- Gary Rance
- George Bell
- Gerry Marlow
- Ian Clarkson
- Joe Laird
- Joey Richardson
- John Berkeley
- Ken Allen
- Les Thorne
- Margaret Garrard
- Mark & Lisa Raby
- Mark Baker
- Mark Hancock
- Martin Pidgen
- Mick Hanbury
- Nick Agar
- Nick Arnull
- Nikos Siragas
- Paul Jones
- Phil Irons
- Philip Greenwood
- Peter Berry
- Peter Wood
- Richard Findlay
- Robin Wood
- Russell Kebble
- Sarah Thirlwell
- Simon Hope
- Simon Whitehead
- Steve Wright
- Stuart King
- Sue Harker
- SWC Club Members
- Tony Wilson
- Tracy Owen
- Walt Claxton
- Walt Claxton & Tom Allison
Tony Wilson 24 March 2011
Tony was given a warm welcome on his return to our club after an
absence
![]() of more than two years – I can’t believe it’s that long since
he turned the clover leaf bowl. This evening he turned four projects
for us, none of which he sanded or finished because the idea was to
show how to turn the projects rather than spend time on the finer points.
of more than two years – I can’t believe it’s that long since
he turned the clover leaf bowl. This evening he turned four projects
for us, none of which he sanded or finished because the idea was to
show how to turn the projects rather than spend time on the finer points.
1. Part Turned Bowl From Wet Sycamore
Tony started with a 15” piece of a rippled sycamore log which still
had the bark covered waney edges on it and a small area of bark inclusion.
To mount it on the lathe he drilled a ¼” rebate on the inner surface,
using a 2¼” forstner bit then mounted this in the chuck. With the lathe
running at 350 rpm he started turning away the outside of the bowl,
using a ½” bowl gouge, gradually increasing the speed as the vibration
reduced. Once he had turned away some of the excess timber he turned
the tool round and turned the bottom, working from the outside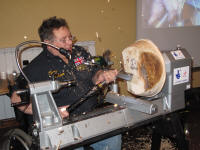 towards
the middle. He turned a chucking point, with a dovetail and made sure
the area around this was very flat, to ensure a good fit in the chuck,
then he turned a smooth and very even curve, to finish the outside.
(See photos TW11_01, 02 and 03).
towards
the middle. He turned a chucking point, with a dovetail and made sure
the area around this was very flat, to ensure a good fit in the chuck,
then he turned a smooth and very even curve, to finish the outside.
(See photos TW11_01, 02 and 03).
To turn the inside Tony mounted it in the chuck, using the foot he
had turned on the base, then he tightened it and tightened it again
to squeeze out any excess water. He emphasised the importance of making
sure wet wood is held very tightly in the chuck otherwise it could work
its way lose. He reduced the lathe speed to 270 rpm before turning it
on and, starting at the outside edge, he carefully turned the surface
with a ½” bowl gouge, letting the tool move in and out with the peaks
and troughs on the surface, until he had got it flat. Then
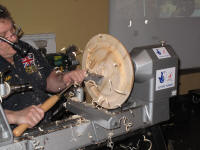 he turned
the lathe up to 400 rpm and took some shearing cuts across the surface
to get rid of any tear out. He used a ¼” bowl gouge to cut a groove approx 1” in from the edge then took 2-3 cuts from the edge to this
groove, to form a rim. After refining the inner edge of the rim he went
back to the ½” bowl gouge and started hollowing out, cutting backwards
and forwards. As he got further into it he left a bulk of timber in
the middle for strength and gradually turned this away as he went along.
Finally he turned a chucking point in the middle so he can re-turn the
outside at a later date. (See photos TW11_04, 05 and 06).
he turned
the lathe up to 400 rpm and took some shearing cuts across the surface
to get rid of any tear out. He used a ¼” bowl gouge to cut a groove approx 1” in from the edge then took 2-3 cuts from the edge to this
groove, to form a rim. After refining the inner edge of the rim he went
back to the ½” bowl gouge and started hollowing out, cutting backwards
and forwards. As he got further into it he left a bulk of timber in
the middle for strength and gradually turned this away as he went along.
Finally he turned a chucking point in the middle so he can re-turn the
outside at a later date. (See photos TW11_04, 05 and 06).
The tree this piece came from was cut down in October/November 2010 and Tony will probably finish turning the bowl in August. He said that when he got it home he would wax the inside of the rim to a depth of approx. ½” and the outside of the rim to approx. 1” to 1½” . This will be enough to seal the end grain which is all you need to do as that is where it will split if not sealed.
2. Ash Bread Board
Tony started by explaining that ash is an excellent wood for turning bread boards, but is not suitable for meat chopping boards as it is very open grained. He recommends sycamore or beech for these.
He mounted a disk of ash measuring approx 1½” thick by 12” diameter
between centres, using 1¼” steb centres. With the lathe running at 390
rpm and using a ½” bowl gouge he worked slowly from the edge, towards
the centre, to face it off. He turned a 2” spigot in the middle then
tidied up the tear out on one side by taking shearing cuts, pressing
the tool hard onto the tool rest, but only lightly onto the wood. He
turned the first couple of inches slightly deeper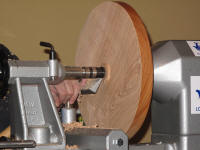 than the rest to give
a smaller surface for the board to stand on then finished this side
by rounding the edge. (See photos TW11_07 and 08).
than the rest to give
a smaller surface for the board to stand on then finished this side
by rounding the edge. (See photos TW11_07 and 08).
After turning the work round on the lathe Tony used the tool rest to ensure it was square in the chuck by moving it to the headstock side of the wood, setting it close to the work and checking the gap. He arranged it so it just touched the tool rest on one side then gave a hard tap to the opposite side to straighten it up. He did this a couple of times until it was running true.
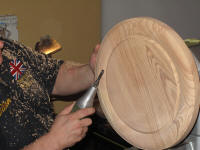 Using a ½” bowl gouge he trued up the surface then used a ¼” bowl
gouge to tidy up the edge. He turned a curved rim approx. 2” to 2½”
wide with a tiny indent on the edge to give it a nice sharp finish.
He turned a small groove then turned the inner surface flat. He finish
it off by carving a pattern of an ear of corn on the two side grain
edges of the rim, using an electric carving tool. (See photos TW11_09
and 10).
Using a ½” bowl gouge he trued up the surface then used a ¼” bowl
gouge to tidy up the edge. He turned a curved rim approx. 2” to 2½”
wide with a tiny indent on the edge to give it a nice sharp finish.
He turned a small groove then turned the inner surface flat. He finish
it off by carving a pattern of an ear of corn on the two side grain
edges of the rim, using an electric carving tool. (See photos TW11_09
and 10).
To finish the underneath Tony mounts a piece of timber coated with fabric in the jaws, then holds the work against it and moves the live centre into the steb centre mark made earlier. Finally he finishes it with food safe oil.
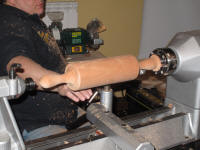
3. One Piece Rolling Pin
Tony turned this from a piece of American cherry measuring 4” square
by 18” long. He mounted it between steb centres and set the tool rest
on the centre line then, using a 1” roughing gouge, he turned it to
a cylinder, gradually turning the lathe speed up until it was running
at 1,000 rpm. (See photo TW11_11).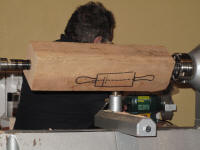
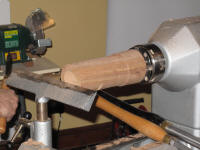
Next he marked out the shape – a 4¼” handle on each end, leaving a 9½” working area. He turned a chucking point at the tailstock end then used a parting tool to cut a groove where each of the handles starts. He turned away the bulk of the timber for the handles with the roughing gouge then cut the central part down to the desired diameter – as cherry is not a very heavy wood he made it slightly thicker than he would for some heavier timbers. Using a ½” bowl gouge he rounded off the ends then he used a 1” bowl gouge to shape the first handle. He got one of the ladies in the audience to check the handle for size; she said it was too thick for her so he turned it smaller until she said the size was right. (See photos TW11_12 and 13).
 Next he turned it round on the lathe, mounting the chucking point
in the jaws and holding it lightly in place with a live centre. He used
a beading/parting tool to finish the inner end of the first handle then
took a finishing cut with the roughing gouge. He turned the second handle
to match the first. At this point he removed it from the lathe and explained
that to finish it he mounts it with a steb centre in the chuck and a
live centre in the tailstock and holds it so it is only just under compression
and the teeth of the steb centre don’t mark the handle, then he finishes
turning the end of the first handle. He finishes his rolling pins with
food safe oil. (See photo TW11_14).
Next he turned it round on the lathe, mounting the chucking point
in the jaws and holding it lightly in place with a live centre. He used
a beading/parting tool to finish the inner end of the first handle then
took a finishing cut with the roughing gouge. He turned the second handle
to match the first. At this point he removed it from the lathe and explained
that to finish it he mounts it with a steb centre in the chuck and a
live centre in the tailstock and holds it so it is only just under compression
and the teeth of the steb centre don’t mark the handle, then he finishes
turning the end of the first handle. He finishes his rolling pins with
food safe oil. (See photo TW11_14).
4. Money Box
For this project Tony used a cylinder of burr elm approx. 4” diameter
and 10” long which had a slot cut out of it using a mortise chisel.
He mounted it between centres, trued it up with a roughing gouge then
marked a piece at the tailstock end for the top, approx. 1½” long, a
piece for the base 2½” long which left a piece 6” long for the main
body of the money box.
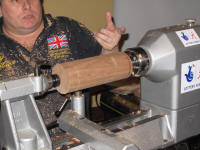 He turned a chucking point on the tailstock end
(the top) then parted it off and cut another chucking point on the piece
that was left. He took it off the lathe then re-mounted it using the
chucking point he had just cut. (See photo TW11_15).
He turned a chucking point on the tailstock end
(the top) then parted it off and cut another chucking point on the piece
that was left. He took it off the lathe then re-mounted it using the
chucking point he had just cut. (See photo TW11_15).
The next step was to cut a hole down the middle to take the money. For this he mounted a 1?” forstner bit in a Jacob’s chuck, in the tailstock and slowly started to hollow it out. However, the drill was binding in the timber so he squared up the end and tried again but still the drill was getting very hot so he stopped and gave a master class in how to sharpen a forstner bit. Eventually he decided to drill a pilot hole with a thin drill, then expanded it with a thicker twist drill, drilling 1” at a time then clearing the swarfe. He finished it with his newly sharpened forstner bit, drilling the hole to a depth that came close to the mark he had made where the base would be. (See photo TW11_16).
 Using a 1” bowl gouge Tony turned the main body to shape, making
the base ?” thicker than the main body. Then he turned a ¼” recess inside
the top, to fit the lid. If he was going to finish this off he would
sand it and part it off then re-mount it on the lathe with the jaws
expanded into the hole he had drilled inside, then tidy the underneath.
(See photo TW11_17).
Using a 1” bowl gouge Tony turned the main body to shape, making
the base ?” thicker than the main body. Then he turned a ¼” recess inside
the top, to fit the lid. If he was going to finish this off he would
sand it and part it off then re-mount it on the lathe with the jaws
expanded into the hole he had drilled inside, then tidy the underneath.
(See photo TW11_17).
Finally he mounted the top in the jaws and turned a recess to fit inside the top of the main body, then another little recess on the edge. He used a small spindle gouge to turn some of the weight out of the middle then slightly tapered the recess to make it easier to put the lid on and off. He turned it round on the chuck then used a bowl gouge to shape the top and a ¼” bowl gouge to cut a small bead where it fits on the body, defining it with a little recess, cut with a parting tool. (See photo TW11_18).Tony’s Tip: To dry wood you should keep it out of the sun and make sure you don’t cover it up completely. You need to leave room for air to circulate round it to help it dry.
Oh, and by the way, if you want to know how to sharpen a forstner bit you will have to ask one of the members who was at the demo!
You are always guaranteed to have a good evening when Tony comes to the club and today was no exception. There was plenty of his usual witty banter and his projects were excellent as always.
Lorrie Flannery
SWC club member