

- Alan Truman
- Albert Harrison
- Ambrose O'Halloran
- Andrew Hall
- Bob Chapman
- Bob Neill
- Clive Brooks
- Colin Fishwick
- David Lowe
- David Springett
- Gary Rance
- George Bell
- Gerry Marlow
- Ian Clarkson
- Joe Laird
- Joey Richardson
- John Berkeley
- Ken Allen
- Les Thorne
- Margaret Garrard
- Mark & Lisa Raby
- Mark Baker
- Mark Hancock
- Martin Pidgen
- Mick Hanbury
- Nick Agar
- Nick Arnull
- Nikos Siragas
- Paul Jones
- Phil Irons
- Philip Greenwood
- Peter Berry
- Peter Wood
- Richard Findlay
- Robin Wood
- Russell Kebble
- Sarah Thirlwell
- Simon Hope
- Simon Whitehead
- Steve Wright
- Stuart King
- Sue Harker
- SWC Club Members
- Tony Wilson
- Tracy Owen
- Walt Claxton
- Walt Claxton & Tom Allison
Andrew Hall 12 April 2012
The theme for this evening was ‘utility ware’
and, before starting the turning, Andrew showed us a porringer he
uses every morning for his breakfast cereal. He had also brought
along a selection of utility bowls and goblets he and his wife use,
together with a rolling pin.
![]()
1. Porringer
After showing us a selection of porringers of
different sizes, including some very small ones for whisky tasting,
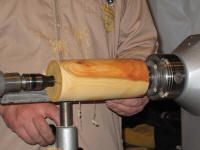
Andrew mounted a section of half a cherry log onto the lathe. It had
been harvested 3-4 months ago and had a diameter of approx. 200mm.
He drilled a hole in the flat surface then mounted it on a screw
chuck and brought the tailstock up to the work to steady it.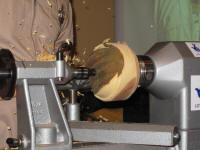 With
the lathe running at 500rpm he used a ½” bowl gouge with a long
swept back grind to true up the edge, then he turned the speed up to
650rpm and started to shape the base and turn away the bark. (See
photos AH12_01 to 03).
With
the lathe running at 500rpm he used a ½” bowl gouge with a long
swept back grind to true up the edge, then he turned the speed up to
650rpm and started to shape the base and turn away the bark. (See
photos AH12_01 to 03).
Once he was happy that it was stable Andrew
removed the tailstock and turned a spigot on the bottom. He
continued turning the base, getting a nice curved shape and used the
edge of the tool to remove some tear out. Using a bowl gouge with a
conventional grind he refined the shape and, whilst doing this, he
discovered a hairline crack near the top of the bowl
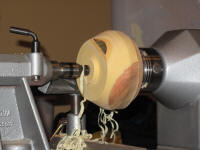 which he was
afraid might go all the way through. So he turned it round on the
lathe and faced off the top in an attempt to lose the crack.
Eventually, after turning about an inch from the top and some more
from the outside the crack was gone and Andrew was able to
concentrate on finishing the bowl. (See photos AH12_04 to 06).
which he was
afraid might go all the way through. So he turned it round on the
lathe and faced off the top in an attempt to lose the crack.
Eventually, after turning about an inch from the top and some more
from the outside the crack was gone and Andrew was able to
concentrate on finishing the bowl. (See photos AH12_04 to 06).
Next Andrew turned away some timber from the
underneath of the bowl, leaving a wide lip at the top, then he
turned away some of the bulk of the timber from the inside and
finished the top of the lip.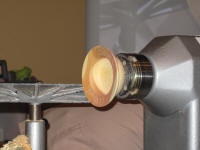 He continued to hollow it out,
finishing the inside with a scraper, then refined the cut on the
outside. (See photos AH12_07 to 09).
He continued to hollow it out,
finishing the inside with a scraper, then refined the cut on the
outside. (See photos AH12_07 to 09).
To finish the underneath Andrew turned it round on the lathe, opening the jaws of the chuck into the inside. He hadn’t done the jaws up too tightly so he was careful how he turned it. Finally, to make the handles, he took it off the lathe and marked the shape on the lip with a pencil then used a Proxxon jig saw to cut away the unwanted material. (See photos AH12_10 and 11).
2. Small Bowl for Olives or Nuts
Andrew mounted the other half of the cherry log
on the lathe using a screw chuck on the flat side and held it in
place with the tailstock. He tidied the edge then turned a curve on
the underneath using the swept back bowl gouge and tidied it with
the traditional grind bowl gouge.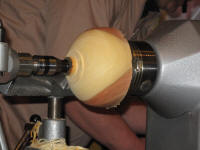 He removed the tailstock, turned a
chucking point then turned it round on the lathe and mounted it in
the jaws. He hollowed out the inside with the swept back bowl gouge,
leaving the wall quite thick, and finished it with the traditional
grind gouge. (See photos AH12_12 and 13).
He removed the tailstock, turned a
chucking point then turned it round on the lathe and mounted it in
the jaws. He hollowed out the inside with the swept back bowl gouge,
leaving the wall quite thick, and finished it with the traditional
grind gouge. (See photos AH12_12 and 13).
To finish the underneath he mounted in the chuck a piece of sponge which he had covered in some towelling and stuck to a piece of wood. He pushed the bowl onto this and held it tightly in place then turned away the foot, leaving the bottom flat. Finally he used a pull saw to cut the remaining pip off the bottom. (See photo AH12_14).
3. Drinking Goblet with Lid
For this project Andrew had a cherry log
measuring approx. 8” long by 5” diameter. He marked the centre on
each end and used steb centres to mount it on the lathe. With the
lathe running at 620 rpm he used a roughing gouge to turn it down to
a cylinder and remove the bark.
 He also demonstrated how to do this
with a bowl gouge which had a long, swept back grind. Next he used a
10 mm beading parting tool to turn a tenon at each end then used a
pull saw to cut the pip off each end and mounted it on the chuck.
(See photos AH12_15 and 16).
He also demonstrated how to do this
with a bowl gouge which had a long, swept back grind. Next he used a
10 mm beading parting tool to turn a tenon at each end then used a
pull saw to cut the pip off each end and mounted it on the chuck.
(See photos AH12_15 and 16).
Andrew used a goblet, which he had cut in half
down the middle, to mark out the pattern then used an Ashley Iles
beading tool to turn a group of three beads then left a space and
turned another group of two beads.
 He parted off the tailstock end,
making it deep enough to turn into a lid, then trued up the end with
a bowl gouge and marked the centre with a parting tool. Using a ⅜”
bowl gouge he turned the section between the two sets of beads and
the section at the top edge into big beads. (See photos AH12_17 to
19).
He parted off the tailstock end,
making it deep enough to turn into a lid, then trued up the end with
a bowl gouge and marked the centre with a parting tool. Using a ⅜”
bowl gouge he turned the section between the two sets of beads and
the section at the top edge into big beads. (See photos AH12_17 to
19).
To hollow the inside he started with a Black &
Decker bullet drill bit mounted in a Jacob’s chuck which he used to
drill down the middle to the required depth, then he hollowed it
with his swept back bowl gouge, taking care to ensure he got an even
wall thickness. To finish the inside he used an Ashley Iles closed
cup hollowing tool. When he was happy with the inside he turned his
attention to the base. He turned another large bead below the small
beads then curved this inwards below it to form the stem. He turned
a further small bead in the stem then a curved foot below this. He
cut it off the lathe with a sharp parting tool, undercutting it
slightly, then drilled a 12 mm stress hole into the centre of the
underneath to prevent it from cracking as it dries. (See photos
AH12_20 to 22).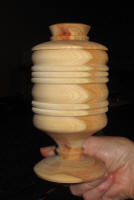
To make the lid he mounted the piece he cut had off the top in the chuck, turned a lip to fit inside the goblet and decorated the inside of this with a gouge and a beading tool. To turn the top he mounted it on the chuck with the jaws gripping on the inside of the lip, then turned it to a hat shape. (See photos AH12_23 and 24).
There was a small piece of timber left after he had finished the goblet and he turned this into a finger rest. He often makes these from left over pieces of timber and sells them to nail salons.
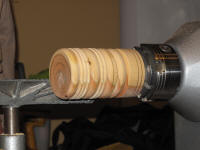
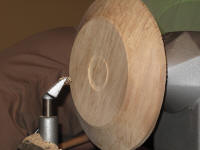
4. Bread ‘basket’
Andrew mounted a disk of sycamore measuring
approx 12” to 14” diameter by 2½” to 3” thick on a screw chuck and
supported it with the tailstock. With the lathe running at 550 rpm
he turned away the sharp edges and a lot of the bulk of the timber.
 He then turned a flat base with a straight side at a 50 degree angle
to the base and another ¼” wide straight piece at the top. He used a
regular bowl gouge to tidy up the bottom, slightly undercutting it,
then used a parting tool to create an inset chucking point with a
dovetail edge in the base and turn off the waste timber. With a
traditional bowl gouge he tidied the area inside the chucking point.
(See photos AH12_25 to 28).
He then turned a flat base with a straight side at a 50 degree angle
to the base and another ¼” wide straight piece at the top. He used a
regular bowl gouge to tidy up the bottom, slightly undercutting it,
then used a parting tool to create an inset chucking point with a
dovetail edge in the base and turn off the waste timber. With a
traditional bowl gouge he tidied the area inside the chucking point.
(See photos AH12_25 to 28).
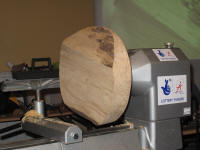
To turn the inside he mounted it on the jaws and supported it with a revolving step centre in the tailstock. After truing up the rim Andrew started turning away the bulk of the wood from the middle, creating a nice gentle curve from the rim to the middle. (See photos AH12_29 to 32).
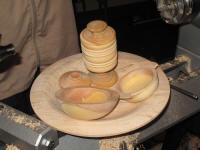 All the pieces turned this evening are suitable
for everyday use around the home and Andrew doesn’t use any finish
on them. One important point he made was that you shouldn’t turn
beads or grooves in pieces you are going to serve food in as they
can harbour germs. Photo AH12_33 shows all the pieces Andrew turned,
including the finger rest.
All the pieces turned this evening are suitable
for everyday use around the home and Andrew doesn’t use any finish
on them. One important point he made was that you shouldn’t turn
beads or grooves in pieces you are going to serve food in as they
can harbour germs. Photo AH12_33 shows all the pieces Andrew turned,
including the finger rest.
Lorrie Flannery
SWC club member