

- Alan Truman
- Albert Harrison
- Ambrose O'Halloran
- Andrew Hall
- Bob Chapman
- Bob Neill
- Clive Brooks
- Colin Fishwick
- David Lowe
- David Springett
- Gary Rance
- George Bell
- Gerry Marlow
- Ian Clarkson
- Joe Laird
- Joey Richardson
- John Berkeley
- Ken Allen
- Les Thorne
- Margaret Garrard
- Mark & Lisa Raby
- Mark Baker
- Mark Hancock
- Martin Pidgen
- Mick Hanbury
- Nick Agar
- Nick Arnull
- Nikos Siragas
- Paul Jones
- Phil Irons
- Philip Greenwood
- Peter Berry
- Peter Wood
- Richard Findlay
- Robin Wood
- Russell Kebble
- Sarah Thirlwell
- Simon Hope
- Simon Whitehead
- Steve Wright
- Stuart King
- Sue Harker
- SWC Club Members
- Tony Wilson
- Tracy Owen
- Walt Claxton
- Walt Claxton & Tom Allison
Les Thorne 18 August 2012
I enjoy seeing Les demonstrate because he is an
enthusiastic
![]() demonstrator who always seems to turn interesting
projects. Consequently I was really looking forward to his day with
us at SWC and I am pleased to say I was not disappointed. He turned
three very different and equally interesting projects. Les doesn’t
like wearing a mask when he demonstrates so he used ash for all
three of his projects, because he says it doesn’t affect him the way
other woods do.
demonstrator who always seems to turn interesting
projects. Consequently I was really looking forward to his day with
us at SWC and I am pleased to say I was not disappointed. He turned
three very different and equally interesting projects. Les doesn’t
like wearing a mask when he demonstrates so he used ash for all
three of his projects, because he says it doesn’t affect him the way
other woods do.
1. Curve Topped Box
Les used a piece of ash measuring approx. 6” x
2½” which he mounted between
centres, using a steb centre at both ends. He turned it to a
cylinder using a spindle roughing gouge then turned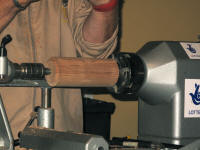 a chucking point
at each end using a ⅜” round skew chisel. In deciding where to make
the split between the lid and the base, he said you need to take
into consideration any knots and splits in the timber as you don’t
want a knot where the join is and, if there are any splits, it’s
worth considering whether you can turn them away. (See photo
LT12_01).
a chucking point
at each end using a ⅜” round skew chisel. In deciding where to make
the split between the lid and the base, he said you need to take
into consideration any knots and splits in the timber as you don’t
want a knot where the join is and, if there are any splits, it’s
worth considering whether you can turn them away. (See photo
LT12_01).
He mounted it in the chuck using one of the spigots and held it in place with the tailstock whilst he trued up the other spigot, making it parallel with the other end. He had decided that the lid, which on this box is longer than the base, would be at the headstock end. He used his skew chisel to mark the point where the lid joins the box, then cut in to the depth he wanted the wall thickness to be. Les explained that the thickness of the wall depends on the wood you are turning it from, for example, boxwood will make a much thinner box than ash. The spigot had to be parallel so he made very fine feathery cuts, holding the tool locked tightly into his side to stop it slipping – “the finer the cut, the firmer you should hold the tool”. Next he parted it off with a thin parting tool, leaving the male part on the lid, but also leaving a small piece on the base to use as a witness mark when he hollowed it. The reason he made the lid into the male fit was because he was going to turn the outside to a curve which could cut into the lip.
Next he turned his attention to hollowing the lid. With the tool rest centred over the middle of the lathe bed, to get the most rigid support, he used a spindle gouge, working from the middle outwards. He started with the flute at 10 o’clock and gradually closed it through 9.30 to 9 o’clock as he came out to the edge. He explained that this is scraping rather than cutting and suggested that beginners should only hollow to a depth of 28mm and to an egg cup shape as “the next 10mm is the hardest part”. He finished with some light cuts to remove any torn grain then went on to demonstrate various hollowing tools:
-
Sorby teardrop scraper.
-
French curve scraper with a negative rake on it i.e. the angle pointing downwards, which makes it less grabby. He says this is a good tool for a beginner.
-
a ¼” gouge, using a bevel rubbing cut and working against the grain i.e. from the outside inwards. This gave the best finish on this wood and burnished as it cut. (See photos LT12_02 & 03).
 Les sanded inside, holding the sandpaper with
one finger so he would have less chance of having an accident with
his fingers. He sprayed lacquer on the inside then, to speed up the
process, he buffed it with wood wax, applied with Webrax. He applied
2-3 coats of the wax then buffed it with a cloth.
Les sanded inside, holding the sandpaper with
one finger so he would have less chance of having an accident with
his fingers. He sprayed lacquer on the inside then, to speed up the
process, he buffed it with wood wax, applied with Webrax. He applied
2-3 coats of the wax then buffed it with a cloth.
To turn the base Les mounted it in the chuck
and started hollowing it as before. He deliberately made a pip in
the bottom by pushing in as he started. He did this so he could
demonstrate how to get rid of a pip. He ‘drilled’ a hole into the
pip then pivoted round without pushing the tool into the wood, so
that he didn’t create another pip. Again, he turned it to an egg cup
- ’U’ shape,
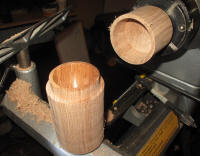 but this time he needed to make the sides straighter to
fit the lid. To do this he made pretend cuts at the bottom, with the
tool not quite touching the wood, then he picked up the cut as he
came up the side. When he was near to the diameter he needed he used
a ‘rollover top’ skew, then a round skew, to cut down into the side,
then blended this into the bottom, holding the tool very firmly. He
stopped slightly short of the witness mark then started fitting the
lid, aiming for a tight fit. When he had finished turning inside the
base the sides were straight with a slight curve in the bottom. (See
photos LT12_04 to 06).
but this time he needed to make the sides straighter to
fit the lid. To do this he made pretend cuts at the bottom, with the
tool not quite touching the wood, then he picked up the cut as he
came up the side. When he was near to the diameter he needed he used
a ‘rollover top’ skew, then a round skew, to cut down into the side,
then blended this into the bottom, holding the tool very firmly. He
stopped slightly short of the witness mark then started fitting the
lid, aiming for a tight fit. When he had finished turning inside the
base the sides were straight with a slight curve in the bottom. (See
photos LT12_04 to 06).
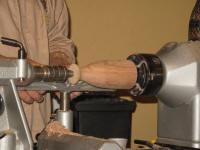
To turn the outside of the lid he fitted it
onto the base, matching up the grain, then used the tailstock to
hold it in place, using light pressure. He started the lathe slowly
so he could make sure it was lined up correctly, then he used a
spindle gouge to cut a cove towards the tailstock end then, working
from the join towards the curve, he turned a milk bottle shape.
Using a small
 spindle roughing gouge he carefully turned a slight
curve across the joint then continued to refine the curve in the
lid. (See photo LT12_07).
spindle roughing gouge he carefully turned a slight
curve across the joint then continued to refine the curve in the
lid. (See photo LT12_07).
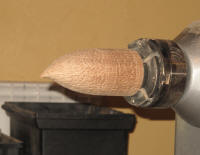
The rest of the work on the outside of the box
was done with the lathe switched off. He moved the tailstock away
then started carving the top using a microplane and only pushed the
plane, as pulling it could close up the holes in it. This was
obviously going to be a long process so he changed to a Proxxon
angle grinder and gradually carved away one side then the other,
blending the edges, until he had eventually turned it to a point. To
do this he held the tool in one hand and kept moving the chuck with
the other hand. He finished the inside of the curve with a
microplane then sanded it, using 120grit on a foam block. To sand
the rest of the box he had the lathe running at 350rpm and held a
strip of abrasive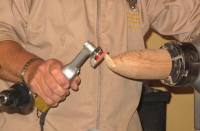 lightly against it. (See photos LT12_08 & 09).
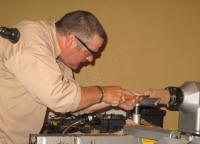
With the shape of the box complete Les turned his attention to decorating it. First he defined the areas where the pattern was to be – he used the tip of a skew chisel to turn a small ‘V’ groove approx 2mm either side of the join between the lid and the base then another one approx. 2mm from the bottom of the box. He used a Proxxon (a dremel type tool would also work), fitted with the ball cutter from a ‘Decorating Elf’ (made by Henry Taylor Tools and available from the Toolpost). Again, with the lathe switched off, he rested his hand on the tool rest, holding the tool in a pencil grip and, in his words, “brought the wood to the tool”, by turning the lathe by hand and moving the tool in a scribbling motion. Starting at the point, he gradually worked along the lid to the ‘V’ groove he cut earlier. He then did the same on the bottom of the box, working between the two ‘V’ grooves. He said it is easier to work on the bottom of the box from the other side of the lathe, if possible, as this will mean there is less danger of skipping. Once the carving was finished he needed to remove the fluffy, raised grain; to do this he used a coarse, 3M rotary sanding brush in a drill and worked all over the surface, again turning the lathe by hand and working from both sides of the lathe.
 When he turned the bottom of the box he made it
fractionally bigger than the top. Now, to finish the turning part of
this project, he turned a very narrow, shallow groove in the top of
the base. The purpose of this was to draw attention away from the
grain match. (See photos LT12_10 & 11).
When he turned the bottom of the box he made it
fractionally bigger than the top. Now, to finish the turning part of
this project, he turned a very narrow, shallow groove in the top of
the base. The purpose of this was to draw attention away from the
grain match. (See photos LT12_10 & 11).
The final stage of this part of the project was
to colour it. First he cleaned up the pattern with a brush, but he
said ideally he would use a compressed air blower for this. Before
applying the colour he placed a board on the lathe to protect it,
then he applied a couple of light, dusting coats of Chestnut
ebonising lacquer, allowing 5 minutes drying time between coats.
Once it was dry he started sanding it to take off the high spots. He
did this with the lathe switched off, rotating it by hand, only
working on the carved areas and not going any finer than 240 grit as
he said you shouldn’t sand it too finely. He then did some light
sanding with the lathe running. He said you could leave it at this
stage, but the colour of the wood will almost certainly change, so
he applied some spirit stains. He keeps these in small, plastic
spray bottles which he says are available from hairdressing
wholesalers. He doesn’t spray the colours straight onto the wood; he
sprays them onto a cloth and then ‘splodges’ it on. First he used
orange, then some green, then bright blue, followed by red. He
worked each successive colour into the areas not previously coloured
then finished with yellow and explained that “yellow is the clever
colour” because it brings all the other colours together and merges
them. Consequently he applied this all over the carved surface with
a cloth, taking care to avoid getting it on the black bands. (See
photos LT12_12 & 13)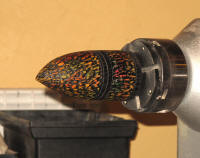
At this stage Les said that this box will tend to collect dust, which will make it look very tired. So to prevent this happening he sealed it, thus making it possible to wipe it with a damp cloth. He sprayed acrylic sanding sealer all over the piece then gave it a light rub back with Webrax. Before taking it off the lathe he removed the lid and lightly sanded inside the top part of the base, using 240 grit, until he got the fit he wanted for the lid, then he sanded it with 320 grit and burnished it with the back of the sandpaper.
In order to finish turning the underneath of
the box he first made a jam chuck. He turned this from a 4” piece of
pine which he first turned to a cylinder then he turned an oversized
spigot on
 the end – this means he can use the same jam chuck over
and over again, just resizing the spigot as required. He mounted
this in the chuck, tapered the end then cut another spigot to fit
the box onto, checking for size at regular intervals until the box
fitted onto it and he was able to push it up tight against the flat
surface so it would stay steady. He turned away the waste timber at
the bottom of the box until there was just a small piece left. He
then took a number of small cuts to work this last bit away. He said
to get the best finish on the bottom you should use either all pull
cuts or all push cuts, but not a mix of both. After sanding it he
used a skew chisel to turn three grooves in the bottom then sprayed
with acrylic gloss lacquer. (See photos LT12_14 to 18).
the end – this means he can use the same jam chuck over
and over again, just resizing the spigot as required. He mounted
this in the chuck, tapered the end then cut another spigot to fit
the box onto, checking for size at regular intervals until the box
fitted onto it and he was able to push it up tight against the flat
surface so it would stay steady. He turned away the waste timber at
the bottom of the box until there was just a small piece left. He
then took a number of small cuts to work this last bit away. He said
to get the best finish on the bottom you should use either all pull
cuts or all push cuts, but not a mix of both. After sanding it he
used a skew chisel to turn three grooves in the bottom then sprayed
with acrylic gloss lacquer. (See photos LT12_14 to 18).
Les kindly donated this box to the club to raise money for our charity. We raffled it at Art in the Gardens and raised £95 for Age UK Sheffield. Thank you Les.
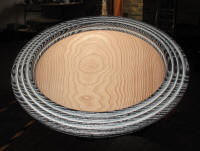
2. Coloured and Textured Bowl
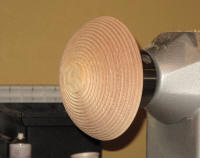
For his second project Les mounted a bowl
blank, measuring approx. 10” x 3”, on the lathe, using a screw
chuck. He used a Robert Sorby long grind, gold bowl gouge, held at
10 o’clock to the wood, to start shaping the underneath and true the
edge. To true the edge he used a bevel rubbing cut, using the tip of
the tool and making the cut slowly rather than pushing it through
the work. To get the bottom flat he first tried a pull cut, then
found a push cut worked better.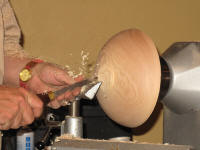 He then demonstrated flattening the
bottom again, but this time using a round skew chisel with a
negative rake. After marking the size of the foot with dividers he
turned a parallel sided spigot and marked the centre with a spindle
gouge so he could reverse chuck it later. For speed Les made a
series of straight line cuts to remove the wood he knew he didn’t
want, then he started refining the shape. First he used a pull cut
but he wasn’t happy with the finish it gave so he used a ¼” bowl
gouge with a standard grind, to do a finishing push cut, working
from the centre to the outer edge. To finish the outside he used a
parting tool to take a small cut off the spigot and turn a small
flat area next to the spigot. (See photos LT12_19 & 20).
He then demonstrated flattening the
bottom again, but this time using a round skew chisel with a
negative rake. After marking the size of the foot with dividers he
turned a parallel sided spigot and marked the centre with a spindle
gouge so he could reverse chuck it later. For speed Les made a
series of straight line cuts to remove the wood he knew he didn’t
want, then he started refining the shape. First he used a pull cut
but he wasn’t happy with the finish it gave so he used a ¼” bowl
gouge with a standard grind, to do a finishing push cut, working
from the centre to the outer edge. To finish the outside he used a
parting tool to take a small cut off the spigot and turn a small
flat area next to the spigot. (See photos LT12_19 & 20).
 Next Les turned his attention to decorating the
outside. He used a small beading tool to turn a series of rings all
the way round the base. He started at the edge of the flat piece by
the spigot and worked his way round to the top. Then he moved the
tool rest round to the top of the bowl and removed the thin slither
of wood that was left after he had turned the last of the rings.
Using a blow torch he burned over the whole of the ring surface,
turning the lathe by hand as he went. Then he used a rotary brush
mounted in a drill and worked all over the burnt surface, this time
with the lathe running. Finally he turned away the carbon he had
burnt on the edge of the spigot. (See photo LT12_21).
Next Les turned his attention to decorating the
outside. He used a small beading tool to turn a series of rings all
the way round the base. He started at the edge of the flat piece by
the spigot and worked his way round to the top. Then he moved the
tool rest round to the top of the bowl and removed the thin slither
of wood that was left after he had turned the last of the rings.
Using a blow torch he burned over the whole of the ring surface,
turning the lathe by hand as he went. Then he used a rotary brush
mounted in a drill and worked all over the burnt surface, this time
with the lathe running. Finally he turned away the carbon he had
burnt on the edge of the spigot. (See photo LT12_21).
He turned it round on the lathe and mounted it in the chuck. The flat area next to the spigot held it tight against the chuck and gave him access to all the beads on the underneath. He turned the outer couple of inches to get it flat, then turned four more rings on this area, but he turned the one on the outer edge with a spindle gouge as he says the beading tool doesn’t work very well on an edge. He tidied these beads with sandpaper, making sure that the outer one was very smooth as that’s the one people will finger. (See photo LT12_22).
 Les started turning the inside of the bowl with
a ¼” bowl gouge then, once the cuts were started, he moved to a
bigger one to remove some of the bulk of the timber. He went back to
the ¼” gouge to undercut the rim, starting by the inner bead, then
cut another bead under the rim and used the edge of his spindle
gouge to round over these two beads. Once the beads were finished he
burned and brushed them as before. He said the best way to burn the
bead under the rim is to use a chef’s blow torch. (See photo
LT12_23).
Les started turning the inside of the bowl with
a ¼” bowl gouge then, once the cuts were started, he moved to a
bigger one to remove some of the bulk of the timber. He went back to
the ¼” gouge to undercut the rim, starting by the inner bead, then
cut another bead under the rim and used the edge of his spindle
gouge to round over these two beads. Once the beads were finished he
burned and brushed them as before. He said the best way to burn the
bead under the rim is to use a chef’s blow torch. (See photo
LT12_23).
Once the beads were finished he turned his
attention to colouring them. First he sprayed all the rings, inside
and out, with ebonising lacquer then ran the lathe slowly to dry it.
Once it was dry he applied a coat of liming wax to the rings,
applying with a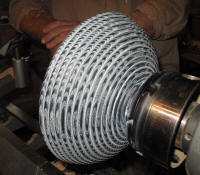 shoe brush and using a tooth brush to get into the
bottom of the grooves. Using another shoe brush he applied a coat of
wood wax then used a cloth, formed into a pad, to take the wax off
again. He said paper towel is not suitable for this as it
disintegrates in the grooves. (See photos LT12_24 & 25).
shoe brush and using a tooth brush to get into the
bottom of the grooves. Using another shoe brush he applied a coat of
wood wax then used a cloth, formed into a pad, to take the wax off
again. He said paper towel is not suitable for this as it
disintegrates in the grooves. (See photos LT12_24 & 25).
To finish the inside he took care to ensure he turned away any stray colour, as ash picks up colour very easily. He used a small, round nosed scraper to turn the area immediately under the inside bead, then he carefully turned the area below that with a ¼” bowl gouge. He finished turning the inside with a bigger, long grind bowl gouge then power sanded it. He started sanding with 120grit, with the sander positioned at 3 o’clock, working back and forth to the middle. He repeated this through the grits, finishing with 400 grit. (See photo LT12_26).
 Finally, Les turned away the chucking point. He
reversed chucked it, putting a piece of paper towel on the inside
then using the tailstock in the hole he had made in the spigot to
hold it in place against a set of rubber jaws. He turned it away
right up to the live centre , making it as small as he could without
it coming of the lathe, using a ⅜” spindle gouge for the last few
cuts. He had made it so small that he was able to snap off the
remaining piece. He used his power sander to sand the foot with the
work off the lathe. (See photos LT12_27 to 29).
Finally, Les turned away the chucking point. He
reversed chucked it, putting a piece of paper towel on the inside
then using the tailstock in the hole he had made in the spigot to
hold it in place against a set of rubber jaws. He turned it away
right up to the live centre , making it as small as he could without
it coming of the lathe, using a ⅜” spindle gouge for the last few
cuts. He had made it so small that he was able to snap off the
remaining piece. He used his power sander to sand the foot with the
work off the lathe. (See photos LT12_27 to 29).
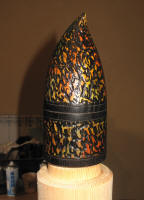
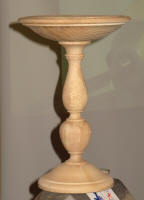
3. Bowl with Baluster Stand
With 45 minutes of demonstration time remaining Les decided to turn this piece very quickly, with a minimum of chat or explanations. He made it in three parts – the base, the stem and the bowl, working from a plan drawing.
First he turned the base from a blank measuring approx. 6” x 2”. It was bigger than he wanted so he reduced the diameter with a long grind bowl gouge, then trued up the bottom. He turned a dovetail recess with a fifteen degree slope then made sure the bottom was absolutely flat. He mounted it on the chuck and held it in place with the live centre then, using a pull cut, he turned it to an ogee shape with a bead on the outer edge. Next he moved the tailstock away and turned a flat area on the top. He drilled a hole in the middle to take the stem, using a forstner bit in a Jacob’s chuck, mounted in the tailstock. Finally he took a finishing cut across the main surface. (See photo LT12_30).
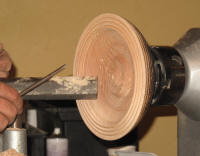
 For the top he mounted a blank measuring
approx. 8” x 1½” onto a screw chuck and turned it to a rough ogee
shape then turned a recessed chucking point. He turned a slightly
undercut flat area to the side of the chucking point with a small
groove on the edge of it. This area was a little smaller than the
diameter of the wood he was going to use for the post. To finish
this side he refined the ogee shape then turned a half bead on the
edge. Next he mounted it on the chuck and trued up the outer area of
the face then continued the bead from the underneath onto the top.
He didn’t finish the inside as he was going to pass it onto a club
member to finish. (See photo LT12_31).
For the top he mounted a blank measuring
approx. 8” x 1½” onto a screw chuck and turned it to a rough ogee
shape then turned a recessed chucking point. He turned a slightly
undercut flat area to the side of the chucking point with a small
groove on the edge of it. This area was a little smaller than the
diameter of the wood he was going to use for the post. To finish
this side he refined the ogee shape then turned a half bead on the
edge. Next he mounted it on the chuck and trued up the outer area of
the face then continued the bead from the underneath onto the top.
He didn’t finish the inside as he was going to pass it onto a club
member to finish. (See photo LT12_31).
Finally he turned his attention to the stem. He
mounted a piece of timber measuring
 approx. 3” x 12” between steb
centres. He turned this to a cylinder then used a pair of Vernier
calipers to measure the spigot for the top, then measured the small
groove at the top and marked this measurement on the stem. He
repeated this at the other end of the stem then turned the two
spigots. To check the fit he took it off the lathe then, when he was
happy with the fit he started shaping the stem. He used spindle
gouge to turn a series of beads and coves, and finished turning the
larger areas with a spindle roughing gouge. He deliberately cut the
bottom spigot too small then demonstrated how you can make it fit,
by cutting three grooves into the spigot which will expand to fit
the width when you press the stem down into the base. The shape for
this project was taken from the book ‘Classic Forms’ by Stuart E Dyas. (See photos LT12_32 &
33).
approx. 3” x 12” between steb
centres. He turned this to a cylinder then used a pair of Vernier
calipers to measure the spigot for the top, then measured the small
groove at the top and marked this measurement on the stem. He
repeated this at the other end of the stem then turned the two
spigots. To check the fit he took it off the lathe then, when he was
happy with the fit he started shaping the stem. He used spindle
gouge to turn a series of beads and coves, and finished turning the
larger areas with a spindle roughing gouge. He deliberately cut the
bottom spigot too small then demonstrated how you can make it fit,
by cutting three grooves into the spigot which will expand to fit
the width when you press the stem down into the base. The shape for
this project was taken from the book ‘Classic Forms’ by Stuart E Dyas. (See photos LT12_32 &
33).
Lorrie Flannery
SWC club member