

- Alan Truman
- Albert Harrison
- Ambrose O'Halloran
- Andrew Hall
- Bob Chapman
- Bob Neill
- Clive Brooks
- Colin Fishwick
- David Lowe
- David Springett
- Gary Rance
- George Bell
- Gerry Marlow
- Ian Clarkson
- Joe Laird
- Joey Richardson
- John Berkeley
- Ken Allen
- Les Thorne
- Margaret Garrard
- Mark & Lisa Raby
- Mark Baker
- Mark Hancock
- Martin Pidgen
- Mick Hanbury
- Nick Agar
- Nick Arnull
- Nikos Siragas
- Paul Jones
- Phil Irons
- Philip Greenwood
- Peter Berry
- Peter Wood
- Richard Findlay
- Robin Wood
- Russell Kebble
- Sarah Thirlwell
- Simon Hope
- Simon Whitehead
- Steve Wright
- Stuart King
- Sue Harker
- SWC Club Members
- Tony Wilson
- Tracy Owen
- Walt Claxton
- Walt Claxton & Tom Allison
Margaret Garrard 26 April 2012
Our regular reporter and photographer were not available for this demonstration, so thank you to Ken Mason and Tom Alison, text and photos, for stepping in and doing a great job.
Margaret turned three projects for us this evening, being a Grass
Vase, a textured finished Salt![]() & Pepper Pots, and finished off with
a brief demonstration on how to use a Ring Tool when hollowing out a
bowl.
& Pepper Pots, and finished off with
a brief demonstration on how to use a Ring Tool when hollowing out a
bowl.
1.Grass Vase
Margaret started by measuring out the dimension onto a piece of cherry
wood, she used a common theme of 1/3 in her measurements to produce
the vase. The overall length was 210mm and used one third of this (70mm)
to find the neck, from the remaining measurement of 140mm, she divided
this by two thirds (93.3mm) to produce the belly of the vase, the remaining
one third being 46.7mm was used to produce the base.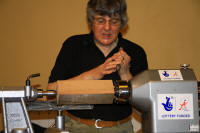
She found the centre at each end and mounted it using the chuck and tail stock centre. Using a 1” roughing gouge she turned the corners off then turned it to a cylinder of 70mm in diameter, gradually increasing the lathe speed as she turned the wood to the correct diameter.
Margaret carefully squared up the end using a swept back spindle
gouge then used a parting tool to mark where she intended to part it
off. Removing the tailstock she turned out a slight hollow at the end
as this would be the top of the vase.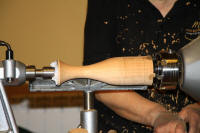 The next operation
was to drill a hole into the hollow (to accommodate the placement of
decorative grasses), the hole was cleaned up by using sandpaper fixed
to a small diameter piece of wood that would allow for ease of movement
inside the hole (sandpaper grit sizes used 120 to 240 grit) Margaret
informed the audience that Cherry wood does not like getting hot as
it “shakes”.
The next operation
was to drill a hole into the hollow (to accommodate the placement of
decorative grasses), the hole was cleaned up by using sandpaper fixed
to a small diameter piece of wood that would allow for ease of movement
inside the hole (sandpaper grit sizes used 120 to 240 grit) Margaret
informed the audience that Cherry wood does not like getting hot as
it “shakes”.
Margaret proceeded to cover the tail stock centre with a piece of paper to act as a support and protection to stop the centre from damaging the hole and vase top.
With the wood secured back between centres Margaret marked out where the neck needed to be turned, she then put a piece of tape on the tool rest to act as a guide for the start and finish points. She then started to cut at the lowest point and moved up to the highest point with the aim to cut one third of the wood (23mm) to produce the lower point of the neck, Margaret worked along the wood between the 2 tape markers on the tool rest using the 1”roughing gouge changing from right to left hand until she reached the size of 23mm, she finished off with a very fine cut using a spindle gouge.
Using a parting tool Margaret made a cut close to the chuck face
this was to prevent the spindle gouge coming into contact with the chuck
as she made a curve at the top of the vase.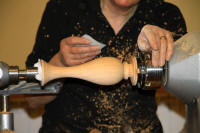
The last stage was to produce the base with a measurement of 46mm, she turned the backend into a ball shape, before producing the base, using a skew she cut the ends in and finished off with a very fine. Sandpaper was used to remove the pencil marks and imperfections leaving a smooth finish, sanding sealer and a very thin layer of renascence wax were applied and last of all a 3/16 parting tool was used to cut the vase from the remaining wood at the chuck end.
2. Textured Salt & Pepper Pot
Margaret used a piece of sycamore for the pepper pot. The wood was place between centres and roughed down to a 50mm diameter with the overall length being 55mm. A dovetail spigot was turned for holding in the chuck.
The cylinder shape was now secured in the chuck, Margaret fitted
Jacobs chuck into the tail stock to hold the cutting/drill tool. A 28mm
hole was bored to a depth of 48mm. Next a 17mm diameter hole was drilled
to a depth of 7mm to accommodat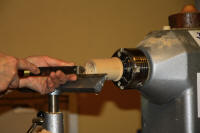 e a rubber grommet (the grommet is used
for sealing the hole when the pepper is put in the pot - diameter size
18mm), next the face was straightened off using a spindle gouge taking
a very fine cut. Using a parting tool Margaret opened up the 28mm hole
to make a recess at the top of the pot of 36mm wide x 3mm deep to take
the shaker lid. Margaret used a curved pair of scissors to hold pieces
of sand paper to smooth out the centre hole.
e a rubber grommet (the grommet is used
for sealing the hole when the pepper is put in the pot - diameter size
18mm), next the face was straightened off using a spindle gouge taking
a very fine cut. Using a parting tool Margaret opened up the 28mm hole
to make a recess at the top of the pot of 36mm wide x 3mm deep to take
the shaker lid. Margaret used a curved pair of scissors to hold pieces
of sand paper to smooth out the centre hole.
Using a small rotary cutter (with 3 cutting edges) Margaret made
a series of small decorative lines in different directions along the
length of the pot.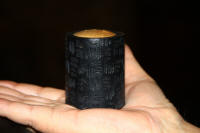
Next Margaret used a small blow torch to remove any pieces of shaving and finished off with a wire brush to remove any soot. Margaret showed the audience how using acrylic paint would give different design finishes and finally a parting tool was used to cut the pot off at the chuck end.
A piece of oak was used to make the shaker top lid (the 1mm holes in the lid were drilled using a pillar drill) this was turned with a flat bottom to fit in the recess with the top edge slightly domed, the sizes being 36mm x 3mm, this was glued in to complete the pot.
The salt pot is made the same way with the exception of the length being 64mm.
3. Using a Ring Tool to hollow out a bowl
Margaret had a request to demonstrate the use of a Ring Tool to hollow
out a bowl.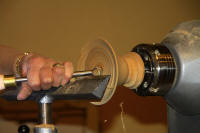
Using a piece of Cherry wood mounted in the chuck on a dovetail spigot Margaret cleaned up the end face of the wood, she then turned out a recess using a ½” bowl gouge, she then started to cut the wood using the Ring Tool, cutting on centre height so the Ring Tool cut in the centre.
At a speed of 1200rpm Margaret used the flat side to cut out a well shape, keeping the bevel in contact with the timber making an arch, the flat side of the Ring Tool allows you to cut a clean finish to take out the centre of the hollow and the beveled edge of the Ring Tool cuts the wood on the side of the bowl.