

- Alan Truman
- Albert Harrison
- Ambrose O'Halloran
- Andrew Hall
- Bob Chapman
- Bob Neill
- Clive Brooks
- Colin Fishwick
- David Lowe
- David Springett
- Gary Rance
- George Bell
- Gerry Marlow
- Ian Clarkson
- Joe Laird
- Joey Richardson
- John Berkeley
- Ken Allen
- Les Thorne
- Margaret Garrard
- Mark & Lisa Raby
- Mark Baker
- Mark Hancock
- Martin Pidgen
- Mick Hanbury
- Nick Agar
- Nick Arnull
- Nikos Siragas
- Paul Jones
- Phil Irons
- Philip Greenwood
- Peter Berry
- Peter Wood
- Richard Findlay
- Robin Wood
- Russell Kebble
- Sarah Thirlwell
- Simon Hope
- Simon Whitehead
- Steve Wright
- Stuart King
- Sue Harker
- SWC Club Members
- Tony Wilson
- Tracy Owen
- Walt Claxton
- Walt Claxton & Tom Allison
Mick Hanbury 10 May 2012
Mick turned three projects for us this evening
- two bowls and a cube.![]()
1. Tiger Bowl
In true Blue Peter fashion this project was one
Mick had prepared earlier - he had turned the outside of a sycamore
bowl and coloured it with tiger stripes.
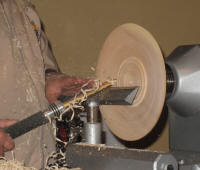 So, to start the evening,
he mounted it in the chuck and faced it off, then step turned it
until he had got it to the desired thickness and shape. He turned it
so that the rim made up two thirds of the surface with one third
left in the middle, which he would later turn into the bowl. He
finished the surface with a push cut, using a ¼” bowl gouge which he
had ground with a double bevel. At this point he also demonstrated
shear scraping with the new Ashley Isles shear scraper. Before
sanding Mick applied a coat of a mix of liquid paraffin and beeswax
to minimise the dust – as he sanded the mixture was pushed into the
wood, meaning he only had to sand with one grit (320). (See photos
MH12_01 & 02).
So, to start the evening,
he mounted it in the chuck and faced it off, then step turned it
until he had got it to the desired thickness and shape. He turned it
so that the rim made up two thirds of the surface with one third
left in the middle, which he would later turn into the bowl. He
finished the surface with a push cut, using a ¼” bowl gouge which he
had ground with a double bevel. At this point he also demonstrated
shear scraping with the new Ashley Isles shear scraper. Before
sanding Mick applied a coat of a mix of liquid paraffin and beeswax
to minimise the dust – as he sanded the mixture was pushed into the
wood, meaning he only had to sand with one grit (320). (See photos
MH12_01 & 02).
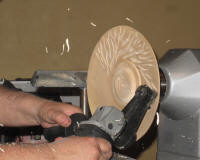 Next Mick started decorating the rim; first he
used an Arbortech to carve a design . He locked the lathe head and
carved a random design in the area between 1 o’clock and 3 o’clock
then, gradually he turned it round until the whole rim was
decorated. Before colouring he quickly ran over the surface with 400
grit, followed by a shoe brush to clean into the grooves. With the
lathe turned off he started to apply spirit based dyes, using
atomiser bottles.
Next Mick started decorating the rim; first he
used an Arbortech to carve a design . He locked the lathe head and
carved a random design in the area between 1 o’clock and 3 o’clock
then, gradually he turned it round until the whole rim was
decorated. Before colouring he quickly ran over the surface with 400
grit, followed by a shoe brush to clean into the grooves. With the
lathe turned off he started to apply spirit based dyes, using
atomiser bottles.
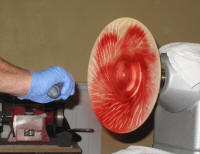 He applied red first, not covering the whole
surface, then yellow into the gaps, running it part of the way into
the red. He then turned the lathe on and let it run for a while to
dry the colours. He applied black acrylic paint next with a sponge
brush – he put a lump of paint in the middle and feathered this onto
the rim, making it a little heavier on the outside of the rim
He applied red first, not covering the whole
surface, then yellow into the gaps, running it part of the way into
the red. He then turned the lathe on and let it run for a while to
dry the colours. He applied black acrylic paint next with a sponge
brush – he put a lump of paint in the middle and feathered this onto
the rim, making it a little heavier on the outside of the rim
 so it
would act like a frame to the piece. Once it was dry he sprayed on a
couple of layers of ‘Tetrosyl Trade Spray’ lacquer. This needs some
time to dry so he took the opportunity to talk us through some of
the other pieces of work he had brought along to show us. (See
photos MH12_03 to 05).
so it
would act like a frame to the piece. Once it was dry he sprayed on a
couple of layers of ‘Tetrosyl Trade Spray’ lacquer. This needs some
time to dry so he took the opportunity to talk us through some of
the other pieces of work he had brought along to show us. (See
photos MH12_03 to 05).
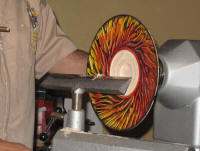
Once the decorating was finished Mick turned
away the middle, taking care to measure the depth to ensure he
didn’t turn it into a picture frame! He turned a small bowl inside
the bigger bowl then textured the
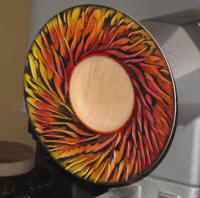 outer bowl but, along with the
audience, he felt this was too much, although it was a useful
exercise in formulating design ideas. So he turned it all away to a
single bowl then applied a layer of the paraffin and beeswax mixture
and sanded the bowl area and the outside edge of the rim with 240,
320 and 400 grit. As before, he went over the rim with a shoe brush
to remove any dust then applied a coat of the oil and beeswax over
the whole piece. (See photos MH12_06 to 09).
outer bowl but, along with the
audience, he felt this was too much, although it was a useful
exercise in formulating design ideas. So he turned it all away to a
single bowl then applied a layer of the paraffin and beeswax mixture
and sanded the bowl area and the outside edge of the rim with 240,
320 and 400 grit. As before, he went over the rim with a shoe brush
to remove any dust then applied a coat of the oil and beeswax over
the whole piece. (See photos MH12_06 to 09).
To finish the underneath Mick had a piece of MDF covered in foam which he mounted in the chuck. He held the bowl against this then used the tail stock to hold it in place, locating it in a small hole he had turned in the middle.
2. Yew Bowl
For this project Mick used a piece of yew
measuring approx 2” by 6”-8”, which had been cut from a plank and
had two natural edge areas.
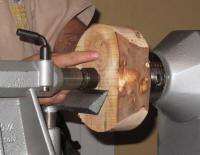 He mounted it on a screw chuck and held
it in place with the tailstock, then he tidied up the surface and
turned a 50mm chucking point before turning it to an ogee shape with
a foot. There were quite a lot of challenges with this project as
there were some areas of tear out, some dead and live knots and some
bark inclusion. After turning it Mick felt the curve was too flat so
He mounted it on a screw chuck and held
it in place with the tailstock, then he tidied up the surface and
turned a 50mm chucking point before turning it to an ogee shape with
a foot. There were quite a lot of challenges with this project as
there were some areas of tear out, some dead and live knots and some
bark inclusion. After turning it Mick felt the curve was too flat so
 he took some shear cuts to soften the curve and blend the area where
the curve flows into the cove. Next he turned a small cove on the
edge of the foot then a ‘v’ cut next to. With the lathe running at
1500 rpm he took the final cut – having the lathe running at this
speed meant the areas at the edge didn’t give him a problem. (See
photos MH12_10 to 12).
he took some shear cuts to soften the curve and blend the area where
the curve flows into the cove. Next he turned a small cove on the
edge of the foot then a ‘v’ cut next to. With the lathe running at
1500 rpm he took the final cut – having the lathe running at this
speed meant the areas at the edge didn’t give him a problem. (See
photos MH12_10 to 12).
To finish the outside Mick applied a coat of his linseed oil and beeswax mixture and sanded it. Then he applied another coat of the oil and wax mix, sanded it again with 400 grit sandpaper and burnished it with paper. He explained that you can apply many coats of the oil and wax if you want to build up a good surface. After refining the chucking point to fit the jaws he turned it round on the lathe.
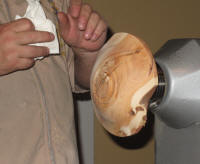
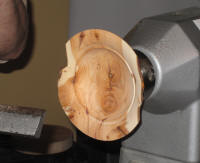 He faced off the surface then started turning
the inside. He took some of the weight from the middle, in steps,
then turned a curved rim with a bead on the centre edge. To finish
he turned a lovely curved bowl with a consistent wall thickness. As
before, he oiled and sanded it then buffed it with paper. To turn
away the chucking point and finish the foot he turned it round on
the lathe and used the tailstock to hold it against the foam pad, as
he did for the first bowl (See photos MH12_13 to 17).
He faced off the surface then started turning
the inside. He took some of the weight from the middle, in steps,
then turned a curved rim with a bead on the centre edge. To finish
he turned a lovely curved bowl with a consistent wall thickness. As
before, he oiled and sanded it then buffed it with paper. To turn
away the chucking point and finish the foot he turned it round on
the lathe and used the tailstock to hold it against the foam pad, as
he did for the first bowl (See photos MH12_13 to 17).
3. Cube
Mick had 2½” cube of timber which he mounted in
some home made jaws.
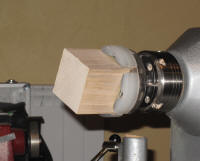 He turned the lathe on and used the tailstock
to mark the centre in one of the six surfaces then put a Jacob’s
chuck in the tailstock and used a 35mm
Festool
forstner bit to drill a hole.
He drilled to just past the centre point then turned the cube round
in the jig and drilled from the other side. He repeated this process
on the other four sides, taking care to avoid breakout when he got
to the middle. (See photos MH12_18 & 19).
He turned the lathe on and used the tailstock
to mark the centre in one of the six surfaces then put a Jacob’s
chuck in the tailstock and used a 35mm
Festool
forstner bit to drill a hole.
He drilled to just past the centre point then turned the cube round
in the jig and drilled from the other side. He repeated this process
on the other four sides, taking care to avoid breakout when he got
to the middle. (See photos MH12_18 & 19).
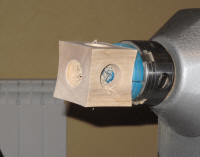 Next he turned a cove, which was approx ¼” deep
at the centre, on the first face then turned it round on the lathe
and repeated this on the opposite face. To make sure it ran true he
mounted it in another set of home made, nylon, jaws that measure 35
mm and expand into the holes. He went on to repeat this process on
all the other faces. Finally he ran a piece of sandpaper along each
of the edge to soften them. (See photos MH12_20 to 22).
Next he turned a cove, which was approx ¼” deep
at the centre, on the first face then turned it round on the lathe
and repeated this on the opposite face. To make sure it ran true he
mounted it in another set of home made, nylon, jaws that measure 35
mm and expand into the holes. He went on to repeat this process on
all the other faces. Finally he ran a piece of sandpaper along each
of the edge to soften them. (See photos MH12_20 to 22).
Lorrie Flannery
SWC club member