

- Alan Truman
- Albert Harrison
- Ambrose O'Halloran
- Andrew Hall
- Bob Chapman
- Bob Neill
- Clive Brooks
- Colin Fishwick
- David Lowe
- David Springett
- Gary Rance
- George Bell
- Gerry Marlow
- Ian Clarkson
- Joe Laird
- Joey Richardson
- John Berkeley
- Ken Allen
- Les Thorne
- Margaret Garrard
- Mark & Lisa Raby
- Mark Baker
- Mark Hancock
- Martin Pidgen
- Mick Hanbury
- Nick Agar
- Nick Arnull
- Nikos Siragas
- Paul Jones
- Phil Irons
- Philip Greenwood
- Peter Berry
- Peter Wood
- Richard Findlay
- Robin Wood
- Russell Kebble
- Sarah Thirlwell
- Simon Hope
- Simon Whitehead
- Steve Wright
- Stuart King
- Sue Harker
- SWC Club Members
- Tony Wilson
- Tracy Owen
- Walt Claxton
- Walt Claxton & Tom Allison
Nick Arnull 19 May 2012
This was Nick’s first visit to our club and,
apart from a few brief minutes![]() in Harrogate
last November, the first time I had seen him turn. He turned a
couple of projects today, taking the opportunity to demonstrate all
the different processes involved. Then he decorated a number of
small hollow vessels to show us the various techniques he uses and
finally he took us through the techniques he uses for airbrushing
his work.
in Harrogate
last November, the first time I had seen him turn. He turned a
couple of projects today, taking the opportunity to demonstrate all
the different processes involved. Then he decorated a number of
small hollow vessels to show us the various techniques he uses and
finally he took us through the techniques he uses for airbrushing
his work.
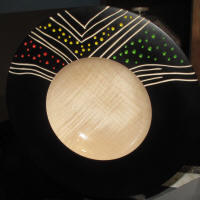
1. Caress Bowl
Nick mounted a rippled sycamore bowl blank
measuring approx 10” x 2” on the lathe then, using a long grind bowl
gouge he tidied up the edge and started to turn the underneath to an
ogee shape, leaving a 10mm wide flat area at the edge. He used a
skew chisel to make a dimple in the centre then, with the tool rest
just above the centre line he put the leg of the dividers in the
hole, turned the lathe on and used the other leg of the dividers to
mark the spigot.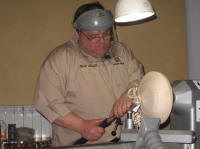 He turned a chucking point on this line then used a
square ground bowl gouge that had a double bevel to make the
finishing cut on the underneath and to turn a shallow hollow inside
the chucking point. To finish turning the underneath he used a ⅜”
round skew chisel to turn a dovetail on the spigot and make a final
shear cut across the surface. (See photos NA12_01 to 03).
He turned a chucking point on this line then used a
square ground bowl gouge that had a double bevel to make the
finishing cut on the underneath and to turn a shallow hollow inside
the chucking point. To finish turning the underneath he used a ⅜”
round skew chisel to turn a dovetail on the spigot and make a final
shear cut across the surface. (See photos NA12_01 to 03).
Nick wanted to get a good depth of finish so,
in spite of having got a bevel burnished finish with the chisel he
started sanding it with 80 grit. He said that by starting with 80
grit and working all the way through to 400 grit you can
 get a much
better depth of finished. He explained that this stemmed from his
days as a stonemason. When he had finished sanding there were a
couple of very fine lines in the surface so he used a rotary sander
to re-do the last two grits. (See photo NA12_04).
get a much
better depth of finished. He explained that this stemmed from his
days as a stonemason. When he had finished sanding there were a
couple of very fine lines in the surface so he used a rotary sander
to re-do the last two grits. (See photo NA12_04).
To draw the eye to the decoration on the top
Nick sprayed the underneath surface with several light coats of
cellulose sanding sealer and cut this back with 0000 grade wire wool
before ebonising it with several very light coats of acrylic based
paint, building it up slowly.
 He said you can apply acrylic over
cellulose but you should never try applying cellulose over acrylic
as you would end up with bubbles and blisters all over the surface.
When it was dry he sprayed it with satin lacquer, again applying it
in several light coats. (See photo NA12_05).
He said you can apply acrylic over
cellulose but you should never try applying cellulose over acrylic
as you would end up with bubbles and blisters all over the surface.
When it was dry he sprayed it with satin lacquer, again applying it
in several light coats. (See photo NA12_05).
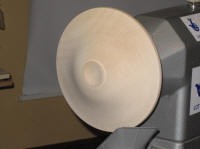
Next Nick turned his attention to the inside of the bowl. He turned it round on the lathe and used a square ground bowl gouge to true up the surface, working from the outside in, then reversing the cut to get rid of any tool marks. He used his round skew chisel to take a finishing cut then sanded the rim, again starting with 80 grit and finishing with 320, then 400 on the rotary sander. As for the underneath, he sprayed it with cellulose sanding sealer and cut it back with wire wool, working with the grain to remove any shine, then applied the black paint, applying several light coats to get a good depth of colour. He didn’t seal the rim at this stage as he was going to decorate it. (See photos NA12_06 to 08).
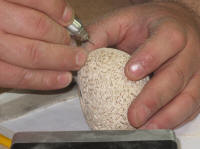
 Once the paint was dry he measured a 60mm rim
and marked this measurement on the surface using a white water
colour pencil. He then used this pencil to draw a pattern of lines
on approx. one third of the rim. He then carved these lines, using
an electric carving tool fitted with a Flexcut ‘v’ gouge, working
from the outside of the bowl towards the middle to avoid any
breakout on the edge of the bowl. To finish carving the pattern he
used two sizes of engineers’ countersink bits in a corded drill to make dots between the carved lines.
Once the paint was dry he measured a 60mm rim
and marked this measurement on the surface using a white water
colour pencil. He then used this pencil to draw a pattern of lines
on approx. one third of the rim. He then carved these lines, using
an electric carving tool fitted with a Flexcut ‘v’ gouge, working
from the outside of the bowl towards the middle to avoid any
breakout on the edge of the bowl. To finish carving the pattern he
used two sizes of engineers’ countersink bits in a corded drill to make dots between the carved lines.
 He says a
corded drill has more torque and power to the motor than a cordless
one. He coloured these dots using spirit based felt pens, applying a
different colour in each of the three sections. Finally he used a
damp cloth to wipe off the guidelines left on the surface then
applied a coat of lacquer to the rim to protect it from dust. (See
photos NA12_09 to 12).
He says a
corded drill has more torque and power to the motor than a cordless
one. He coloured these dots using spirit based felt pens, applying a
different colour in each of the three sections. Finally he used a
damp cloth to wipe off the guidelines left on the surface then
applied a coat of lacquer to the rim to protect it from dust. (See
photos NA12_09 to 12).
Once the decoration was finished Nick turned
his attention to the middle of the bowl. He started turning on the
line he had marked to define the rim, working towards the middle,
taking care to ensure any shavings that landed on
 the tool rest
didn’t rub into the decorated surface. When he was happy with the
shape he used his square ground bowl gouge to take the finishing
cuts. When he was finished he had created a very clean, sharp edge
between the rim and the bowl. He sanded the bowl taking a lot of
care to ensure he didn’t round over the top edge. He applied several
coats of sanding sealer and acrylic lacquer, waiting for the shine
to go matt between coats, then went over the inside of the bowl with
wire wool and brushed off the wire wool dust. He wiped over the
surface with a cloth then applied a coat of T-Cut, with a cloth and
burnished it with the cloth, with the lathe running slowly. He took
a lot of care to ensure he didn’t get any on the rim. After applying
several coats of the T-Cut he gave it a final burnish with a clean
cloth, increasing the speed of the lathe as he was burnishing. By
the time he had finished he had built up a high gloss shine that
made the inside of the bowl look wet. (See photos NA12_13 to 16).
the tool rest
didn’t rub into the decorated surface. When he was happy with the
shape he used his square ground bowl gouge to take the finishing
cuts. When he was finished he had created a very clean, sharp edge
between the rim and the bowl. He sanded the bowl taking a lot of
care to ensure he didn’t round over the top edge. He applied several
coats of sanding sealer and acrylic lacquer, waiting for the shine
to go matt between coats, then went over the inside of the bowl with
wire wool and brushed off the wire wool dust. He wiped over the
surface with a cloth then applied a coat of T-Cut, with a cloth and
burnished it with the cloth, with the lathe running slowly. He took
a lot of care to ensure he didn’t get any on the rim. After applying
several coats of the T-Cut he gave it a final burnish with a clean
cloth, increasing the speed of the lathe as he was burnishing. By
the time he had finished he had built up a high gloss shine that
made the inside of the bowl look wet. (See photos NA12_13 to 16).
At the end of the day Nick very kindly donated this bowl to the club to sell for our charity.
2. Hollow Vessel
For this project Nick used a round piece of
sycamore, measuring approx. 5” across by 6” long. It had been left
in a bucket of 50/50 fairy liquid and water for some time to
re-constitute the wood as it had become too dry. He had already
turned a spigot at one end and at the other end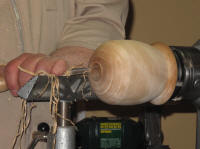 he had drilled a
hole 4” long to help it dry out. He mounted it in the chuck and used
a long grind bowl gouge to tidy the edge then used a spindle gouge
to curve over the end. He turned away some of the bulk of the timber
at the chuck end then continued the curve he had turned at the other
end, curving it round into the hole. He used a skew chisel to turn a
flat spot on the edge of the opening then turned his attention to
hollowing the inside. (See photos NA12_17 & 18).
he had drilled a
hole 4” long to help it dry out. He mounted it in the chuck and used
a long grind bowl gouge to tidy the edge then used a spindle gouge
to curve over the end. He turned away some of the bulk of the timber
at the chuck end then continued the curve he had turned at the other
end, curving it round into the hole. He used a skew chisel to turn a
flat spot on the edge of the opening then turned his attention to
hollowing the inside. (See photos NA12_17 & 18).
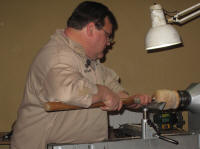 He started the hollowing with a Kel McNaughton
straight hollowing tool to open up a void in the top. He used an
airgun to clear the material from the inside then changed to a
curved blade to work under the rim. To finish the hollowing he used
a Rolly Monroe then used a point tool to turn a defining ring in the
top edge. To finish the top half of the vessel he took a final cut
over the top surface with a skew chisel. (See photo NA12_19).
He started the hollowing with a Kel McNaughton
straight hollowing tool to open up a void in the top. He used an
airgun to clear the material from the inside then changed to a
curved blade to work under the rim. To finish the hollowing he used
a Rolly Monroe then used a point tool to turn a defining ring in the
top edge. To finish the top half of the vessel he took a final cut
over the top surface with a skew chisel. (See photo NA12_19).
To finish the outside he took it off the lathe,
mounted a cone of ash in the chuck, pushed the neck of the vessel
onto it and held it in place with a revolving centre which he
located in the centre hole. He started to turn the bottom half of
the vessel, 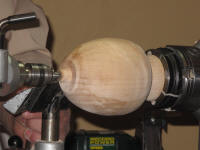 getting a nice smooth curve, then he turned away a lot
of waste wood at the bottom, leaving a narrow piece about ½” long.
He continued shaping the outside, turning a groove near the bottom,
then used a ⅜” spindle gouge to slightly hollow the bottom. Finally
he turned away the remaining waste wood. He stopped at this point as
the object of the exercise was to show how he turns his hollow
vessels; he covered the decoration as a separate project. (See photo
NA12_20).
getting a nice smooth curve, then he turned away a lot
of waste wood at the bottom, leaving a narrow piece about ½” long.
He continued shaping the outside, turning a groove near the bottom,
then used a ⅜” spindle gouge to slightly hollow the bottom. Finally
he turned away the remaining waste wood. He stopped at this point as
the object of the exercise was to show how he turns his hollow
vessels; he covered the decoration as a separate project. (See photo
NA12_20).
3. Decorating hollow forms
Having shown us how to turn a hollow form Nick now showed us how he decorates them. He showed us a selection of small hollow forms, each of which had been partly decorated, then went on to show us how each one had been done.
 First he used a ‘microRota’ but said you can
use a Dremel if you don’t have one of these, although the Dremel is
not so easy to use. He showed us three different texturing
techniques – scribbling, dragging the cutter across the surface and
using a “dentist’s drill” to produce random patterns to the depth of
the ball cutter. Once the texturing was completed he used a radial
sanding brush (nylon impregnated with abrasive) mounted in a drill
to run all over the surface of each pot. This softens the texture
slightly and removes any raised fibres on the surface. (See photos
NA12_21 & 22).
First he used a ‘microRota’ but said you can
use a Dremel if you don’t have one of these, although the Dremel is
not so easy to use. He showed us three different texturing
techniques – scribbling, dragging the cutter across the surface and
using a “dentist’s drill” to produce random patterns to the depth of
the ball cutter. Once the texturing was completed he used a radial
sanding brush (nylon impregnated with abrasive) mounted in a drill
to run all over the surface of each pot. This softens the texture
slightly and removes any raised fibres on the surface. (See photos
NA12_21 & 22).
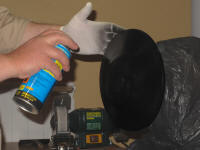
Next he coloured one of the pots. He turned it
upside down and mounted it
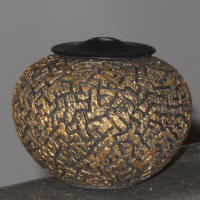 on a stick to hold it then he applied Mylands water based black acrylic paint all over with a paint brush
to give the background colour. He uses a brush to apply it as he
says the paint wouldn’t go into all the gullies and crevices if he
sprayed it on. When it was dry he took a squeeze of Galeria gold
acrylic paint and applied it to the high spots with a brush then,
when it was dry, he gave it several coats of acrylic satin lacquer.
To finish the pot he put a black lid on the top. He had turned this
at home, with a small hole in the top, and he said he would glue it
in place. (See photos NA12_23 to 25).
on a stick to hold it then he applied Mylands water based black acrylic paint all over with a paint brush
to give the background colour. He uses a brush to apply it as he
says the paint wouldn’t go into all the gullies and crevices if he
sprayed it on. When it was dry he took a squeeze of Galeria gold
acrylic paint and applied it to the high spots with a brush then,
when it was dry, he gave it several coats of acrylic satin lacquer.
To finish the pot he put a black lid on the top. He had turned this
at home, with a small hole in the top, and he said he would glue it
in place. (See photos NA12_23 to 25).
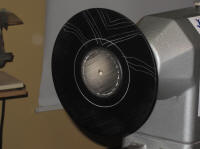
4. Airbrushing
For his final project of the day Nick talked us
through the equipment you need to buy to do
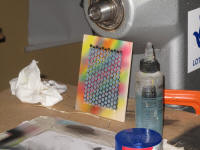 airbrushing, then he
showed us a small project. He taped a piece of sequin backing onto a
piece of board and sprayed it black then peeled the sequin backing
off to reveal a pattern of dots. Next he sprayed random patterns
onto this in yellow, then red, then blue and finally white, but
before applying the white he put the mask back onto the board into a
position slightly offset from the original position. After applying
the white he removed the mask to reveal a 3d effect caused by
offsetting the mask. (See photos NA12_26 & 27)
airbrushing, then he
showed us a small project. He taped a piece of sequin backing onto a
piece of board and sprayed it black then peeled the sequin backing
off to reveal a pattern of dots. Next he sprayed random patterns
onto this in yellow, then red, then blue and finally white, but
before applying the white he put the mask back onto the board into a
position slightly offset from the original position. After applying
the white he removed the mask to reveal a 3d effect caused by
offsetting the mask. (See photos NA12_26 & 27)
Nick took a lot of care to ensure the airbrush was thoroughly cleaned between colours, using special airbrush cleaner, especially before applying the white.
Lorrie Flannery
SWC club member