

- Alan Truman
- Albert Harrison
- Ambrose O'Halloran
- Andrew Hall
- Bob Chapman
- Bob Neill
- Clive Brooks
- Colin Fishwick
- David Lowe
- David Springett
- Gary Rance
- George Bell
- Gerry Marlow
- Ian Clarkson
- Joe Laird
- Joey Richardson
- John Berkeley
- Ken Allen
- Les Thorne
- Margaret Garrard
- Mark & Lisa Raby
- Mark Baker
- Mark Hancock
- Martin Pidgen
- Mick Hanbury
- Nick Agar
- Nick Arnull
- Nikos Siragas
- Paul Jones
- Phil Irons
- Philip Greenwood
- Peter Berry
- Peter Wood
- Richard Findlay
- Robin Wood
- Russell Kebble
- Sarah Thirlwell
- Simon Hope
- Simon Whitehead
- Steve Wright
- Stuart King
- Sue Harker
- SWC Club Members
- Tony Wilson
- Tracy Owen
- Walt Claxton
- Walt Claxton & Tom Allison
Nikos Siragas 20 December 2012
It was good to see Nikos and Frances at the
club again this month
![]() and to see him turn another of his signature
pieces. Once again he turned three projects for us, a sculptured
vase, a decorative ring and a honey spoon.
and to see him turn another of his signature
pieces. Once again he turned three projects for us, a sculptured
vase, a decorative ring and a honey spoon.
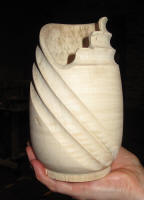
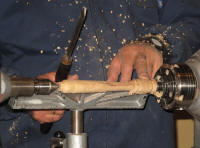
1. Sculptured Vase
Nikos mounted a piece of rippled sycamore
measuring approx. 4” x 4” x 8” between centres.
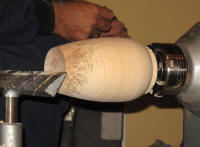 He turned this to a
cylinder with a roughing gouge then, using a Gary Rance round skew
chisel, he turned a spigot at one end and mounted it in the chuck. He started shaping it with a roughing gouge then used a skew chisel
to round the bottom and a long grind bowl gouge to shape the top. He
made pull cuts, using the side of the bowl gouge then went on to
show us how to use the skew chisel as a scraper by pointing the tip
of the tool down to the wood. (See photos NS12_01 & 02).
He turned this to a
cylinder with a roughing gouge then, using a Gary Rance round skew
chisel, he turned a spigot at one end and mounted it in the chuck. He started shaping it with a roughing gouge then used a skew chisel
to round the bottom and a long grind bowl gouge to shape the top. He
made pull cuts, using the side of the bowl gouge then went on to
show us how to use the skew chisel as a scraper by pointing the tip
of the tool down to the wood. (See photos NS12_01 & 02).
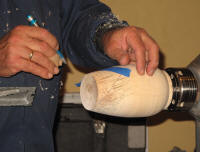 Next he started marking out the pattern for the
sculpting. First he marked three lines round the top, the width of
the microplane he was going to use later to carve it. Then he
applied a couple of pieces of masking top to the wood, at an angle
to the top, to mark the lines for the ‘v’ area he was going to cut
out. (See photos NS12_03 & 04).
Next he started marking out the pattern for the
sculpting. First he marked three lines round the top, the width of
the microplane he was going to use later to carve it. Then he
applied a couple of pieces of masking top to the wood, at an angle
to the top, to mark the lines for the ‘v’ area he was going to cut
out. (See photos NS12_03 & 04).
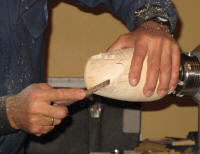
The next stage was to hollow it out. He
recommended starting by drilling a hole, using a metal cutting drill
and drilling to the full depth of the vase. However, he didn’t have
a drill so he used a spindle gouge to drill it. He used a variety of
tools to hollow it – after starting it with the spindle gouge he
moved to a ring tool.
 He left enough space between the tool rest and
the wood to pull the tool out and worked with the tool turned to
between 8 and 9 o’clock (he had made a mark on the handle to show
when it was turned to 9 o’clock). He also used a scraper to turn
away material at the bottom then refined the inside until he was
happy with the cut and the shape. He had turned it to approx. 5-7mm
thick. (See photos NS12_05 & 06).
He left enough space between the tool rest and
the wood to pull the tool out and worked with the tool turned to
between 8 and 9 o’clock (he had made a mark on the handle to show
when it was turned to 9 o’clock). He also used a scraper to turn
away material at the bottom then refined the inside until he was
happy with the cut and the shape. He had turned it to approx. 5-7mm
thick. (See photos NS12_05 & 06).
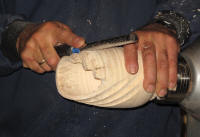
Now Nikos started sculpting it. He started by
cutting out the ‘v’ he marked earlier, using a Proxxon mounted with
an Arbortech blade. He
 continued to use this to shape the edges and
cut out the 3 steps on one side of the ‘v’ (defined by the lines he
had marked round the top). He used a small file to smooth the edges
of the steps and round over the inside of the edges of the top and
the ‘v’. He changed to a rasp disk on his Proxxon to continue
smoothing the edges then used a home made sanding disk in the Proxxon. To finish this area he used sandpaper which
he had wrapped round a dowel and secured in place with Velcro. (See
photos NS12_07 to 10).
continued to use this to shape the edges and
cut out the 3 steps on one side of the ‘v’ (defined by the lines he
had marked round the top). He used a small file to smooth the edges
of the steps and round over the inside of the edges of the top and
the ‘v’. He changed to a rasp disk on his Proxxon to continue
smoothing the edges then used a home made sanding disk in the Proxxon. To finish this area he used sandpaper which
he had wrapped round a dowel and secured in place with Velcro. (See
photos NS12_07 to 10).
To carve the grooves Nikos used a round
microplane.
 Taking slow strokes, he worked in from the edge to avoid
any chipping out. He took the grooves around the top, starting at
the steps, then continued them down the side of the vase, following
the line of the ‘v’ and working all the way to the bottom. He sanded
the grooves using the sandpaper on a stick I described earlier and
also a Dremel sanding disk. (See photos NS12_11 to 14).
Taking slow strokes, he worked in from the edge to avoid
any chipping out. He took the grooves around the top, starting at
the steps, then continued them down the side of the vase, following
the line of the ‘v’ and working all the way to the bottom. He sanded
the grooves using the sandpaper on a stick I described earlier and
also a Dremel sanding disk. (See photos NS12_11 to 14).
 Nikos stopped this project at this point but
went on to explain that he sands the inside using a home made
sanding tool. This is a round stick, domed at the end and wrapped
with kitchen paper, held in place with masking tape to make it soft.
He then wraps sandpaper round this. He finishes the inside with
sanding sealer. To finish the bottom he uses a jam chuck made from a
long block of wood, wrapped in kitchen paper held in place with
masking tape. He rounds of the underneath and makes is slightly
concave. (See photos NS12_15 & 16).
Nikos stopped this project at this point but
went on to explain that he sands the inside using a home made
sanding tool. This is a round stick, domed at the end and wrapped
with kitchen paper, held in place with masking tape to make it soft.
He then wraps sandpaper round this. He finishes the inside with
sanding sealer. To finish the bottom he uses a jam chuck made from a
long block of wood, wrapped in kitchen paper held in place with
masking tape. He rounds of the underneath and makes is slightly
concave. (See photos NS12_15 & 16).
2. Decorative Ring
For this project Nikos used a piece of olive
wood measuring approx. 1” x 1” x 4” which had a hole drilled through
the side near one end.
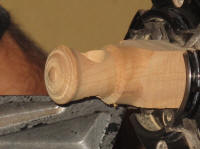 He turned it to a cylinder using a bowl gouge
then turned the end to a slight dome. He decorated the end using a
Decorating Elf. He cut an area of pattern near the middle then
turned a groove either side of this to give it definition. He then
repeated this near the edge. (See photos NS12_17 & 18).
He turned it to a cylinder using a bowl gouge
then turned the end to a slight dome. He decorated the end using a
Decorating Elf. He cut an area of pattern near the middle then
turned a groove either side of this to give it definition. He then
repeated this near the edge. (See photos NS12_17 & 18).
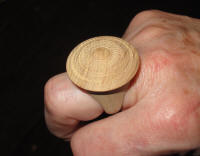 Once he was happy with the top he started
turning away the area under the ring, then gave it a quick sanding
before parting it off. He explained that he would normally sand it
down to 600 grit. To do the final shaping he mounted a home made
sanding disk in the lathe which he used to sand away some of the
bulk from the sides and finish the underneath. He also used his
Dremel to round the edges. He finishes this with several coats of
oil, wiped off between coats with kitchen paper. Then, after the
final coat he cuts it back with wire wool and finishes it with wax.
(See photos NS12_19 & 20).
Once he was happy with the top he started
turning away the area under the ring, then gave it a quick sanding
before parting it off. He explained that he would normally sand it
down to 600 grit. To do the final shaping he mounted a home made
sanding disk in the lathe which he used to sand away some of the
bulk from the sides and finish the underneath. He also used his
Dremel to round the edges. He finishes this with several coats of
oil, wiped off between coats with kitchen paper. Then, after the
final coat he cuts it back with wire wool and finishes it with wax.
(See photos NS12_19 & 20).
3. Honey Spoon
Nikos turned this from a piece of olive wood
measuring approx. 1” x 1” x 7” which he mounted between centres and
turned to a cylinder using the side of a roughing gouge.
 He cut a
series of grooves in one end, using a parting tool, then rounded the
edges of them. These grooves were much wider than he had intended
because he didn’t have a thin parting tool, he explained that he
prefers to
He cut a
series of grooves in one end, using a parting tool, then rounded the
edges of them. These grooves were much wider than he had intended
because he didn’t have a thin parting tool, he explained that he
prefers to
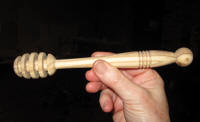 make them much narrower. He started shaping the handle
with a roughing gouge then refined it with a bowl gouge. He used a
round skew chisel to turn a ball at the end of the handle then
turned a curve round the grooved area so the middle grooves were
deeper than the outer ones. Once he was happy with the shape he
turned four decorative grooves in the thick part of the handle and
tidied the ball at the end. Finally he gave it a quick sanding and
explained that he normally sands these to 600 grit, taking care not
to press too hard, then finishes them with walnut oil. After parting
it off at both ends he tidied the ends with a chisel and sandpaper.
(See photos NS12_21 to 25).
make them much narrower. He started shaping the handle
with a roughing gouge then refined it with a bowl gouge. He used a
round skew chisel to turn a ball at the end of the handle then
turned a curve round the grooved area so the middle grooves were
deeper than the outer ones. Once he was happy with the shape he
turned four decorative grooves in the thick part of the handle and
tidied the ball at the end. Finally he gave it a quick sanding and
explained that he normally sands these to 600 grit, taking care not
to press too hard, then finishes them with walnut oil. After parting
it off at both ends he tidied the ends with a chisel and sandpaper.
(See photos NS12_21 to 25).
Lorrie Flannery
SWC club member