

- Alan Truman
- Albert Harrison
- Ambrose O'Halloran
- Andrew Hall
- Bob Chapman
- Bob Neill
- Clive Brooks
- Colin Fishwick
- David Lowe
- David Springett
- Gary Rance
- George Bell
- Gerry Marlow
- Ian Clarkson
- Joe Laird
- Joey Richardson
- John Berkeley
- Ken Allen
- Les Thorne
- Margaret Garrard
- Mark & Lisa Raby
- Mark Baker
- Mark Hancock
- Martin Pidgen
- Mick Hanbury
- Nick Agar
- Nick Arnull
- Nikos Siragas
- Paul Jones
- Phil Irons
- Philip Greenwood
- Peter Berry
- Peter Wood
- Richard Findlay
- Robin Wood
- Russell Kebble
- Sarah Thirlwell
- Simon Hope
- Simon Whitehead
- Steve Wright
- Stuart King
- Sue Harker
- SWC Club Members
- Tony Wilson
- Tracy Owen
- Walt Claxton
- Walt Claxton & Tom Allison
Joe Laird 18 May 2013
For this year’s full day demonstration we were
fortunate to welcome Joe Laird to the club.
![]() He is an Irishman who
lives just outside Belfast
and this was his first demonstration in England. Those who came along to the
demonstration will all agree he is a very talented turner and we
were treated to an excellent day.
He is an Irishman who
lives just outside Belfast
and this was his first demonstration in England. Those who came along to the
demonstration will all agree he is a very talented turner and we
were treated to an excellent day.
1. Wooden Plate
Joe and his family regularly use wooden plates
for their food as “bacteria cannot multiply on wood”. So for his
first project Joe turned a pair of dinner plates. He started with a
10” sycamore blank that was 1” thick. He held it against the jaws
using friction and the tailstock,
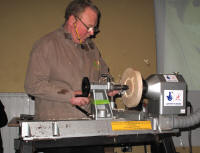 then tidied the surface and turned
a chucking point using a bedan, on what was to become the upper
surface of the plate. He mounted this in the jaws then turned a
recess to fit on the chuck. He made the inside of the recess
slightly convex, to minimize the chances of breaking through when
turning the inside. He tidied the outer edge then turned the
underneath of the rim so it was concave and finished the foot,
making that slightly concave too. He finished the foot and the
recess with a skew and explained that he only sands his plates to
240 grit to allow the oil to penetrate. (See photos JL_01 to 04).
then tidied the surface and turned
a chucking point using a bedan, on what was to become the upper
surface of the plate. He mounted this in the jaws then turned a
recess to fit on the chuck. He made the inside of the recess
slightly convex, to minimize the chances of breaking through when
turning the inside. He tidied the outer edge then turned the
underneath of the rim so it was concave and finished the foot,
making that slightly concave too. He finished the foot and the
recess with a skew and explained that he only sands his plates to
240 grit to allow the oil to penetrate. (See photos JL_01 to 04).
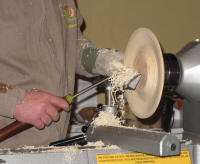 Joe turned the plate round on the chuck,
mounting it in the recess. He started turning the inside of the
plate, but left the chucking point in case he needed to re-chuck it.
He curved the rim out to the edge then back in towards the centre.
Before turning the middle he took some finishing cuts on the outer
area, supporting it at the back with his hand, wearing a glove to
prevent friction burns. Next he turned away the chucking point and
turned the middle so it came to a slight bump as, he says, there is
always a bump in the centre of china plates.(See photos JL_05 to 08).
Joe turned the plate round on the chuck,
mounting it in the recess. He started turning the inside of the
plate, but left the chucking point in case he needed to re-chuck it.
He curved the rim out to the edge then back in towards the centre.
Before turning the middle he took some finishing cuts on the outer
area, supporting it at the back with his hand, wearing a glove to
prevent friction burns. Next he turned away the chucking point and
turned the middle so it came to a slight bump as, he says, there is
always a bump in the centre of china plates.(See photos JL_05 to 08).
After finishing the first plate he very quickly turned a second one to match. He then explained that he finishes his plates with a food safe oil that smells of lemon, “as people will buy a wooden plate that smells of lemon”. He does all the oiling at the end, when both sides are finished and he applies it all over in one go, so one side isn’t buckled by adding moisture it.
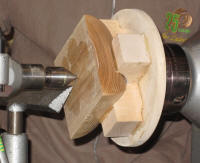
2. Square Bowl
This project is turned from a cube of timber.
Joe makes this from two 6” by 3”
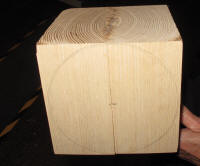 blanks which he glues together,
using hot melt glue, taking care to ensure the grain is running in
the same direction. He then marks a circle on the jointed, side
grain edge and cuts off the corners on a band saw. He mounted it
between steb centres on the side
grain and used a roughing gouge to tidy it up and make it round. He
took very careful cuts because he was turning end grain. He
explained that you must take care when doing this to keep it level
as you work from side to side, to ensure you keep an even thickness.
Once it was round he changed to a skew chisel for the finishing
cuts; he said “this gives the best finish on end grain”. (See photos
JL_09 to 12).
blanks which he glues together,
using hot melt glue, taking care to ensure the grain is running in
the same direction. He then marks a circle on the jointed, side
grain edge and cuts off the corners on a band saw. He mounted it
between steb centres on the side
grain and used a roughing gouge to tidy it up and make it round. He
took very careful cuts because he was turning end grain. He
explained that you must take care when doing this to keep it level
as you work from side to side, to ensure you keep an even thickness.
Once it was round he changed to a skew chisel for the finishing
cuts; he said “this gives the best finish on end grain”. (See photos
JL_09 to 12).
 Next he marked the middle of the turned edge
and made a mark on this line, with a bradawl, where it crossed each
of the glued seams. He sanded it then mounted it between centres on
the marks he had just made. He turned it with a roughing gouge,
taking
Next he marked the middle of the turned edge
and made a mark on this line, with a bradawl, where it crossed each
of the glued seams. He sanded it then mounted it between centres on
the marks he had just made. He turned it with a roughing gouge,
taking
 very gentle cuts and ensuring he kept the chisel parallel to
the wood all the time. He said you need to remember that you are
only turning a very small surface, the rest of the chisel movement
is passing through air. He continued turning this until he had
turned a curve all the way to the glue seams. Then he took a final
cut with the skew chisel and explained that it is important to
ensure the diameter is the same on
very gentle cuts and ensuring he kept the chisel parallel to
the wood all the time. He said you need to remember that you are
only turning a very small surface, the rest of the chisel movement
is passing through air. He continued turning this until he had
turned a curve all the way to the glue seams. Then he took a final
cut with the skew chisel and explained that it is important to
ensure the diameter is the same on
 each plane. He sanded it with the
lathe switched off, working with the grain. At this stage he would
normally polish it. After taking it off the lathe he split the joint
on one he had turned earlier. (See photos JL_13 to 16).
each plane. He sanded it with the
lathe switched off, working with the grain. At this stage he would
normally polish it. After taking it off the lathe he split the joint
on one he had turned earlier. (See photos JL_13 to 16).
To turn the inside Joe mounted it on a
faceplate,
 using a home made chuck made from pieces of 1” x 1” which
have a curve turned in them to match the curve of the bowl. These
are glued onto a disk of wood which is mounted on the lathe. After
finding the centre on the flat surface he put it in the jig, held it
in place with the tailstock and, once he was happy it was running
true, he attached the edges to the jig with hot melt glue to keep it
in place. (See photos JL_17 to 20).
using a home made chuck made from pieces of 1” x 1” which
have a curve turned in them to match the curve of the bowl. These
are glued onto a disk of wood which is mounted on the lathe. After
finding the centre on the flat surface he put it in the jig, held it
in place with the tailstock and, once he was happy it was running
true, he attached the edges to the jig with hot melt glue to keep it
in place. (See photos JL_17 to 20).
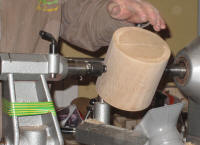
Now Joe was able to start turning the inside.
First he tidied the top
 then he started turning the rim, curving it
inwards and continuing to turn it until the steb mark on the edge
had gone. He left the bulk of the timber in the middle for rigidity
and said he would normally sand the rim at this stage. To turn into
the bowl he kept the tailstock in place and was very careful to make
sure he didn’t catch his hand on the corner. Once he was happy with
the depth he started turning away under the centre core of timber
and, when it was small enough, he snapped it off. He finished the
inside with a small bowl gouge then sanded and waxed it. To take the
bowl off the jig you can warm it in the microwave or with a hot air
gun, but on this occasion he cut the joints with a Stanley knife. (See photos JL_21 to 25).
then he started turning the rim, curving it
inwards and continuing to turn it until the steb mark on the edge
had gone. He left the bulk of the timber in the middle for rigidity
and said he would normally sand the rim at this stage. To turn into
the bowl he kept the tailstock in place and was very careful to make
sure he didn’t catch his hand on the corner. Once he was happy with
the depth he started turning away under the centre core of timber
and, when it was small enough, he snapped it off. He finished the
inside with a small bowl gouge then sanded and waxed it. To take the
bowl off the jig you can warm it in the microwave or with a hot air
gun, but on this occasion he cut the joints with a Stanley knife. (See photos JL_21 to 25).
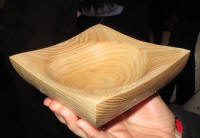
Joe left a curved base on this bowl but if he wanted to flatten the base, after splitting the joint he would find the centre of the flat surface by drawing lines from corner to corner, then mount it on a screw chuck and turn the bottom to the desired shape.
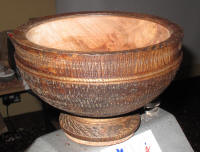
3. Celtic Style Bowl
For this project Joe mounted an elm burr blank
measuring approx. 8” by 6” on a screw
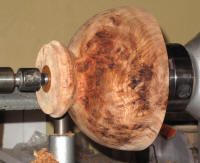 chuck and held it in place
with the tailstock. He turned the outside to a rough bowl shape then
turned a spigot on the end. He started to form the shape of a foot
then turned his attention to refining the shape of the bowl,
and turned a waist between
the bowl and the foot. (See photos JL_26 and 27).
chuck and held it in place
with the tailstock. He turned the outside to a rough bowl shape then
turned a spigot on the end. He started to form the shape of a foot
then turned his attention to refining the shape of the bowl,
and turned a waist between
the bowl and the foot. (See photos JL_26 and 27).
Once he was happy with the shape and had removed any last tool marks Joe started to texture it. First he marked two lines, one an inch from the top and the other approximately an inch from the ‘waist’. With the lathe running slowly he used an Arbortech to carve a pattern between the lines. Because the lathe was running slowly the pattern ran in straight lines from the top to the bottom; “if you want the lines to curve round it you need to run the lathe at a higher speed”. Next he turned a bead at the top of the foot then a series of small beads between this and the texturing. He turned the top inch – between the texturing and the top of the bowl – until it was flat then turned a bead between this and the top of the carving. Using a texturing tool he then turned a pattern on the top of the foot and the edge of the rim. (See photos JL_28 and 29).
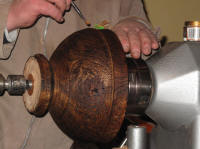 To finish the outside Joe used “2 grit”, that
is a wire brush on a power drill, to remove all the tear out from
the carving and texturing. He followed this with a hand held wire
brush to take off any last bits of tear out, both with the lathe
running and with it switched off. To
make it look old and highlight the texturing he applied Briwax
‘Jacobean Dark Oak’ with a brush, which he dipped in white spirit
from time to time. He wiped the excess wax off with a soft bristle
brush, with the lathe off then used the brush to polish it with the
lathe running. He highlighted the two main beads with gilt cream
applied with a small brush. (See photos JL_30 and 31).
To finish the outside Joe used “2 grit”, that
is a wire brush on a power drill, to remove all the tear out from
the carving and texturing. He followed this with a hand held wire
brush to take off any last bits of tear out, both with the lathe
running and with it switched off. To
make it look old and highlight the texturing he applied Briwax
‘Jacobean Dark Oak’ with a brush, which he dipped in white spirit
from time to time. He wiped the excess wax off with a soft bristle
brush, with the lathe off then used the brush to polish it with the
lathe running. He highlighted the two main beads with gilt cream
applied with a small brush. (See photos JL_30 and 31).
After cleaning up the tenon he turned it round on the lathe and mounted it in the chuck. He tidied up the top edge then used a texturing tool to turn a spiral pattern on the rim, with the lathe running at 450 rpm. He cleaned this with the hand held wire brush then applied the wax to it and cleaned it as before. He advised that you should not use paper to clean and buff it as it will catch in all the texturing. He also suggested that if it goes too dark you could give it a light sanding to highlight the tops of the texturing. (See photo JL_32).
Finally, Joe quickly turned the inside of the
bowl and turned a small bead on the inside edge of the rim, to break
the area between the inside and the outside.
 Before taking the final
cuts he waxed the inside of the rim; this was so the last cuts could
remove any excess wax. He took the finishing cuts with a freshly
sharpened tool, taking care to avoid damaging the bead at the top.
Normally Joe would sand this, but as the wood was a bit wet he left
it for a club member to finish. (See photos JL_33 to 35).
Before taking the final
cuts he waxed the inside of the rim; this was so the last cuts could
remove any excess wax. He took the finishing cuts with a freshly
sharpened tool, taking care to avoid damaging the bead at the top.
Normally Joe would sand this, but as the wood was a bit wet he left
it for a club member to finish. (See photos JL_33 to 35).
This bowl is based on the shape of the ‘Ardagh Chalice’ - click the link to see the museum picture.
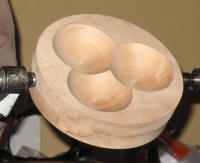
4. Shamrock Bowl
For this project Joe used an 8” x 2” sycamore
bowl blank which he turned down to fit in button jaws. He cleaned
the face with a bowl gouge then refined the cut with a skew,
emphasising the importance of this surface being flat. He tidied the
edge to just above the buttons on the jaws,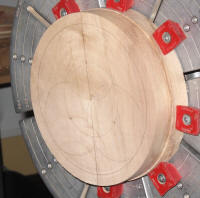 then started to mark out
the pattern. First he marked the centre then he drew a vertical line
through the centre from the top to the bottom, following the line of
the grain and taking it onto the outer edge. He marked a ring near
the outside edge, for the rim of the bowl, then he set a compass to
half the distance from the centre to the outer line. He put the
compass point on the centre and drew a circle, then positioned the
compass at the point where the circle and the vertical line crossed
each other and drew another circle – this one went from the centre
mark to the outer ring. He then positioned the compass at each of
the points where the two circles crossed and marked the point where
the compass intersected the centre circle. Finally he positioned the
compass on these two points and drew two more circles then he
drilled a hole in the centre of each of the three outer, ‘bowl’,
circles to the depth he wanted the bowls to be, making sure they
were all the same depth. (See photos JL_36 to 38).
then started to mark out
the pattern. First he marked the centre then he drew a vertical line
through the centre from the top to the bottom, following the line of
the grain and taking it onto the outer edge. He marked a ring near
the outside edge, for the rim of the bowl, then he set a compass to
half the distance from the centre to the outer line. He put the
compass point on the centre and drew a circle, then positioned the
compass at the point where the circle and the vertical line crossed
each other and drew another circle – this one went from the centre
mark to the outer ring. He then positioned the compass at each of
the points where the two circles crossed and marked the point where
the compass intersected the centre circle. Finally he positioned the
compass on these two points and drew two more circles then he
drilled a hole in the centre of each of the three outer, ‘bowl’,
circles to the depth he wanted the bowls to be, making sure they
were all the same depth. (See photos JL_36 to 38).
Now Joe was ready to turn this project. First he tidied the top surface again to remove the compass hole in the middle and make sure it was still flat. He sanded it then reversed it on the button jaws to clean off the back and the outer edge, once more making sure the surface was flat. He explained that he would normally sand it at this point.
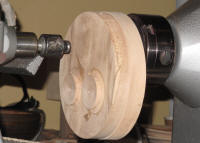 To prepare for turning the inside of the three
bowls he mounted each of them in turn on a screw chuck and used hot
melt glue to fix a small disk on the back of each, centring them with the tail stock. When the glue was set he turned
each of them to a spigot. The lathe was jumping a bit when he did
this so a couple of our members held it steady for him. (See photos
JL_39 and 40).
To prepare for turning the inside of the three
bowls he mounted each of them in turn on a screw chuck and used hot
melt glue to fix a small disk on the back of each, centring them with the tail stock. When the glue was set he turned
each of them to a spigot. The lathe was jumping a bit when he did
this so a couple of our members held it steady for him. (See photos
JL_39 and 40).
To turn the first bowl he mounted one of the
spigots in the chuck and turned it to the depth of the screw hole
and to the diameter of the marked circle. When he was happy with the
shape he made a finishing cut with a ⅜” bowl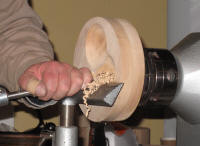 gouge. He said that he
would normally sand and polish it at this stage. He repeated this
process for the other two bowls but he had to take more care with
these because the bowls were overlapping each other, so he slowed
the lathe down. (See photos JL_41 and 42).
gouge. He said that he
would normally sand and polish it at this stage. He repeated this
process for the other two bowls but he had to take more care with
these because the bowls were overlapping each other, so he slowed
the lathe down. (See photos JL_41 and 42).
The next part of the project was to turn the
stem. For this Joe marked a tiny hole, with a bradawl in the centre
of the edge, at the two points where the he had drawn the vertical
line at the beginning. He then took it off the lathe and removed the
three chucking points by mounting them in the chuck and knocking the
bowl off them. Using the two holes he had
 marked on the side he
mounted it between steb centres. With the chisel held right up to
the tailstock Joe carefully drew it towards himself to tidy it, then
started turning towards the middle to form the stalk
and then he drew the chisel
back towards the edge to make a recess for the stalk. To make it
deeper he used a small bowl gouge with a very long grind to get into
the recess. When it was finished he hand sanded away any tear out on
the edge. (See photos JL_43 and 44).
marked on the side he
mounted it between steb centres. With the chisel held right up to
the tailstock Joe carefully drew it towards himself to tidy it, then
started turning towards the middle to form the stalk
and then he drew the chisel
back towards the edge to make a recess for the stalk. To make it
deeper he used a small bowl gouge with a very long grind to get into
the recess. When it was finished he hand sanded away any tear out on
the edge. (See photos JL_43 and 44).
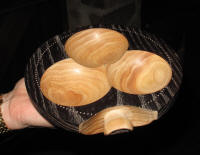
To finish the underneath he mounted it in the
button jaws and turned away the remaining glue and the hole in the
middle. Then turned the bottom so
 it was flat and turned a smooth
curve out towards the edge, with a narrow rim at the edge. He mad a
final cut round the outer edge to remove the pin holes in the stem
and the opposite side. (See photo JL_45). Photos JL_46 and 47 show a
finished shamrock bowl which Joe had decorated on the top and side.
it was flat and turned a smooth
curve out towards the edge, with a narrow rim at the edge. He mad a
final cut round the outer edge to remove the pin holes in the stem
and the opposite side. (See photo JL_45). Photos JL_46 and 47 show a
finished shamrock bowl which Joe had decorated on the top and side.
Thank you Joe for a most enjoyable and inspirational day of turning. I feel sure many of the people there will be having a go at some of your projects in their own workshops.
Lorrie Flannery
SWC Club member