

- Alan Truman
- Albert Harrison
- Ambrose O'Halloran
- Andrew Hall
- Bob Chapman
- Bob Neill
- Clive Brooks
- Colin Fishwick
- David Lowe
- David Springett
- Gary Rance
- George Bell
- Gerry Marlow
- Ian Clarkson
- Joe Laird
- Joey Richardson
- John Berkeley
- Ken Allen
- Les Thorne
- Margaret Garrard
- Mark & Lisa Raby
- Mark Baker
- Mark Hancock
- Martin Pidgen
- Mick Hanbury
- Nick Agar
- Nick Arnull
- Nikos Siragas
- Paul Jones
- Phil Irons
- Philip Greenwood
- Peter Berry
- Peter Wood
- Richard Findlay
- Robin Wood
- Russell Kebble
- Sarah Thirlwell
- Simon Hope
- Simon Whitehead
- Steve Wright
- Stuart King
- Sue Harker
- SWC Club Members
- Tony Wilson
- Tracy Owen
- Walt Claxton
- Walt Claxton & Tom Allison
Peter Berry 13 June 2013
Because wood carving is quite a different
discipline to woodturning Peter took![]() us through all the different
stages. He started at a basic level , with relief carving, then
moved on to appliqué relief carving and finished with three
dimensional carving, also known as carving in the round. Throughout
the demonstration he used Flexcut tools; these consist of a series
of different gouges which slot into handles.
us through all the different
stages. He started at a basic level , with relief carving, then
moved on to appliqué relief carving and finished with three
dimensional carving, also known as carving in the round. Throughout
the demonstration he used Flexcut tools; these consist of a series
of different gouges which slot into handles.
1. Relief Carving
Peter started by placing a template of a leaf
on a block of lime then drew round
 the outside of it and added the
main stem. Using a ‘v’ cut gouge he cut round the pattern, working
with the grain. Starting at the widest part of the curve, he worked
towards the point on both sides then turned the block round and
carved from where he had started back to the stem, then he carved
the stem itself. To make the leaf stand out he carved all the way
round the outside of it so the leaf appeared to be raised from the
surface. He skimmed the surface of the leaf with a very shallow
chisel and tidied the stem, then textured the area surrounding the
leaf. Finally, he drew on the veins and carved them with the ‘v’
tool, then made a nick on the outside edge of the leaf, at the ends
of the veins. After signing it he sprayed it with silicone spray.
(See photos PB_01 and 02).
the outside of it and added the
main stem. Using a ‘v’ cut gouge he cut round the pattern, working
with the grain. Starting at the widest part of the curve, he worked
towards the point on both sides then turned the block round and
carved from where he had started back to the stem, then he carved
the stem itself. To make the leaf stand out he carved all the way
round the outside of it so the leaf appeared to be raised from the
surface. He skimmed the surface of the leaf with a very shallow
chisel and tidied the stem, then textured the area surrounding the
leaf. Finally, he drew on the veins and carved them with the ‘v’
tool, then made a nick on the outside edge of the leaf, at the ends
of the veins. After signing it he sprayed it with silicone spray.
(See photos PB_01 and 02).
2. Appliqué Relief Carving
For this project Peter had a piece of lime that
he had already cut on the bandsaw to the shape of a man’s head and
shoulders with details of the ears, eyes, nose, hat, and neckerchief
all drawn onto it. First he chamfered all round the edges, with a
shallow gouge, curving them down to about half of their original
thickness. Then he carved away all the detail that had been drawn
onto it. Once this was done he redrew the detail onto it and carved
out the lines for the edge of the hat and the neckerchief; he carved
these quite deeply, to make them stand out. After that he finished
carving all the fine detail. (See photos PB_03 to 05).
of a man’s head and
shoulders with details of the ears, eyes, nose, hat, and neckerchief
all drawn onto it. First he chamfered all round the edges, with a
shallow gouge, curving them down to about half of their original
thickness. Then he carved away all the detail that had been drawn
onto it. Once this was done he redrew the detail onto it and carved
out the lines for the edge of the hat and the neckerchief; he carved
these quite deeply, to make them stand out. After that he finished
carving all the fine detail. (See photos PB_03 to 05).
3. Three Dimensional Carving or Carving in the Round
Peter started by saying that to visualise a
project in the round you need to think of it as two halves. He
started with a block shaped mouse which had the grain running along
it, from the nose to the tail, thus making the tail very strong. It
also had a block of wood
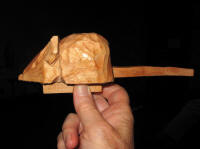 screwed to the underneath to hold it in a
vice. The vice he used is a universally accessible one, which means
he can move it round so he can work from all angles. This is
available from Axminster’s and can be found on their website as a Stanley
Multi Angle Hobby Vice’.
screwed to the underneath to hold it in a
vice. The vice he used is a universally accessible one, which means
he can move it round so he can work from all angles. This is
available from Axminster’s and can be found on their website as a Stanley
Multi Angle Hobby Vice’.
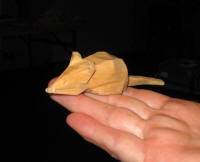 He
rounded off the corners both manually and with a power carver,
explaining that “a power tool is a way of doing things more quickly,
not of doing things you cannot do manually”. He also used a palm
handle for his gouge so he could get close in to the work. He shaped
the body, head, tail and ears with the shallow gouge then used a
deep gouge to carve out inside the ears. When he had finished he
sprayed it with acrylic gloss lacquer. (See photos PB_06 to 13). After
finishing the mouse Peter repeated the project, starting from
scratch, cutting the block shape into a small piece of wood, approx.
1” x 1” x 12”, using a small (Proxxon) bandsaw to cut the block
shape. Then, because it was very small, he carved it with a knife,
holding the work in his hand. This is called whittling. (See photos
PB_14 and 15).
He
rounded off the corners both manually and with a power carver,
explaining that “a power tool is a way of doing things more quickly,
not of doing things you cannot do manually”. He also used a palm
handle for his gouge so he could get close in to the work. He shaped
the body, head, tail and ears with the shallow gouge then used a
deep gouge to carve out inside the ears. When he had finished he
sprayed it with acrylic gloss lacquer. (See photos PB_06 to 13). After
finishing the mouse Peter repeated the project, starting from
scratch, cutting the block shape into a small piece of wood, approx.
1” x 1” x 12”, using a small (Proxxon) bandsaw to cut the block
shape. Then, because it was very small, he carved it with a knife,
holding the work in his hand. This is called whittling. (See photos
PB_14 and 15).
4.
Relief Carved Wood Spirit Face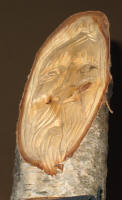
For his final project Peter carved a face into a silver birch log which had a flat surface cut at an angle down its length. He drew the pattern onto the surface then started carving it away with the ‘v’ gouge in his reciprocating power carver, this replicates the in/out movement of the hand carver. He gradually cut away all the drawn lines which he had been using to ensure the different areas of the face were in the right place. He carved the deeper detail by hand as the power carver isn’t so good at this. He explained that it’s the deeper detail that makes the face look more animated. (See photos PB_16 to 19).
Lorrie Flannery
SWC club member