

- Alan Truman
- Albert Harrison
- Ambrose O'Halloran
- Andrew Hall
- Bob Chapman
- Bob Neill
- Clive Brooks
- Colin Fishwick
- David Lowe
- David Springett
- Gary Rance
- George Bell
- Gerry Marlow
- Ian Clarkson
- Joe Laird
- Joey Richardson
- John Berkeley
- Ken Allen
- Les Thorne
- Margaret Garrard
- Mark & Lisa Raby
- Mark Baker
- Mark Hancock
- Martin Pidgen
- Mick Hanbury
- Nick Agar
- Nick Arnull
- Nikos Siragas
- Paul Jones
- Phil Irons
- Philip Greenwood
- Peter Berry
- Peter Wood
- Richard Findlay
- Robin Wood
- Russell Kebble
- Sarah Thirlwell
- Simon Hope
- Simon Whitehead
- Steve Wright
- Stuart King
- Sue Harker
- SWC Club Members
- Tony Wilson
- Tracy Owen
- Walt Claxton
- Walt Claxton & Tom Allison
Simon Whitehead 11 April 2013
![]() This was the first time I had seen Simon
demonstrate so I didn’t really know what to expect. I was certainly
not disappointed; he is an excellent turner with a great sense of
humour, so it was a very enjoyable evening. He turned two projects
for us, an off-centre coloured bowl and a box with a finial lid.
This was the first time I had seen Simon
demonstrate so I didn’t really know what to expect. I was certainly
not disappointed; he is an excellent turner with a great sense of
humour, so it was a very enjoyable evening. He turned two projects
for us, an off-centre coloured bowl and a box with a finial lid.
1. Off-Centre Coloured Bowl
For his first project Simon used an 8” – 9”
spalted sycamore bowl blank on which he had made two screw holes,
one in the centre and the other a little off-centre - half an inch
from the centre one. To start turning it he mounted it on a screw
chuck using the centre hole.
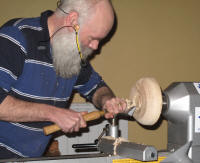 He turned the outside edge to a curve
with a bowl gouge then took the sharp edges off the top. He tidied
up the base then used a parting tool to turn a chucking point. He
then remounted it on the screw chuck, using the off-centre screw
hole. He marked the centre on the base then turned another chucking
point. (See photos SW_01 to 03).
He turned the outside edge to a curve
with a bowl gouge then took the sharp edges off the top. He tidied
up the base then used a parting tool to turn a chucking point. He
then remounted it on the screw chuck, using the off-centre screw
hole. He marked the centre on the base then turned another chucking
point. (See photos SW_01 to 03).
He turned it round on the lathe, mounting it on the centre chucking point to tidy the outside curve and take away some of the weight. He started turning the top, curving it back to the edge. To tidy the top and the curves he used a large scraper which was ground square so he can use both edges, therefore making it last twice as long. He positioned it with the handle held above the centre line, so he just used the top edge. Then, for the final cut, he held it free hand, without using the tool rest, resting the tool handle on his shoulder. He used some wet paper to dampen areas of torn fibre, then sanded it. (See photos SW_04 and 05).
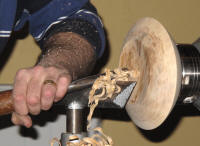 He then remounted it on the off centre chucking
point and turned away some of the top surface, then started turning
He then remounted it on the off centre chucking
point and turned away some of the top surface, then started turning
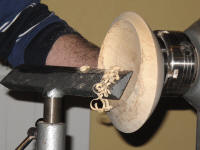 the bowl, working from the outer edge to the middle. When he was
happy with the shape he used a large round scraper to remove any
last steps and lumps, then sanded it. (See photos SW_06 and 07).
the bowl, working from the outer edge to the middle. When he was
happy with the shape he used a large round scraper to remove any
last steps and lumps, then sanded it. (See photos SW_06 and 07).
At this stage he took it off the lathe and sprayed inside the bowl with gold crackle paint then added a coat of black paint in the interval and set it aside to dry. He then returned to the project at the end of the evening.
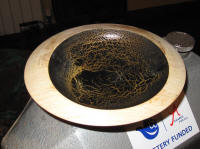 Once the paint had dried Simon mounted the bowl
back on the lathe, using the off-centre spigot, and skimmed the edge
to remove the paint. After refining the shape of the underneath he
lightly sanded it, softening the sharp outer edge to avoid cuts. To
finish this bowl he takes it off the lathe and sprays it all over
with melamine lacquer. (See photo SW_22).
Once the paint had dried Simon mounted the bowl
back on the lathe, using the off-centre spigot, and skimmed the edge
to remove the paint. After refining the shape of the underneath he
lightly sanded it, softening the sharp outer edge to avoid cuts. To
finish this bowl he takes it off the lathe and sprays it all over
with melamine lacquer. (See photo SW_22).
2. Box with Finial Lid
Simon mounted a piece of elm 4” square by 8”
long between centres, using a four prong drive. He used a spindle
roughing gouge to turn it to a cylinder then a parting tool to
straighten the tailstock end, which was going to be the bottom of
the box. He turned a spigot, which he used to mount it in the chuck,
then used the spindle roughing gouge to bring it down to the desired
diameter.
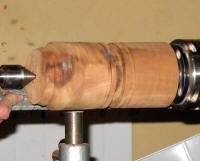 Using a parting tool he cut a groove ¼” deep and about ½”
wide, to separate the lid from the box. He then cut another groove
either side of the first one. Leaving a piece on each side which he
would later turn into beads. (See photos SW_08 to 11).
Using a parting tool he cut a groove ¼” deep and about ½”
wide, to separate the lid from the box. He then cut another groove
either side of the first one. Leaving a piece on each side which he
would later turn into beads. (See photos SW_08 to 11).
He started turning away timber at the tailstock
end to shape the lid and the finial then used a parting tool to turn
a step at the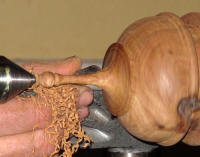 bottom of the final. He rounded the area under the
finial and rolled beads he had started earlier. After refining the
shape of the finial he used a parting tool to turn a ball at the top
of it then slimmed down the rest of it. Finally for the lid, he used
a skew to sharpen the edges beneath the ball and part it off. (See
photos SW_12 to 14).
bottom of the final. He rounded the area under the
finial and rolled beads he had started earlier. After refining the
shape of the finial he used a parting tool to turn a ball at the top
of it then slimmed down the rest of it. Finally for the lid, he used
a skew to sharpen the edges beneath the ball and part it off. (See
photos SW_12 to 14).
Next Simon parted the lid off the base, leaving
a witness mark on the box to use later then used a small bowl gouge
to turn the inside of it.
 He started with the heel of the tool on
the centre, drew it back towards the edge then pushed the tool in to
start the cut as he got to the edge, coming almost back to the
witness mark. Alternatively, he suggested you could use a skew to
start the edge. He used a skew to shape the inside edge, taking off
small amounts at a time until the lid fitted. Once he was happy with
the fit he finished hollowing the inside, leaving a step near the
top, then used
He started with the heel of the tool on
the centre, drew it back towards the edge then pushed the tool in to
start the cut as he got to the edge, coming almost back to the
witness mark. Alternatively, he suggested you could use a skew to
start the edge. He used a skew to shape the inside edge, taking off
small amounts at a time until the lid fitted. Once he was happy with
the fit he finished hollowing the inside, leaving a step near the
top, then used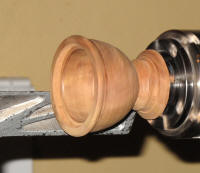 a scraper to take some light finishing cuts. (See
photo SW_15).
a scraper to take some light finishing cuts. (See
photo SW_15).
Finally he turned his attention to finishing the outside. He used a parting tool to turn away a lot of the waste timber at the bottom then used a gouge to shape it, following the inside shape. After turning a foot in the bottom he lightly sanded it then parted it off. To finish the bottom he turned it round on the lathe and expanded the jaws into the inside, making sure he didn’t over tighten it. He used a gouge to tidy the underneath, turning it to a slight hollow. (See photos SW_16 and 17).
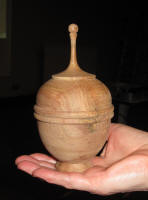 To finish the lid he put the finial into the
chuck and held it on the step he had turned at the base of the
finial. Using a skew he started to turn the inside edge, then used a
bowl gouge to hollow it out, checking for an even thickness. Before
taking it off the chuck he checked the fit on the base and took off
a fraction as it was a bit tight. (See photos SW_18 to 21).
To finish the lid he put the finial into the
chuck and held it on the step he had turned at the base of the
finial. Using a skew he started to turn the inside edge, then used a
bowl gouge to hollow it out, checking for an even thickness. Before
taking it off the chuck he checked the fit on the base and took off
a fraction as it was a bit tight. (See photos SW_18 to 21).
Lorrie Flannery
SWC club member