

- Alan Truman
- Albert Harrison
- Ambrose O'Halloran
- Andrew Hall
- Bob Chapman
- Bob Neill
- Clive Brooks
- Colin Fishwick
- David Lowe
- David Springett
- Gary Rance
- George Bell
- Gerry Marlow
- Ian Clarkson
- Joe Laird
- Joey Richardson
- John Berkeley
- Ken Allen
- Les Thorne
- Margaret Garrard
- Mark & Lisa Raby
- Mark Baker
- Mark Hancock
- Martin Pidgen
- Mick Hanbury
- Nick Agar
- Nick Arnull
- Nikos Siragas
- Paul Jones
- Phil Irons
- Philip Greenwood
- Peter Berry
- Peter Wood
- Richard Findlay
- Robin Wood
- Russell Kebble
- Sarah Thirlwell
- Simon Hope
- Simon Whitehead
- Steve Wright
- Stuart King
- Sue Harker
- SWC Club Members
- Tony Wilson
- Tracy Owen
- Walt Claxton
- Walt Claxton & Tom Allison
Ambrose O'Halloran 11 September 2008
Demonstration by Ambrose O’Halloran – 11 September 2008
Ambrose started
![]() the evening by introducing himself and his wife, Brid, who is also a turner and had accompanied him on the trip. He told us about their background, what they do back home in Eire and talked about their philosophy on woodturning.
the evening by introducing himself and his wife, Brid, who is also a turner and had accompanied him on the trip. He told us about their background, what they do back home in Eire and talked about their philosophy on woodturning.
The first item he turned was a hanging tealight holder with a finial underneath it, which he turned from a large piece of sycamore. He drilled a hole in one end, which he used to mount it between centres on small fitting gripper jaws, then once he had trued up the piece of wood he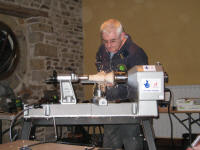 moved the tailstock away. First he used a spindle gouge to turn the hole for the tealight in the end of the piece of wood and then a French bédan to straighten the inside edge. He finished the top of the tealight by doming it slightly and marking three points round the edge at 120 degrees, at which he then drilled small holes to take the chain he uses to hang it. After a light sanding he took the piece off the lathe and re-mounted it between centres using the hole he had turned for the tealight to hold it on the chuck. Using a roughing out gouge he turned it to a cone shape then switched to a bowl gouge to turn a curve underneath where the tealight will be held (see photos 1 and 2
). Once the base was completed he turned to the finial, first using a roughing out gouge to remove the bulk of the wood, taking ever lighter cuts as the wood became thinner. Having removed the bulk of the wood he used a skew chisel to do the fine turning on the finial (see photo 3).
moved the tailstock away. First he used a spindle gouge to turn the hole for the tealight in the end of the piece of wood and then a French bédan to straighten the inside edge. He finished the top of the tealight by doming it slightly and marking three points round the edge at 120 degrees, at which he then drilled small holes to take the chain he uses to hang it. After a light sanding he took the piece off the lathe and re-mounted it between centres using the hole he had turned for the tealight to hold it on the chuck. Using a roughing out gouge he turned it to a cone shape then switched to a bowl gouge to turn a curve underneath where the tealight will be held (see photos 1 and 2
). Once the base was completed he turned to the finial, first using a roughing out gouge to remove the bulk of the wood, taking ever lighter cuts as the wood became thinner. Having removed the bulk of the wood he used a skew chisel to do the fine turning on the finial (see photo 3).
After the break Ambrose mounted a kiln dried bowl blank onto the chuck, explaining that he was using kiln dried wood as it needed to be very dry for the burning process he was going to
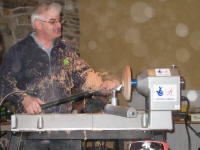 demonstrate. He used a face plate to mount this onto the chuck then measured and marked a spigot which he turned with a bowl gouge and tidied with the bédan. Without doing any further work on this side of the timber he turned it round and mounted the spigot on the chuck, but didn’t remove the face plate. He used a standard bowl gouge with a pushing cut to tidy the area from the edge of the wood to the face plate then took a finishing cut with a long grind bowl gouge, using a pull cut with the tool face turned into the wood and not rubbing the bevel at all, in effect using it as a sheer scraper. Once the surface was perfectly flat he gave it a very light sanding with a power sander. Ambrose went into great detail to explain the advantages and disadvantages of different grinds on the various types of chisel he used. Before going onto the next stage Ambrose explained the effects of using three different gases (butane, propane and mapp) to burn the surface of the wood and went onto to use a mapp gas burner to colour the surface of the timber (see photo 4) until it was jet black then brushed it briefly to remove the soot. He finished it with a coat of Danish oil but explained that he would normally apply three coats to get a good molecular bond, cutting back between coats.
The next stage was to turn it back round on the lathe and turn a curved profile on the base of the bowl (see photos 5, 6 and 7 and note the finger tip lightness of the way he holds the gouge in photo 5). After a light sanding he finished it with a coat of Danish oil. Yet again he turned it round on the lathe so he could finish the inside and top of the bowl, mounting the spigot on the chuck and removing the face plate. He now turned his attention to the inside of the bowl where he used a standard grind bowl gouge, taking great care to ensure the bevel was supported so the tool didn’t kick back and damage the burnt surface (see photo 8). Ambrose suggested that a bowl is aesthetically much better if the inside edge has a slight undercut, it tends to give a much better curve. To finish he cut a small ‘ledge’ on the outside edge with the bédan and a corresponding cut on the inner edge with the skew chisel.
For the final part of the demonstration the lathe was moved away so that Ambrose could sit at a table to demonstrate various texturing techniques:
-
a hammering technique using a mallet to hammer metal rods with patterns on the end into the surface of the wood
-
carving techniques using a power carver with a flexible drive
-
a rotary burr in a dremel on a flexible drive to make holes in the surface of the timber
-
pyrography using a variety of wire shapes to burn patterns into the surface
He then showed a series of slides to illustrate the effects of the various texturing techniques and showed turnings done by some of the world’s top turners which were inspired by the turners’ surroundings.
This was an outstanding and very interesting demonstration with a lot of emphasis on the importance of getting inspiration from everyday objects and surroundings to turn and texture pieces that are more interesting than plain wooden pieces; to use texturing to enhance your work where appropriate and interpret an idea rather than using it just for the sake of it.
This novice turner thanks you Ambrose for a truly inspirational evening.
Lorrie Flannery
![]()
SWC club member