

- Alan Truman
- Albert Harrison
- Ambrose O'Halloran
- Andrew Hall
- Bob Chapman
- Bob Neill
- Clive Brooks
- Colin Fishwick
- David Lowe
- David Springett
- Gary Rance
- George Bell
- Gerry Marlow
- Ian Clarkson
- Joe Laird
- Joey Richardson
- John Berkeley
- Ken Allen
- Les Thorne
- Margaret Garrard
- Mark & Lisa Raby
- Mark Baker
- Mark Hancock
- Martin Pidgen
- Mick Hanbury
- Nick Agar
- Nick Arnull
- Nikos Siragas
- Paul Jones
- Phil Irons
- Philip Greenwood
- Peter Berry
- Peter Wood
- Richard Findlay
- Robin Wood
- Russell Kebble
- Sarah Thirlwell
- Simon Hope
- Simon Whitehead
- Steve Wright
- Stuart King
- Sue Harker
- SWC Club Members
- Tony Wilson
- Tracy Owen
- Walt Claxton
- Walt Claxton & Tom Allison
Sue Harker 14 June 2012
1 Back to Back Candle Holder![]()
"Back
to back" is a form of involuted turning using just 2 sections of wood.
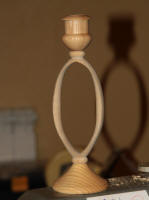
The completed candle holder comprised 3 sections, a base, a central hollowed elliptical section and a top section candle holder. The central section was finished with a spigot each end so it could sit in the base and also support the top section candle holder
The elliptical section was shaped first and used 2 lengths of wood of rectangular section. These had been previously planed and thicknessed. Rough sizes were 10 x 2 x 1 inches. (Size could be changed in length and width to vary the finished central section.) These pieces were glued together (using pva and paper) along the back edges to form a thin brick shape and screwed together at each end for additional security when turning.
Once dry they were held between centres (pi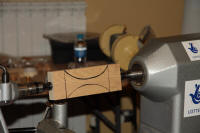 c 3) , ensuring the hold
points were dead centre on the joint sections to ensure even shaping
of the pieces. Sue used steb centres at each end to hold the section.
c 3) , ensuring the hold
points were dead centre on the joint sections to ensure even shaping
of the pieces. Sue used steb centres at each end to hold the section.
A ½inch spindle gouge was used to shape the section, remembering to cut down at all times from the edges to the centre point. A black pen was used to indicate the required boundaries of the cut to produce the required shape and a cardboard template to check progress.
Once shaped, initial sanding of the shaped section was done with a foam pad as support and keeping sanding speed high to retain a clean edge to the work. Much of the sanding was then completed with the lathe switched off and using a Velcro covered stick to hold the abrasive. The important aspect of this was to ensure the edges weren’t rounded over.
After sanding was complete the turned edges were finished with sanding sealer and the 2 sections of wood separated, reversed, glued and screwed back together ensuring the shaped sections fitted together cleanly.
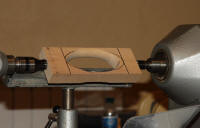 When dry the screws were removed and the piece was ready for the
outer shape to be turned to mirror the inner ellipse. The piece was
again held between steb centres (pic 6) ensuring the hold points were dead
centre to allow even shaping of the piece.
When dry the screws were removed and the piece was ready for the
outer shape to be turned to mirror the inner ellipse. The piece was
again held between steb centres (pic 6) ensuring the hold points were dead
centre to allow even shaping of the piece.
 A ½inch spindle gouge was again used to shape the outer sections
working from the centre outwards and turning until the “flats” disappeared
on the outer edges. Care was taken to ensure enough wood was left to
make a small bead at each end of the ellipse (pic 9) and then a ½inch
diameter spigot. Whilst turning the edges to shape a black pen was used
to keep highlighting the areas needing attention.
A ½inch spindle gouge was again used to shape the outer sections
working from the centre outwards and turning until the “flats” disappeared
on the outer edges. Care was taken to ensure enough wood was left to
make a small bead at each end of the ellipse (pic 9) and then a ½inch
diameter spigot. Whilst turning the edges to shape a black pen was used
to keep highlighting the areas needing attention.
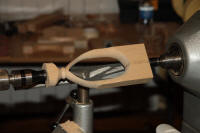
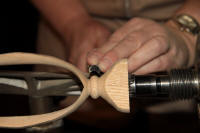 Once the ellipse shape had been created a bead was formed using an
adapted ½inch spindle gouge. The back of this had been ground across at
45 degree angle so that when it was turned over on the tool rest it
presented a cove shape to the wood which could be used to scrape a bead
of the required size. (pic 11) To maintain the strength of the piece
this was done at the tail stock end first, followed by a ½inch spigot
to hold 1 of the outer sections. This was then repeated at the headstock
end.
Once the ellipse shape had been created a bead was formed using an
adapted ½inch spindle gouge. The back of this had been ground across at
45 degree angle so that when it was turned over on the tool rest it
presented a cove shape to the wood which could be used to scrape a bead
of the required size. (pic 11) To maintain the strength of the piece
this was done at the tail stock end first, followed by a ½inch spigot
to hold 1 of the outer sections. This was then repeated at the headstock
end.
The piece was sanded to clean up the edges and refine the shape of the ellipse where required. Again care was taken not to round over the edge sections. Finally the piece was finished with sanding sealer, ready for buffing later and then parted off using a small saw.
Although Sue did not do it on this occasion finials can be mounted within the ellipse fixed at the top and/or bottom of the piece. To house these it would be necessary to drill a hole through the length of the spigots, exiting inside the ellipse. If this is done it is crucial the holes are drilled centrally to ensure the finials will fit absolutely vertically. Sue had had a jig built to help her do this.
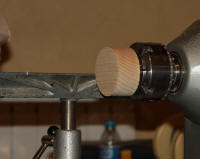 The Base was turned from a small piece mounted on the chuck in bowl
orientation (pic 12) . The back of the piece had been previously drilled
to provide a chucking point. This was initially turned to round before
being drilled with a ½inch forstner bit deep enough to accommodate the
spigot of the central section. The outer shape of the base was then
created and refined before being sanded and finished with sanding sealer.
At this stage the piece was reversed onto a spigot jam chuck to allow
the base to be shaped and finished in a similar manner.
The Base was turned from a small piece mounted on the chuck in bowl
orientation (pic 12) . The back of the piece had been previously drilled
to provide a chucking point. This was initially turned to round before
being drilled with a ½inch forstner bit deep enough to accommodate the
spigot of the central section. The outer shape of the base was then
created and refined before being sanded and finished with sanding sealer.
At this stage the piece was reversed onto a spigot jam chuck to allow
the base to be shaped and finished in a similar manner.
Finally the third section, the candle stick cup, was made. A piece of approximately 2inch section was mounted in the chuck, parallel grain, and a spigot formed at one end so the piece could be remounted for turning to shape.
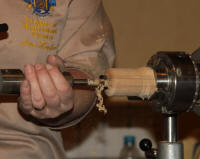 Initially the top section was turned to round, leaving the top face
as broad a diameter as possible, and the top face then shaped slightly
upwards to the centre point. At this stage a ⅞inch diameter hole was
drilled deep enough to accommodate the brass candle cup (pic 16) . This
was followed by a ½inch diameter hole sufficiently deep to extend the
proposed length of the candle cup. This would be used to sit the cup
on the top spigot of the ellipse section. Before starting to shape the
rest of the candle cup the edges of the outer hole were rounded over
to allow the brass cup to sit neatly.
Initially the top section was turned to round, leaving the top face
as broad a diameter as possible, and the top face then shaped slightly
upwards to the centre point. At this stage a ⅞inch diameter hole was
drilled deep enough to accommodate the brass candle cup (pic 16) . This
was followed by a ½inch diameter hole sufficiently deep to extend the
proposed length of the candle cup. This would be used to sit the cup
on the top spigot of the ellipse section. Before starting to shape the
rest of the candle cup the edges of the outer hole were rounded over
to allow the brass cup to sit neatly.
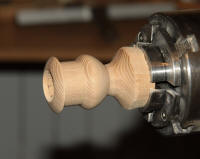 Using pencil lines to indicate the depth of the brass cup hole and
the desired overall length of the candle cup shaping was then completed
taking care not to cut away too deeply at the base. Once the top section
(pic 17) shape had been created this was sanded and again finished with
sanding sealer before being reverse chucked on a suitable spigot to
allow the bottom to be turned away revealing the previously drilled
½inch diameter hole. At this point the base was sanded ensuring top
and bottom blended together and finished in the same manner.
Using pencil lines to indicate the depth of the brass cup hole and
the desired overall length of the candle cup shaping was then completed
taking care not to cut away too deeply at the base. Once the top section
(pic 17) shape had been created this was sanded and again finished with
sanding sealer before being reverse chucked on a suitable spigot to
allow the bottom to be turned away revealing the previously drilled
½inch diameter hole. At this point the base was sanded ensuring top
and bottom blended together and finished in the same manner.
All the sections were now complete, ready for gluing and assembling. ( pic 18)
PS An American (Dewayne Colwell) does a similar exercise producing a heart shaped central section at which can be viewed on YouTube here - the video is over one hour.
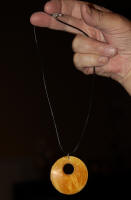
2. Offset hole Pendant using polyester resin
Starting with a 4inch section of polyester resin Sue mounted it in a chuck to be able to turn a spigot at the other end. She did this using a bedan/parting tool which had been ground at a slight angle to produce the desired dovetail to fit her chuck jaws. The piece was the reversed to hold on the new spigot.
Using a negative rake scraper Sue first trued up the diameter of the section and then used the same tool to flatten the end section of the resin which would be the back of the pendant. A small hole was then drilled near the edge of the section to hold a silver loop for the hanging cord. This hole was drilled to a sufficient depth for a number of pendants and ensured the material didn’t chip out at the back, as it would if individual pieces were drilled one by one.
Having flattened the back and drilled it this was sanded to a finish. Sue preferred to use open mesh type abrasives on resin as they did not clog up. Having finished the back of the pendant Sue then parted off a thin section.
This section was then mounted on a pre made jam chuck centrally drilled to the same 50mm diameter. The resin was held in place for security by double sided carpet tape stuck to the back and onto the jam chuck. Using the same scraper Sue proceeded to shape the front of the pendant producing a curved face to it. Once shaped the face was completely sanded to a good finish.
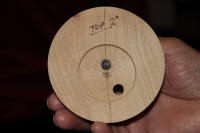 At this point the piece was transferred into a second jam chuck and
held in the same fashion by carpet tape. The hole in the second chuck
was however drilled slightly offset (pic 21) from centre to allow a
small offset section to be taken out of the pendant. It is important
the amount of offset is no more than 9mm to allow sufficient material
remains for the hanging hole in the remaining narrow section of the
pendant. Care must also be taken at this stage to mount the pendant
on the jam chuck so that the hanging hole is correctly placed. Having
fitted the pendant to the 2nd jam chuck a pencil line was
drawn to indicate the extent of the circular section to be taken out
and this was then carefully removed using a ⅜inch spindle gouge in a
scraping action. Having removed this section sanding was completed taking
care to only sand the inner hole. At this point the pendant was completed
and just needed buffing to a high shine before fitting with its hanging
cord.
At this point the piece was transferred into a second jam chuck and
held in the same fashion by carpet tape. The hole in the second chuck
was however drilled slightly offset (pic 21) from centre to allow a
small offset section to be taken out of the pendant. It is important
the amount of offset is no more than 9mm to allow sufficient material
remains for the hanging hole in the remaining narrow section of the
pendant. Care must also be taken at this stage to mount the pendant
on the jam chuck so that the hanging hole is correctly placed. Having
fitted the pendant to the 2nd jam chuck a pencil line was
drawn to indicate the extent of the circular section to be taken out
and this was then carefully removed using a ⅜inch spindle gouge in a
scraping action. Having removed this section sanding was completed taking
care to only sand the inner hole. At this point the pendant was completed
and just needed buffing to a high shine before fitting with its hanging
cord.
Our regular reporter and photographer were on holiday for this demo - so thanks to Tom Allison for the photographs and Steve Lilley for this report of Sue's demo.