

A Project by Duncan Andrews & Phil Flannery
For the second in our occasional series of
members projects Phil and Duncan turned a pepper mill.
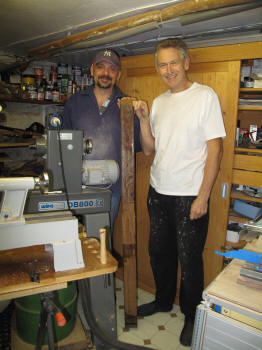 The
idea evolved a few weeks ago when Duncan was at our house and Phil
showed him a piece of timber measuring 3” square by approx. 4½ feet
long. It had been one of the posts of a score board that had been
taken down from the eighteenth hole of a local golf club. Phil had
been given quite a bit of this timber by Dave Badkin and had turned
some of it into fruit, but he thought it was a shame to use a long
piece of timber like this for fruit, so he was looking for a
different project for it. He asked Duncan if he had any ideas and
Duncan said he had a long pepper mill mechanism he had bought as
part of a pack of three, so how about getting together and turning
it into a pepper mill. Here is how they did it. (See photo PM_01)
The
idea evolved a few weeks ago when Duncan was at our house and Phil
showed him a piece of timber measuring 3” square by approx. 4½ feet
long. It had been one of the posts of a score board that had been
taken down from the eighteenth hole of a local golf club. Phil had
been given quite a bit of this timber by Dave Badkin and had turned
some of it into fruit, but he thought it was a shame to use a long
piece of timber like this for fruit, so he was looking for a
different project for it. He asked Duncan if he had any ideas and
Duncan said he had a long pepper mill mechanism he had bought as
part of a pack of three, so how about getting together and turning
it into a pepper mill. Here is how they did it. (See photo PM_01)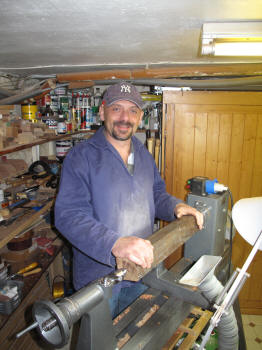 .
.
They cut a 20” long piece from the timber, which they mounted
between centres and turned to a cylinder. They used the pepper mill
shaft to mark the required length and the cutting point for the top,
then cut a spigot on one end to hold it in the chuck. They cut 5”
off the other end for the top, leaving 15” for the main body. (See
photos PM_02, 03 & 04).
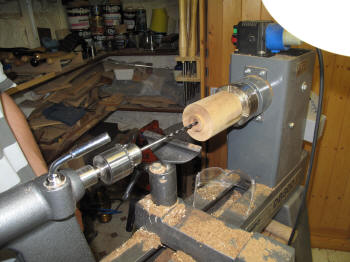
Having cut the timber to length the next job was to drill a hole for
the shaft. For this they mounted a 24mm forstner bit into a jacob’s
chuck held in the tailstock to start the hole. They then attached
the forstner bit to a drill extension and finished drilling the hole
through half the length of the timber. (See photos PM_05 & 06).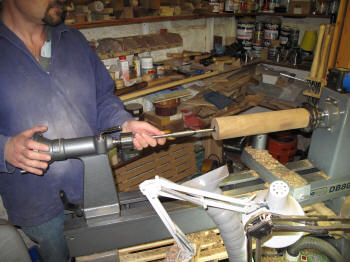
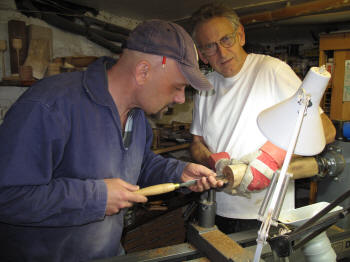 Next
they cut a recess on the top for the holding plate that holds in
place the bar that goes down the middle of the pepper mill, to stop
it moving around when filling it with peppercorns. This done they
turned it round on the lathe and mounted it on expanding pin jaws in
the recess they had just cut and drilled a hole through the bottom
to meet the one they had drilled earlier – fortunately the holes met
up in the middle. (See photos PM07, 08 & 09).
Next
they cut a recess on the top for the holding plate that holds in
place the bar that goes down the middle of the pepper mill, to stop
it moving around when filling it with peppercorns. This done they
turned it round on the lathe and mounted it on expanding pin jaws in
the recess they had just cut and drilled a hole through the bottom
to meet the one they had drilled earlier – fortunately the holes met
up in the middle. (See photos PM07, 08 & 09).
Using a parting tool they cut two recesses in the bottom – one
measuring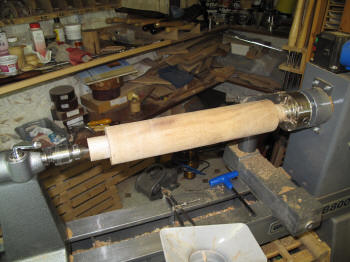 32mm to take the mechanism and a shallower one measuring 57mm to
take the plate to hold the mechanism in place. To hold it in place
on the lathe for the next stage they turned two jam chucks, both of
which were quite tight fitting and mounted one in the chuck and the
other in the tailstock. (See photos PM_10, 11 & 12).
32mm to take the mechanism and a shallower one measuring 57mm to
take the plate to hold the mechanism in place. To hold it in place
on the lathe for the next stage they turned two jam chucks, both of
which were quite tight fitting and mounted one in the chuck and the
other in the tailstock. (See photos PM_10, 11 & 12).
They turned it until it was smooth then marked and turned 2 large
beads at the bottom and another two at the top then turned a vase
shape between them. After sanding it to 1200 grit they took it off
the lathe and finished it with Osmo Oil. (See photos PM13 to 18).
 To
make the top they cut a spigot on one end and mounted it in the
chuck then cut a small spigot on the other end to fit into the body
of the pepper mill. After cutting a recess in this spigot for the
drive plate, they drilled a 6mm hole all the way through the middle
then measured the required length and cut off the excess on the
bandsaw. Before re-mounting it on the lathe they checked that it was
a good fit on the pepper mill. (See photos PM_19 to 22).
To
make the top they cut a spigot on one end and mounted it in the
chuck then cut a small spigot on the other end to fit into the body
of the pepper mill. After cutting a recess in this spigot for the
drive plate, they drilled a 6mm hole all the way through the middle
then measured the required length and cut off the excess on the
bandsaw. Before re-mounting it on the lathe they checked that it was
a good fit on the pepper mill. (See photos PM_19 to 22).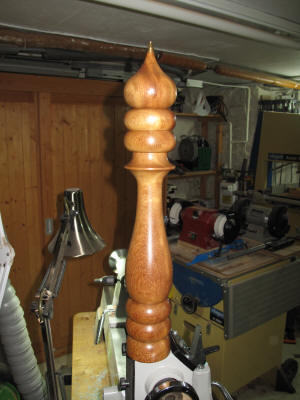
To finish turning the top they mounted it between centres, using
a light pull drive in the headstock to avoid marking it and turned
it to an onion shape to complement the shape of the brass knob that
screws into the top. After truing up the end where the top and
bottom meet they sanded and finished it to the same level as the
main body then assembled the finished article. Over the following
few days three further coats of Osmo Oil were applied to it. (See
photos PM_23 to 27).