

- Alan Truman
- Albert Harrison
- Ambrose O'Halloran
- Andrew Hall
- Bob Chapman
- Bob Neill
- Clive Brooks
- Colin Fishwick
- David Lowe
- David Springett
- Gary Rance
- George Bell
- Gerry Marlow
- Ian Clarkson
- Joe Laird
- Joey Richardson
- John Berkeley
- Ken Allen
- Les Thorne
- Margaret Garrard
- Mark & Lisa Raby
- Mark Baker
- Mark Hancock
- Martin Pidgen
- Mick Hanbury
- Nick Agar
- Nick Arnull
- Nikos Siragas
- Paul Jones
- Phil Irons
- Philip Greenwood
- Peter Berry
- Peter Wood
- Richard Findlay
- Robin Wood
- Russell Kebble
- Sarah Thirlwell
- Simon Hope
- Simon Whitehead
- Steve Wright
- Stuart King
- Sue Harker
- SWC Club Members
- Tony Wilson
- Tracy Owen
- Walt Claxton
- Walt Claxton & Tom Allison
Nikos Siragas 17 December 2009
Nikos Siragas, the world renowned artistic turner from , came along
with his wife,
![]() Frances, to entertain us with an evening of sculptural
turning. He made two main projects for us this evening plus a bonus
project at the end. For the first he turned a simple bowl, in a classic
shape which he later turned into a three sided bowl; the second was
a pierced vase with a ‘V’ shaped top. Each of these projects would normally
take approximately five hours to complete so, for the purposes of the
demonstration, Nikos showed us the basic techniques he uses then explained
what he does at home to refine and finish them.
Frances, to entertain us with an evening of sculptural
turning. He made two main projects for us this evening plus a bonus
project at the end. For the first he turned a simple bowl, in a classic
shape which he later turned into a three sided bowl; the second was
a pierced vase with a ‘V’ shaped top. Each of these projects would normally
take approximately five hours to complete so, for the purposes of the
demonstration, Nikos showed us the basic techniques he uses then explained
what he does at home to refine and finish them.
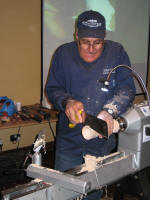
First Project
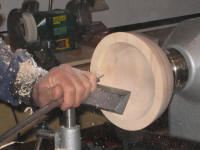
He mounted a sycamore blank measuring approx. 3” by 8” onto the lathe using a screw chuck and held it in place with a steb centre in the tailstock. He quickly turned it to the rough desired shape, with a foot which he used to mount it in the chuck, then refined the outside shape and tidied the top. He used the tailstock to hold a template onto the bowl; this had an equilateral triangle drawn on it. He marked the three points of the triangle onto the bowl surface and drew the lines out to the edge, then marked a line round the outside of the bowl about three quarters of an inch down from the edge.(See photos NS01/02/03 & 04).
 He started turning the inside of the bowl using a bowl gouge then
changed to a multi tip scraper, fitted with a teardrop blade, emphasising
that the blade should be angled between 8 and 9 o’clock to get the best
cut. To get rid of any rough areas and give a nice clean finish he put
the lathe into reverse and worked with the tool on the far side of the
bowl and the blade angled between 3 and 4 o’clock. To finish the inside
of the bowl he positioned the scraper in the centre of the bowl and
took some very fine cuts to make it smooth. Nikos had left the edge
of the bowl quite thick in preparation for the next stage, which is
where he moved from woodturning to wood carving. (See photos NS05/06
& 07).
He started turning the inside of the bowl using a bowl gouge then
changed to a multi tip scraper, fitted with a teardrop blade, emphasising
that the blade should be angled between 8 and 9 o’clock to get the best
cut. To get rid of any rough areas and give a nice clean finish he put
the lathe into reverse and worked with the tool on the far side of the
bowl and the blade angled between 3 and 4 o’clock. To finish the inside
of the bowl he positioned the scraper in the centre of the bowl and
took some very fine cuts to make it smooth. Nikos had left the edge
of the bowl quite thick in preparation for the next stage, which is
where he moved from woodturning to wood carving. (See photos NS05/06
& 07).
To get the shape of the three edges of the bowl Nikos extended the
three marker lines he had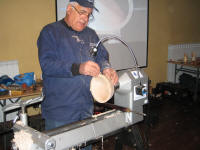 made on the top of the bowl earlier, down
the outside to the line he had drawn round the edge. He then put on
a piece of masking tape from the top of one line - on the bowl edge,
to the bottom of the next - where it met the line he had drawn round
the edge. He drew a line along the edge of the tape, between the two
points then repeated this process for the other two segments. Next,
using a fine toothed saw, he cut down each of the marker lines to the
line round the bowl than cut along each of the lines he had made with
the masking tape. He used a round rasp to smooth and shape the edges
and make an inward curve on the outside to form a curved lip. (See photos
NS08/09 & 10).
made on the top of the bowl earlier, down
the outside to the line he had drawn round the edge. He then put on
a piece of masking tape from the top of one line - on the bowl edge,
to the bottom of the next - where it met the line he had drawn round
the edge. He drew a line along the edge of the tape, between the two
points then repeated this process for the other two segments. Next,
using a fine toothed saw, he cut down each of the marker lines to the
line round the bowl than cut along each of the lines he had made with
the masking tape. He used a round rasp to smooth and shape the edges
and make an inward curve on the outside to form a curved lip. (See photos
NS08/09 & 10).
 After rasping all three segments Nikos re-turned the outside, starting
at the bottom of the rasped curve and working down to the base then
he used a Proxxon electric carving tool to merge the curves and he gradually
formed the shape he wanted using a combination of the Proxxon, the bowl
gouge and sanding disks attached to the Proxxon. After sanding and finishing
the
After rasping all three segments Nikos re-turned the outside, starting
at the bottom of the rasped curve and working down to the base then
he used a Proxxon electric carving tool to merge the curves and he gradually
formed the shape he wanted using a combination of the Proxxon, the bowl
gouge and sanding disks attached to the Proxxon. After sanding and finishing
the outside he used a flat rasp to sand the lip and curve it into the
bowl then he sanded it using Velcro backed sandpaper attached to a stick
which was curved on one side and flat on the other with Velcro stuck
to it to hold the sandpaper in place. (See photos NS11 & 12). He went
on to explain that once he is happy with the thickness and shape he
finishes the inside with the scraper and sands it down to 1,000 or 1,500
grit then seals it with sanding sealer and finishes it on the buffer
with carnuba wax. (See photos NS25 & 26).
outside he used a flat rasp to sand the lip and curve it into the
bowl then he sanded it using Velcro backed sandpaper attached to a stick
which was curved on one side and flat on the other with Velcro stuck
to it to hold the sandpaper in place. (See photos NS11 & 12). He went
on to explain that once he is happy with the thickness and shape he
finishes the inside with the scraper and sands it down to 1,000 or 1,500
grit then seals it with sanding sealer and finishes it on the buffer
with carnuba wax. (See photos NS25 & 26).
A step-by-step guide to turning this project can be found in the December 2009 edition of Woodturning Magazine and Nikos said he also plans to put it on his web site.
Second Project
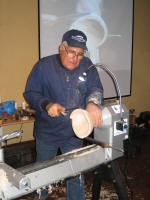
Nikos mounted a piece of sycamore measuring approx. 2” square by
8” long between centres. He started to turn it round using a spindle
gouge, turned a spigot on it and then mounted it in the chuck, holding
it steady with the steb centre in the tailstock. Once he had finished
turning it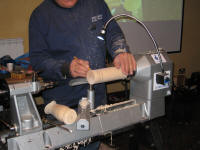 round he removed the tailstock, trued the end and marked
the centre point. With the tool rest on the centre line he drew a line
across the end then continued the line down each side to the end and
marked another line round it, approximately 2” from the top (See photo
NS13). As with the previous project, he used masking tape to draw a
line from the top of one line on the side to where it crosses the ring
on the other side and then repeated the process on the other side so
the two lines met, forming a ‘V’ shape. (See photo NS14). Next he used
a long grind spindle gouge to drill in the end and start hollowing the
vessel and gradually shape the inside. (See photo NS15). He explained
that at home he uses a metal work drill which he has mounted in a handle
to drill down into it. As he was working down into it he made a bump
in the bottom which caused the gouge to bounce, so he turned it away
with the scraper which he then continued working with to refine the
inside shape. He left it fairly thick at this stage and started turning
the outside shape, checking regularly for thickness.
round he removed the tailstock, trued the end and marked
the centre point. With the tool rest on the centre line he drew a line
across the end then continued the line down each side to the end and
marked another line round it, approximately 2” from the top (See photo
NS13). As with the previous project, he used masking tape to draw a
line from the top of one line on the side to where it crosses the ring
on the other side and then repeated the process on the other side so
the two lines met, forming a ‘V’ shape. (See photo NS14). Next he used
a long grind spindle gouge to drill in the end and start hollowing the
vessel and gradually shape the inside. (See photo NS15). He explained
that at home he uses a metal work drill which he has mounted in a handle
to drill down into it. As he was working down into it he made a bump
in the bottom which caused the gouge to bounce, so he turned it away
with the scraper which he then continued working with to refine the
inside shape. He left it fairly thick at this stage and started turning
the outside shape, checking regularly for thickness.
 As with the bowl, he used a saw to cut out the shapes he drew earlier
then used a flat rasp and the Proxxon to shape the edge and a combination
of the Proxxon and a round and flat rasp to shape the curve under the
lip, gradually working round the inside and outside to form and merge
the curves. With the lathe locked he used strips of cloth sandpaper
to smooth out the curves, together with sanding bits on a Dremel. (See
photos NS16/17/18 & 19).
As with the bowl, he used a saw to cut out the shapes he drew earlier
then used a flat rasp and the Proxxon to shape the edge and a combination
of the Proxxon and a round and flat rasp to shape the curve under the
lip, gradually working round the inside and outside to form and merge
the curves. With the lathe locked he used strips of cloth sandpaper
to smooth out the curves, together with sanding bits on a Dremel. (See
photos NS16/17/18 & 19).
Next Nikos turned his attention to piercing the vase. He marked a
line just below the edge and another parallel to it, about an inch below
it. He used a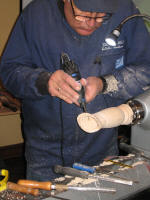 RotoZip drill which cuts on the side to pierce holes between
the lines and then used a small round file to shape the lines he had
drawn into grooves. (See photos NS20/21 & 22). He then went on to explain
that once the carving is finished he continues the hollowing and refines
the shape of the lower part of the outside, matching the inside to the
outside. He sands the inside with sandpaper attached round a stick and
folded over the end, held in place with masking tape. To finish the
bottom he makes a jam chuck with a cylinder of wood, with a spigot to
hold it in the chuck and with layers of kitchen paper wrapped round
it to protect the inside of the vase. He turns a concave shape under
the foot then seals it with several coats of sanding sealer, applied
with a brush and cut back between coats with kitchen paper and fine
steel wool and, finally, he buffs it with carnuba wax. (See photos NS27
& 28).
RotoZip drill which cuts on the side to pierce holes between
the lines and then used a small round file to shape the lines he had
drawn into grooves. (See photos NS20/21 & 22). He then went on to explain
that once the carving is finished he continues the hollowing and refines
the shape of the lower part of the outside, matching the inside to the
outside. He sands the inside with sandpaper attached round a stick and
folded over the end, held in place with masking tape. To finish the
bottom he makes a jam chuck with a cylinder of wood, with a spigot to
hold it in the chuck and with layers of kitchen paper wrapped round
it to protect the inside of the vase. He turns a concave shape under
the foot then seals it with several coats of sanding sealer, applied
with a brush and cut back between coats with kitchen paper and fine
steel wool and, finally, he buffs it with carnuba wax. (See photos NS27
& 28).
Bonus Project
As there were a few minutes left at the end of the evening Nikos
quickly turned a pendant from a piece of bubinga measuring approx. 1½”
in diameter. He curved the end, cut a groove
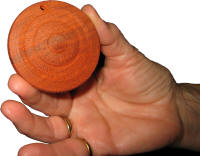 behind it with a parting
tool, made a pattern on it with a chatter tool then outlined the pattern
with grooves cut using a parting tool. He explained that he sometimes
uses a small gas burner to burn the ‘chatter’ area. He used a small
drill to make a hole for a leather thread to go through then cut it
off with a parting tool and sanded the back on a home made sanding disk
mounted on the chuck. (See photos NS23 & 24).
behind it with a parting
tool, made a pattern on it with a chatter tool then outlined the pattern
with grooves cut using a parting tool. He explained that he sometimes
uses a small gas burner to burn the ‘chatter’ area. He used a small
drill to make a hole for a leather thread to go through then cut it
off with a parting tool and sanded the back on a home made sanding disk
mounted on the chuck. (See photos NS23 & 24).
It was interesting to see the amazing lengths a craftsman like Nikos goes to in order to produce the beautiful work he has become famous for. Thank you also Nikos and Frances for making it to our club on such a horrible cold, and snowy evening; a far cry from the Cretan weather you are used to working in.
Lorrie Flannery![]()
SWC club member