

- Alan Truman
- Albert Harrison
- Ambrose O'Halloran
- Andrew Hall
- Bob Chapman
- Bob Neill
- Clive Brooks
- Colin Fishwick
- David Lowe
- David Springett
- Gary Rance
- George Bell
- Gerry Marlow
- Ian Clarkson
- Joe Laird
- Joey Richardson
- John Berkeley
- Ken Allen
- Les Thorne
- Margaret Garrard
- Mark & Lisa Raby
- Mark Baker
- Mark Hancock
- Martin Pidgen
- Mick Hanbury
- Nick Agar
- Nick Arnull
- Nikos Siragas
- Paul Jones
- Phil Irons
- Philip Greenwood
- Peter Berry
- Peter Wood
- Richard Findlay
- Robin Wood
- Russell Kebble
- Sarah Thirlwell
- Simon Hope
- Simon Whitehead
- Steve Wright
- Stuart King
- Sue Harker
- SWC Club Members
- Tony Wilson
- Tracy Owen
- Walt Claxton
- Walt Claxton & Tom Allison
Alan Truman 13 October 2011
Pot Pourri Bowl with Lid and Finial
This item was made in three pieces see final photo.![]()
Alan had already defined the “scoops” in the
base, and began by mounting it on the lathe.
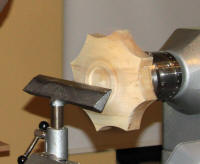 He turned a void for an expansion chuck and delineated a
foot. He then turned the
outside of the bowl, from outside edge to centre. Normally this would be done from centre to edge (with the
grain), but this way avoided tear-out at the points. Having done this, he power sanded from 120 to 320, locking
the spindle to power sand each “scoop”, photo AT11_05
He turned a void for an expansion chuck and delineated a
foot. He then turned the
outside of the bowl, from outside edge to centre. Normally this would be done from centre to edge (with the
grain), but this way avoided tear-out at the points. Having done this, he power sanded from 120 to 320, locking
the spindle to power sand each “scoop”, photo AT11_05
He brushed off the dust, covered the lathe bed and gave the item two coats of cellulose sanding sealer which was diluted 50/50 with cellulose thinners, applying it with a rag. He followed this with Briwax applied with 0000 wire wool and buffed it to a shine with a soft cloth.
 The piece was reversed, checked for true
running and the bowl hollowed – again from outside edge to centre –
undercutting the rim. He
began each cut about 1/8” from the rim, riding the bevel. He used callipers (photo
AT11_06) to measure the depth and made final
cuts to leave as few tool marks as possible. Alan power sanded, again from 120 – 320, brushed away the
dust, applied sanding sealer and polished as before. (photo AT11_07)
The piece was reversed, checked for true
running and the bowl hollowed – again from outside edge to centre –
undercutting the rim. He
began each cut about 1/8” from the rim, riding the bevel. He used callipers (photo
AT11_06) to measure the depth and made final
cuts to leave as few tool marks as possible. Alan power sanded, again from 120 – 320, brushed away the
dust, applied sanding sealer and polished as before. (photo AT11_07)
The lid already had holes drilled in it part
through, and this was mounted on the lathe using a screw chuck. Alan stressed he was looking for a “relaxed” fit. (photo
AT11_08) He trued the face from the outside edge, establishing
the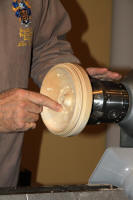 diameter needed by offering up the already turned base. He proceeded to hollow the lid until the holes were reached. (photo
AT11_10) To avoid
tearing the holes he turned the flute upwards and allowed the bevel
to rub. He left a “boss”
to accommodate the screw chuck and made a 1/8” deep chucking point.
( photo AT11_12) He left a small
raised area where a finial would be mounted.
Just one coat of sanding
sealer was applied, but no polish, and then careful power sanding
with 120 grit. The
inside of the holes were sanded by hand, using abrasive wrapped
around a dowel. The lid
was re-chucked using the recess, trued up, and the top turned to
match the inside curve. (photo AT11_14). The outside was sanded and polished as for the base. (photo
AT11_15)
diameter needed by offering up the already turned base. He proceeded to hollow the lid until the holes were reached. (photo
AT11_10) To avoid
tearing the holes he turned the flute upwards and allowed the bevel
to rub. He left a “boss”
to accommodate the screw chuck and made a 1/8” deep chucking point.
( photo AT11_12) He left a small
raised area where a finial would be mounted.
Just one coat of sanding
sealer was applied, but no polish, and then careful power sanding
with 120 grit. The
inside of the holes were sanded by hand, using abrasive wrapped
around a dowel. The lid
was re-chucked using the recess, trued up, and the top turned to
match the inside curve. (photo AT11_14). The outside was sanded and polished as for the base. (photo
AT11_15)
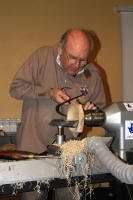
 The yew finial blank was mounted in O’Donnell
jaws (photo AT11_16) and the tailstock brought up for support to begin with. The item was roughed to a cylinder, planed with the skew,
shaped, sanded, sealed and polished with carnauba was. It was parted with the long end of the skew, and glued in to
the lid. (photo AT11_17).
The yew finial blank was mounted in O’Donnell
jaws (photo AT11_16) and the tailstock brought up for support to begin with. The item was roughed to a cylinder, planed with the skew,
shaped, sanded, sealed and polished with carnauba was. It was parted with the long end of the skew, and glued in to
the lid. (photo AT11_17).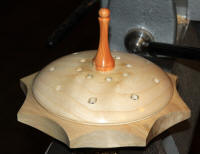
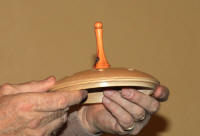
See finished item (photo AT11_21). Alan kindly left a “kit” for the project for our raffle.
Lesley Churton
SWC Secretary