

- Alan Truman
- Albert Harrison
- Ambrose O'Halloran
- Andrew Hall
- Bob Chapman
- Bob Neill
- Clive Brooks
- Colin Fishwick
- David Lowe
- David Springett
- Gary Rance
- George Bell
- Gerry Marlow
- Ian Clarkson
- Joe Laird
- Joey Richardson
- John Berkeley
- Ken Allen
- Les Thorne
- Margaret Garrard
- Mark & Lisa Raby
- Mark Baker
- Mark Hancock
- Martin Pidgen
- Mick Hanbury
- Nick Agar
- Nick Arnull
- Nikos Siragas
- Paul Jones
- Phil Irons
- Philip Greenwood
- Peter Berry
- Peter Wood
- Richard Findlay
- Robin Wood
- Russell Kebble
- Sarah Thirlwell
- Simon Hope
- Simon Whitehead
- Steve Wright
- Stuart King
- Sue Harker
- SWC Club Members
- Tony Wilson
- Tracy Owen
- Walt Claxton
- Walt Claxton & Tom Allison
Andrew Hall 9 August 2012
This evening’s demonstration was scheduled to
![]() be
given by Tony Wilson but, sadly, he had to pull out at the last minute
due to health problems. Fortunately Andrew Hall, an old stalwart of
our club, very kindly stepped in to help us out.
be
given by Tony Wilson but, sadly, he had to pull out at the last minute
due to health problems. Fortunately Andrew Hall, an old stalwart of
our club, very kindly stepped in to help us out.
Andrew turned two projects for us this evening, both of them from 12th century oak that he says was probably French. The wood was taken from the bell tower of Durham cathedral in 1989 and was left lying at the bottom of the tower until 2010.
1. Square Lidded Box
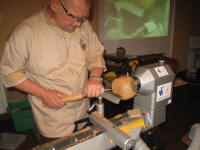
Andrew mounted a block of oak measuring approx. 8” long by 5” square,
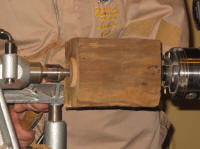 between
centres, using a steb centre in the chuck and a standard live centre.
First he cleaned it . He used a vacuum cleaner to suck the dirt out
of the bark, then a wire brush in an electric drill to clean up the
surface. That done, he removed any loose bark then finished cleaning
it with a hand held wire brush. Using a beading parting tool Andrew
tidied up the headstock end and turned a chucking point. He then repeated
this at the tailstock end. (See photos AH12_34 & 35).
between
centres, using a steb centre in the chuck and a standard live centre.
First he cleaned it . He used a vacuum cleaner to suck the dirt out
of the bark, then a wire brush in an electric drill to clean up the
surface. That done, he removed any loose bark then finished cleaning
it with a hand held wire brush. Using a beading parting tool Andrew
tidied up the headstock end and turned a chucking point. He then repeated
this at the tailstock end. (See photos AH12_34 & 35).
Using one of these chucking points Andrew mounted it in the chuck
and cut a 12mm groove with a parting tool, approx one third of the way
along from the
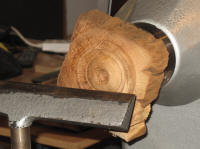 headstock.
He then parted this off on the tailstock side of the groove, leaving
the lid section mounted on the lathe. To turn the inside of the lid
he marked the centre then drilled a 12mm hole and used a spindle gouge
to start hollowing it. Then he used a Kelton hollowing tool to undercut
it and give the illusion of a hollow form and curved the outer edge
of this area. Using a bowl gouge he turned some beads and coves around
the hole. He sanded it and then used a mini texturing tool to make a
pattern on the bead and cleaned this with a hogs hair brush. (See photos
AH12_36 to 39).
headstock.
He then parted this off on the tailstock side of the groove, leaving
the lid section mounted on the lathe. To turn the inside of the lid
he marked the centre then drilled a 12mm hole and used a spindle gouge
to start hollowing it. Then he used a Kelton hollowing tool to undercut
it and give the illusion of a hollow form and curved the outer edge
of this area. Using a bowl gouge he turned some beads and coves around
the hole. He sanded it and then used a mini texturing tool to make a
pattern on the bead and cleaned this with a hogs hair brush. (See photos
AH12_36 to 39).
To turn the top of the lid Andrew used the outside of the lip to
mount
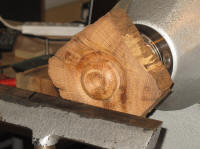 it
in the jaws, then used a long grind bowl gouge to turn a gentle curve,
watching the silhouette of the wood as he worked from the edge to the
chucking point. He turned the chucking point into a bead then turned
underneath the outer edge of the bead with a parting tool and blended
this in with a spindle gouge. Finally he hollowed the centre of the
bead and textured it, to match the underneath. (See photos AH12_40 to
42).
it
in the jaws, then used a long grind bowl gouge to turn a gentle curve,
watching the silhouette of the wood as he worked from the edge to the
chucking point. He turned the chucking point into a bead then turned
underneath the outer edge of the bead with a parting tool and blended
this in with a spindle gouge. Finally he hollowed the centre of the
bead and textured it, to match the underneath. (See photos AH12_40 to
42).
After the break Andrew mounted the bottom of the box on the lathe
and marked where the opening should be. He hollowed it out, making it
square in the bottom, then used the lid to check the size. He parted
away some of the inside edge until he had a
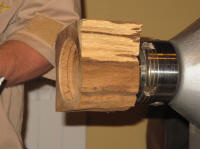 slack
fit – Andrew says tight fitting lids are for turners and loose ones
for the public. In his experience the public don’t buy boxes with tight
fitting lids. Once he was happy with the fit he tidied up the top edge
then did some more hollowing on the inside, working from the centre
and curving it round. To finish the inside he used an Ashley Iles closed
cup hollowing tool to remove the torn grain left by the bowl gouge.
(See photo AH12_43).
slack
fit – Andrew says tight fitting lids are for turners and loose ones
for the public. In his experience the public don’t buy boxes with tight
fitting lids. Once he was happy with the fit he tidied up the top edge
then did some more hollowing on the inside, working from the centre
and curving it round. To finish the inside he used an Ashley Iles closed
cup hollowing tool to remove the torn grain left by the bowl gouge.
(See photo AH12_43).
To finish turning the base he turned it round on the lathe and expanded the jaws into the inside. He tidied the base then turned beads, coves and a ‘hollow form’ together with texturing, to complement the patterns on the lid. (See photo AH12_44).
Next he decorated the outside, using a countersink bit in an electric
drill he make a series of indentations on two sides of the base and
on the top surface of the lid, then used an angle grinder to turn some
grooves in another edge. (See photo AH12_45).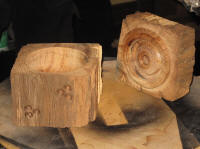
Finally Andrew cleaned and coloured the outside of the box. He fitted the lid onto the base then used a brass wire brush to clean up the edges, paying particular attention to the area where the lid and the base meet. Wearing a latex glove he applied brass colour to the highlights on the sides and copper and silver colour on the top of the lid. He put some verdigris on the texturing on the bottom then applied bronze colouring round the outside edge of the base. To finish he used a scrubbing brush to blend the colours, pressing hard on the surface, then used a pyrography pen to burn his signature brand onto it.
Andrew very kindly donated this piece to the club to raise money for our charity. So we raffled it at Art in the Gardens and raised £86 for Age UK Sheffield. Thank you Andrew.
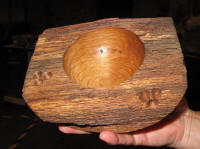
2. Chunky Oak Bowl
For this project Andrew used a block of the ‘cathedral oak’ measuring
 approx.
2” x 4” x 6” which he mounted in the jaws, using in a screw chuck in
one of the flat surfaces. He started turning the other flat surface
to a curve with a bowl gouge, using a push cut to start then changing
to a draw cut. He left a flat area at the bottom and used a parting
tool to turn a dovetail in this area, then used a spiralling tool to
decorate inside the dovetail. (See photos AH12_46 & 47).
approx.
2” x 4” x 6” which he mounted in the jaws, using in a screw chuck in
one of the flat surfaces. He started turning the other flat surface
to a curve with a bowl gouge, using a push cut to start then changing
to a draw cut. He left a flat area at the bottom and used a parting
tool to turn a dovetail in this area, then used a spiralling tool to
decorate inside the dovetail. (See photos AH12_46 & 47).
Andrew turned the piece round on the late, using the recess on the
base to mount it on the jaws. He locked the lathe head then used a wire
brush in an electric drill to clean the centuries of dirt from the bark
surface. He hollowed
 out
the bowl area, using a ½” bowl gouge, making a nice spherical curve,
leaving some of the bark surface on round the outside of the bowl area.
(See photo AH12_48).
out
the bowl area, using a ½” bowl gouge, making a nice spherical curve,
leaving some of the bark surface on round the outside of the bowl area.
(See photo AH12_48).
As with the last project, he decorated it with holes and grooves as well as some lines made into a fan shape, using a chain saw blade in his Arbortech. To finish it he applied a coat of beeswax with a piece of grey Webrax then polished it up, using a scrubbing brush then a brass wire brush in the grooves. Finally he branded the underneath and waxed it. (See photos AH12_49 & 50).
Lorrie Flannery
SWC club member