

- Alan Truman
- Albert Harrison
- Ambrose O'Halloran
- Andrew Hall
- Bob Chapman
- Bob Neill
- Clive Brooks
- Colin Fishwick
- David Lowe
- David Springett
- Gary Rance
- George Bell
- Gerry Marlow
- Ian Clarkson
- Joe Laird
- Joey Richardson
- John Berkeley
- Ken Allen
- Les Thorne
- Margaret Garrard
- Mark & Lisa Raby
- Mark Baker
- Mark Hancock
- Martin Pidgen
- Mick Hanbury
- Nick Agar
- Nick Arnull
- Nikos Siragas
- Paul Jones
- Phil Irons
- Philip Greenwood
- Peter Berry
- Peter Wood
- Richard Findlay
- Robin Wood
- Russell Kebble
- Sarah Thirlwell
- Simon Hope
- Simon Whitehead
- Steve Wright
- Stuart King
- Sue Harker
- SWC Club Members
- Tony Wilson
- Tracy Owen
- Walt Claxton
- Walt Claxton & Tom Allison
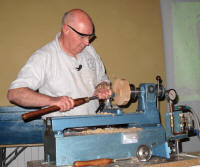
Bob Chapman 12 May 2011
The theme of Bob’s demonstration this evening
was decorating techniques, rather than his usual projects from start
to finish. Consequently, with the exception of the
![]() last item, he
didn’t do any sanding or finishing. He also, very kindly, donated
most of the pieces he had turned to the club for our members to
finish and sell to raise money for our charity for the year,
Bluebell Wood Children’s Hospice.
last item, he
didn’t do any sanding or finishing. He also, very kindly, donated
most of the pieces he had turned to the club for our members to
finish and sell to raise money for our charity for the year,
Bluebell Wood Children’s Hospice.
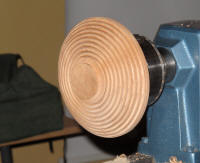
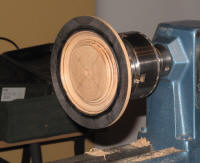
1. Texturing – Beading
Bob mounted a disk of beech measuring approx.
1½” by 6” on a screw chuck,
 to make a shallow bowl.
He turned a spigot and made a
small hole in the middle of it, then he quickly turned away some
timber and marked a foot slightly bigger than the spigot. He trued
up the edge with a bowl gouge then turned it to a gentle curve,
leaving a small flat edge at the rim. Next he used a 6mm Ashley Iles
beading tool to turn a series of beads across the whole surface. He
started next to the foot and worked outwards, this way you can
ensure the beads are evenly spread. (See photos BC11_01 to 04).
to make a shallow bowl.
He turned a spigot and made a
small hole in the middle of it, then he quickly turned away some
timber and marked a foot slightly bigger than the spigot. He trued
up the edge with a bowl gouge then turned it to a gentle curve,
leaving a small flat edge at the rim. Next he used a 6mm Ashley Iles
beading tool to turn a series of beads across the whole surface. He
started next to the foot and worked outwards, this way you can
ensure the beads are evenly spread. (See photos BC11_01 to 04).
 He turned it round on the lathe, using the
spigot to mount it on the chuck, trued up the rim and turned a small
groove just in from the edge to act as a stop if his chisel slipped.
He turned the inside to a curve to match the outside, taking care he
didn’t cut too deep and go through one of the grooves between the
beads on the outside. He used a round scraper to smooth out any
ridges, working from the centre outwards. He explained that although
you would normally work from the outside towards the centre in a
bowl, he finds he can be much more precise with the scraper if he
pulls it from the middle rather than pushing it inwards.
He turned it round on the lathe, using the
spigot to mount it on the chuck, trued up the rim and turned a small
groove just in from the edge to act as a stop if his chisel slipped.
He turned the inside to a curve to match the outside, taking care he
didn’t cut too deep and go through one of the grooves between the
beads on the outside. He used a round scraper to smooth out any
ridges, working from the centre outwards. He explained that although
you would normally work from the outside towards the centre in a
bowl, he finds he can be much more precise with the scraper if he
pulls it from the middle rather than pushing it inwards.
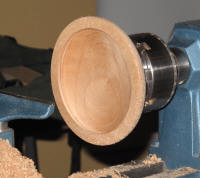
To finish it he mounted a disk in the chuck which had sandpaper stuck to the surface (normally he would use rubber). Holding the inside of the bowl against this, he used the tailstock to hold it in place, locating it in the hole he had turned in the middle, to turn away the spigot.
2. Texturing – Using a Proxxon
Bob mounted another beech blank, the same as
the last one and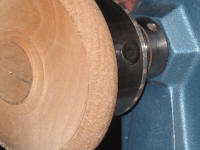 turned the outside as before, turning a slight
inward curve on the rim. He marked a line a little way round from
the edge then used a Proxxon, fitted with a chainsaw blade, to
texture the area between the line and the rim. He held the tool at
45º to the work and had the lathe running at the speed he had
turned the outside as before, turning a slight
inward curve on the rim. He marked a line a little way round from
the edge then used a Proxxon, fitted with a chainsaw blade, to
texture the area between the line and the rim. He held the tool at
45º to the work and had the lathe running at the speed he had
 used
to turn the bowl. This left some tear out which he couldn’t sand, so
he went over it with a Dremel with an 80 grit radial bristle disk
(bought from ‘Woodworks Craft Supplies’). To finish the outside he
used a 3mm Ashley Iles beading tool to turn a bead at the edge of
the texturing. (See photos BC11_05 to 07).
used
to turn the bowl. This left some tear out which he couldn’t sand, so
he went over it with a Dremel with an 80 grit radial bristle disk
(bought from ‘Woodworks Craft Supplies’). To finish the outside he
used a 3mm Ashley Iles beading tool to turn a bead at the edge of
the texturing. (See photos BC11_05 to 07).
After turning it round on the lathe he turned the inside similar to the first bowl but made the rim a little wider and flat with a slight undercut under the rim. He then used the Proxxon and Dremel to texture and tidy the rim. (See photo BC11_08).
3. Burning and Blackening Wood
During the break Bob turned the outside of a
bowl to an ogee shape then turned a
 flat rim with a bead on the
inner edge. Using a gas blowtorch he burnt the rim and the bead – he
turned the lathe by hand and ensured he got an even finish by taking
care not to linger in any one place. However, the blowtorch will not
burn the groove between the rim and the bead so he coloured that
with Indian ink. (See photos BC11_09 and 10).
flat rim with a bead on the
inner edge. Using a gas blowtorch he burnt the rim and the bead – he
turned the lathe by hand and ensured he got an even finish by taking
care not to linger in any one place. However, the blowtorch will not
burn the groove between the rim and the bead so he coloured that
with Indian ink. (See photos BC11_09 and 10).
As an experiment Bob used the Proxxon to texture the blackened surface but the effect was not very attractive so he turned it away and turned a groove in the rim. Next he re-coloured it using a two part bodywork filler from ‘Plastic Padding’, called ‘Leak Fix’. He mixed this to a paste then applied it to the rim with a piece of flexible plastic, pushing it into the groove and scraped the excess off the surface. Whilst waiting for it to set he finished turning the inside of the bowl then skimmed the surface of the rim, just leaving filler in the groove. This gives an interesting black band round the rim and once the surface is set it can be sanded and polished.
Other blackening techniques Bob talked about are:
- Leave a piece of steel wool in a jar of vinegar for several days, or even longer, then you can turn oak black by wiping the vinegar onto it with a piece of kitchen paper
- Sulphate of iron dissolved in water can be dabbed on to oak to turn it a bluish black
- Rustin’s ‘Wood Bleach A’ – which is dilute caustic soda - can be dabbed on oak to darken it
- Bicarbonate of soda dissolved in water can also be dabbed on oak to darken it
- All these techniques will work on any timber that has a high tannin content.
4. Miniature Hat with Stand
Bob’s final project of the evening came from an
idea he saw at Ipswich Woodturning Club. Whilst doing a
demonstration there one of the members gave Bob a bag which
contained a selection of miniature hats which he turns to sell for
charity.
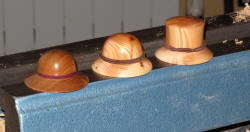 Photo BC11_11 shows a selection of the hats similar to
those made by that gentleman; the bands on the middle and right hand
hats are pony tail bands.
Photo BC11_11 shows a selection of the hats similar to
those made by that gentleman; the bands on the middle and right hand
hats are pony tail bands.
He mounted a cylinder of wood measuring approx. 1½” by 6” in the chuck and turned a shallow, concave piece at the end which he sanded and treated it with sanding sealer. He then drilled a hole into the end of the wood, using a spindle gouge. Once he had drilled it to the required depth he opened the inside out to an internal diameter of approx. 1”, turned it to a gentle curve and smoothed it out with a scraper. He sanded the inside and finished it with sanding sealer then turned a tiny dovetail recess on the inside edge.
Next he measured the depth and marked this
measurement on the outside, adding a little extra to allow for wall
thickness then parted it off. He turned it round on the lathe and
mounted it in small pin jaws which opened into the small dovetail
recess on the inside. After turning the top down to the rough
diameter he turned the brim then used a skew chisel to make a couple
of ‘v’ cuts to define the hat band. He then turned the top to a
rounded, panama hat shape and deepened the ‘v’ cuts either side of
the hat band so he could apply colour to it without it bleeding into
the rest of the hat.
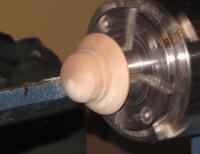 He coloured the band with a red, water based,
felt crayon. After sanding it he applied sanding sealer to it with a
brush, taking care to ensure he didn’t get any on the coloured band.
(See photos BC11_12 to 15).
He coloured the band with a red, water based,
felt crayon. After sanding it he applied sanding sealer to it with a
brush, taking care to ensure he didn’t get any on the coloured band.
(See photos BC11_12 to 15).
To make the stand he mounted a piece of beech
measuring approx. 1½” thick by 3” long in the chuck and used a 2.5mm
drill mounted in the tailstock to drill a hole approx. 1½” long in
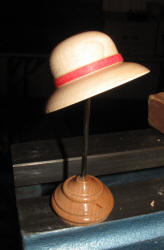 the end. He turned the end to a size that fitted into the hat,
parted it most of the way through, sanded it, domed the top with a
skew chisel and parted it off. He drilled another 1½” hole in the
remaining timber and turned the end to a point. He turned a bead
below this, then a gentle curve followed by another bead. After
parting it most of the way through he sanded it then finished
parting it off. He joined the two parts together with a piece of
2.5mm brass rod which was approx. 3” long which he super glued in
place. Finally he buffed and polished the hat and stand using the
Beall wood buff system. (See photos BC11_16 to 18).
the end. He turned the end to a size that fitted into the hat,
parted it most of the way through, sanded it, domed the top with a
skew chisel and parted it off. He drilled another 1½” hole in the
remaining timber and turned the end to a point. He turned a bead
below this, then a gentle curve followed by another bead. After
parting it most of the way through he sanded it then finished
parting it off. He joined the two parts together with a piece of
2.5mm brass rod which was approx. 3” long which he super glued in
place. Finally he buffed and polished the hat and stand using the
Beall wood buff system. (See photos BC11_16 to 18).
At the end of the evening he raffled the hat and stand off and donated the other three hats to the club to sell, with all proceeds going to our charity for this year, Bluebell Wood Children’s Hospice.
You can always expect a good evening when Bob comes to the club and today was no exception. He kept us entertained for the whole evening with his excellent projects and witty banter, so thank you once again Bob for another excellent evening.
Lorrie Flannery
SWC club member