

- Alan Truman
- Albert Harrison
- Ambrose O'Halloran
- Andrew Hall
- Bob Chapman
- Bob Neill
- Clive Brooks
- Colin Fishwick
- David Lowe
- David Springett
- Gary Rance
- George Bell
- Gerry Marlow
- Ian Clarkson
- Joe Laird
- Joey Richardson
- John Berkeley
- Ken Allen
- Les Thorne
- Margaret Garrard
- Mark & Lisa Raby
- Mark Baker
- Mark Hancock
- Martin Pidgen
- Mick Hanbury
- Nick Agar
- Nick Arnull
- Nikos Siragas
- Paul Jones
- Phil Irons
- Philip Greenwood
- Peter Berry
- Peter Wood
- Richard Findlay
- Robin Wood
- Russell Kebble
- Sarah Thirlwell
- Simon Hope
- Simon Whitehead
- Steve Wright
- Stuart King
- Sue Harker
- SWC Club Members
- Tony Wilson
- Tracy Owen
- Walt Claxton
- Walt Claxton & Tom Allison
Bob Chapman 11 October 2012
This evening’s demonstration was to be Bob’s
last at our club as![]() he has decided to retire from the demonstration
circuit. However, he plans to continue to give lessons and appear at
woodworking shows. As we have come to expect with Bob, his first
project was artistic but his second one was aimed at the new turners
in our club, with lots of hints and tips on tool use and techniques.
he has decided to retire from the demonstration
circuit. However, he plans to continue to give lessons and appear at
woodworking shows. As we have come to expect with Bob, his first
project was artistic but his second one was aimed at the new turners
in our club, with lots of hints and tips on tool use and techniques.
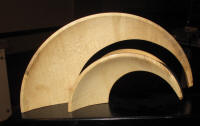
1. A Night at the Opera
This piece is based on the opera house in Santa Cruz, the capital of Tenerife. The ‘Auditorio de Tenerife’, which is situated close to the sea front, was designed by Santiago Caltrava to look like sails and is known locally as ‘the wave’. Bob’s representation of it took the form of two curves mounted on a base board, the smaller one being 80% of the size of the larger one.
To make it he first turns a bowl.
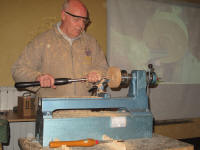 So he mounted
a beech blank measuring approx 1½” x 5” on the lathe using a screw
chuck. He marked a spigot then used a parting tool to make a 5-6mm
deep cut on the outside of this mark. He used a bowl gouge turned to
10 o’clock and held at 90º to the work then used the tip of the tool
to make pull cuts and turn away the waste wood. He used a skew
chisel to turn a dovetail on the edge of the spigot then trued up
the outer edge of the bowl with the bowl gouge. Finally he turned it
to a simple bowl shape, working from the middle to the edge and
leaving a small flat area next to the spigot. (See photo BC12_01).
So he mounted
a beech blank measuring approx 1½” x 5” on the lathe using a screw
chuck. He marked a spigot then used a parting tool to make a 5-6mm
deep cut on the outside of this mark. He used a bowl gouge turned to
10 o’clock and held at 90º to the work then used the tip of the tool
to make pull cuts and turn away the waste wood. He used a skew
chisel to turn a dovetail on the edge of the spigot then trued up
the outer edge of the bowl with the bowl gouge. Finally he turned it
to a simple bowl shape, working from the middle to the edge and
leaving a small flat area next to the spigot. (See photo BC12_01).
After turning it round on the lathe Bob used a
skew chisel to take the sharpness off the outer
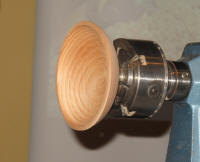 edge then turned a
groove just in from the edge. This was to define the thickness of
the bowl and he would use it to locate the gouge when starting his
turning cuts. As he worked he left a lump in the middle for
stability then started to turn this away when it was getting in the
way of the chisel. He continued turning the inside until he had an
even wall thickness and a smooth, flowing curve. Bob didn’t do any
sanding of the bowl but he said he normally power sands the insides
of his bowls. (See photos BC12_02 & 03).
edge then turned a
groove just in from the edge. This was to define the thickness of
the bowl and he would use it to locate the gouge when starting his
turning cuts. As he worked he left a lump in the middle for
stability then started to turn this away when it was getting in the
way of the chisel. He continued turning the inside until he had an
even wall thickness and a smooth, flowing curve. Bob didn’t do any
sanding of the bowl but he said he normally power sands the insides
of his bowls. (See photos BC12_02 & 03).
The next stage of the project is to cut the
bowl up to give the two curves. He measured the diameter of the bowl
(13cm), worked out what 80% of that was (10.4cm) then set his
compass to half that figure (5.2cm). He positioned the point of the
compass into the edge of the spigot (in the corner) and drew a
circle on the base, he was then going to cut through this line. For
this he used a home made jig which consisted of two pieces of
plywood hinged along one side and with an adjuster on the opposite
side.
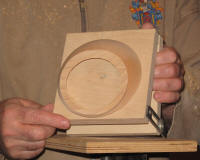 He used a hot melt glue gun to stick the bowl to the jig, but
avoided putting glue on the part of the circle where it passes
closest to the jig. He took this to his bandsaw, adjusted the jig
until he had the circle lined up with the blade then cut through the
pencil line. He removed it from the jig and sanded the edge of the
piece left on the jig; he did this off the lathe using a sanding
disk. To cut this, outer part of the bowl, in half he marked a line
through the centre then cut it in half on the bandsaw. (See photos
BC12_04 to 06).
He used a hot melt glue gun to stick the bowl to the jig, but
avoided putting glue on the part of the circle where it passes
closest to the jig. He took this to his bandsaw, adjusted the jig
until he had the circle lined up with the blade then cut through the
pencil line. He removed it from the jig and sanded the edge of the
piece left on the jig; he did this off the lathe using a sanding
disk. To cut this, outer part of the bowl, in half he marked a line
through the centre then cut it in half on the bandsaw. (See photos
BC12_04 to 06).
To make up the curve he applied glue to the two
inner surfaces, matching the point and the curve. He would normally
use PVA glue for this but for speed he
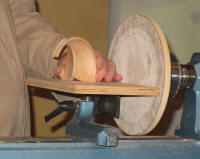 used super glue this evening.
One side was a little longer than the other so he cut away the
excess material at the wide end then prepared to sand it to the
finished shape. He mounted a sanding drum in the chuck then softened
the inner edge of the curve, taking away the sharp edge. Next he
mounted a home made disk sander on the lathe which he used to sand
the wide end (base) of the curve to an angle that lifts the tip off
the surface when it is mounted on the base. (See photos BC12_07 &
08).
used super glue this evening.
One side was a little longer than the other so he cut away the
excess material at the wide end then prepared to sand it to the
finished shape. He mounted a sanding drum in the chuck then softened
the inner edge of the curve, taking away the sharp edge. Next he
mounted a home made disk sander on the lathe which he used to sand
the wide end (base) of the curve to an angle that lifts the tip off
the surface when it is mounted on the base. (See photos BC12_07 &
08).
To finish the spine of the curve he made a
curved piece of dowel, to fit over it, which he turned from another
bowl blank. To make this he took the measurement between the two
outside edges of the curve (10cm) then added another half a
centimetre to this to give him the diameter he needed to turn it to.
He mounted another 5” bowl blank on the lathe then marked a 10.5cm
circle on it. He used a captive ring tool to define the shape of the
ring then used a bowl gouge to turn away the material either side of
it to give him space to work. He continued turning the ring with the
captive ring tool but took care to ensure he didn’t cut all the way
through as at this stage he would normally sand it to 120grit; he
doesn’t need to go any further as he paints it. He finished turning
it off the blank
 with a parting tool. (See photos BC12_09 & 10).
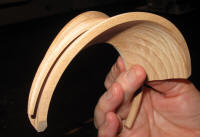
He marked the length of dowel he needed by
holding it against the curve, then snapped it to size. He put the
sanding disk back on the lathe and sanded one end of the dowel
square. Then he sanded the outer part of the curve and the sides of
one end, starting a little way in and working towards the end,
ensuring he kept the edges rounded. To finish it he sprays the dowel
black, with matt black car paint then, when it’s dry, he glues it
onto the spine of the curve using araldite. He applies the glue at
the tip
 and on a couple more points along the length, then uses
clothes pegs to pull it into place and hold it until the glue sets.
(See photo BC12_11).
and on a couple more points along the length, then uses
clothes pegs to pull it into place and hold it until the glue sets.
(See photo BC12_11).
When he has made both curves Bob mounts them on a base board which he paints black. To keep them steady on the base board he uses a couple of dowels, made from BBQ skewers, in the wide end of each curve. (See photo BC12_12).
2. Bowl Turning Techniques
Bob’s second project was a master class in bowl turning techniques for our less experienced members.
Lorrie Flannery
SWC club member