

- Alan Truman
- Albert Harrison
- Ambrose O'Halloran
- Andrew Hall
- Bob Chapman
- Bob Neill
- Clive Brooks
- Colin Fishwick
- David Lowe
- David Springett
- Gary Rance
- George Bell
- Gerry Marlow
- Ian Clarkson
- Joe Laird
- Joey Richardson
- John Berkeley
- Ken Allen
- Les Thorne
- Margaret Garrard
- Mark & Lisa Raby
- Mark Baker
- Mark Hancock
- Martin Pidgen
- Mick Hanbury
- Nick Agar
- Nick Arnull
- Nikos Siragas
- Paul Jones
- Phil Irons
- Philip Greenwood
- Peter Berry
- Peter Wood
- Richard Findlay
- Robin Wood
- Russell Kebble
- Sarah Thirlwell
- Simon Hope
- Simon Whitehead
- Steve Wright
- Stuart King
- Sue Harker
- SWC Club Members
- Tony Wilson
- Tracy Owen
- Walt Claxton
- Walt Claxton & Tom Allison
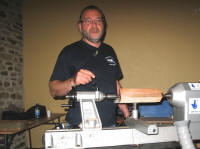
Mark Hancock 12 July 2012
Mark made a welcome return to the club, five
years after his previous visit.![]() The theme of his demonstration was
to show us his way of doing things and, to demonstrate this, he made
a twisted goblet with a captive ring.
The theme of his demonstration was
to show us his way of doing things and, to demonstrate this, he made
a twisted goblet with a captive ring.
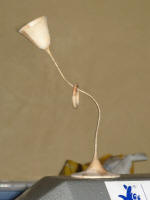
1. Turning the Goblet
Mark started with a piece of wet apple wood,
measuring approx. 2” square by 8” to 10” long with what he referred
to as ‘parallel grain’; i.e. the grain runs parallel to the lathe.
 He mounted this between centres, using a ring centre in the
tailstock. (See photo MHC12_ 01).
He mounted this between centres, using a ring centre in the
tailstock. (See photo MHC12_ 01).
First he turned it to a cylinder, using a
spindle roughing gouge then he used a ⅜” bowl gouge to turn a long
spigot at the tailstock end reduce the bulk of the timber down to
roughly the diameter he wanted the goblet piece to be. He took it
off the lathe and used the spigot to mount it in an O’Donnell chuck,
then he trued up the end and roughly turned the outside of the cup.
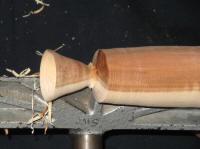 He used a spindle gouge to hollow out the cup, working from the
inside out towards the edge. (See photos MHC12_ 02 to 04).
He used a spindle gouge to hollow out the cup, working from the
inside out towards the edge. (See photos MHC12_ 02 to 04).
Once he was happy with the shape he finished
the inside with a scraper. He used his spindle gouge to turn the
outside of the goblet, checking for wall thickness to ensure he
didn’t make it too thin. Once he was happy with the shape he removed
any remaining tool marks using a cabinet scraper. Then he used a
spindle roughing gouge to remove the bulk of timber from the first
couple of inches of the stem. Next he started to turn a very thin
stem, using a ⅛” spindle gouge and working on small sections at a
time. When he had got an even thickness he finished it with a skew
chisel.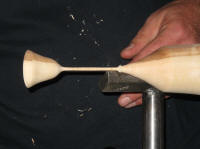 (See photo MHC12_05 & 06).
Mark continued turning the rest of the stem,
removing the excess timber and turning the thin stem, as described
above. Then, when he got close to the end, he marked where the top
of the foot was going to be and used a parting tool to turn a
captive ring from the timber above the foot. He removed the bulk of
the timber between the ring and the foot then turned his attention
to finishing the ring. He curved the outside of it with a spindle
gouge then used a ring tool he had made from a forged nail to turn
the inside of the ring, working from both sides until he had cut all
the way through. Once it had broken away he carved off the remaining
timber on the inside with a skew chisel. (See photos MHC12_07 & 08).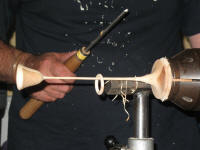
Mark didn’t do any sanding but explained that to sand the inside of the ring he wraps abrasive round the stem and gently holds the ring against it with the lathe running. Finally he turned the foot and parted it off the lathe, undercutting it and using the side of the parting tool to scrape the underneath. (See photo MHC12_09).
2. Twisting the Stem
To twist the stem Mark uses a musical
instrument maker’s electric bending iron. First though he rested the
stem on a block of wood and used a cabinet scraper to scrape away
some of the stem on each side, working across the grain, making the
two sides flat and even.
 He sanded it before bending it as it
wouldn’t be easy to sand once it was twisted. (See photos MHC12_10 &
11).
He sanded it before bending it as it
wouldn’t be easy to sand once it was twisted. (See photos MHC12_10 &
11).
Mark wetted the stem then slowly pressed it against the bending iron, taking care to ensure he kept it wet and kept it moving. He was careful not to press too hard as doing so would break the fibres. He continued twisting and turning it until he had reached his desired shape. (See photo MHC12_12).
This was an interesting twist (pun intended) on an object many of us have turned before.
Lorrie Flannery
SWC club member