

- Alan Truman
- Albert Harrison
- Ambrose O'Halloran
- Andrew Hall
- Bob Chapman
- Bob Neill
- Clive Brooks
- Colin Fishwick
- David Lowe
- David Springett
- Gary Rance
- George Bell
- Gerry Marlow
- Ian Clarkson
- Joe Laird
- Joey Richardson
- John Berkeley
- Ken Allen
- Les Thorne
- Margaret Garrard
- Mark & Lisa Raby
- Mark Baker
- Mark Hancock
- Martin Pidgen
- Mick Hanbury
- Nick Agar
- Nick Arnull
- Nikos Siragas
- Paul Jones
- Phil Irons
- Philip Greenwood
- Peter Berry
- Peter Wood
- Richard Findlay
- Robin Wood
- Russell Kebble
- Sarah Thirlwell
- Simon Hope
- Simon Whitehead
- Steve Wright
- Stuart King
- Sue Harker
- SWC Club Members
- Tony Wilson
- Tracy Owen
- Walt Claxton
- Walt Claxton & Tom Allison
David Springett 14 April
It was a real treat to see David at our club this month. Despite
being famous for
![]() his seemingly impossible projects and an author of
several books on woodturning, this was the first time I had seen him.
He turned a number of projects with the purpose of demonstrating the
various techniques he uses, so he didn’t sand or finish any of them.
I have done my best in this report to describe what David did, but some
of his jigs and techniques were so detailed that I was unable to
go into a great deal of detail. If you want to know more I suggest you
buy his books or come along to his next demonstration at our club in
September 2012.
his seemingly impossible projects and an author of
several books on woodturning, this was the first time I had seen him.
He turned a number of projects with the purpose of demonstrating the
various techniques he uses, so he didn’t sand or finish any of them.
I have done my best in this report to describe what David did, but some
of his jigs and techniques were so detailed that I was unable to
go into a great deal of detail. If you want to know more I suggest you
buy his books or come along to his next demonstration at our club in
September 2012.
1. Arrow through a glass apple
David mounted a piece of lime between centres. It measured 200mm
long by 20mm square, and he had routed grooves on each side, at one
end, to form ‘flights’. The diameter of the hole through the apple was
9mm so, after cutting in with a skew chisel at the
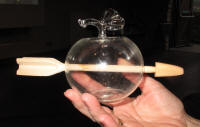 headstock end to
form a stop against the square end, he used the skew to turn the shaft
to 8mm, curving it into the ‘flight’. Using another skew chisel, ground
across the diagonal, he cut a piece off the tailstock end to give the
appearance of the shaft coming through the flight. See photos DS11_01
and 02).
headstock end to
form a stop against the square end, he used the skew to turn the shaft
to 8mm, curving it into the ‘flight’. Using another skew chisel, ground
across the diagonal, he cut a piece off the tailstock end to give the
appearance of the shaft coming through the flight. See photos DS11_01
and 02).
After cutting the arrow head to shape David boils it for 15 minutes then compresses it in jaws for 3 days. He is then able to push it through the apple and he puts the tip into hot water which expands it back to shape. (See photo DS11_03).
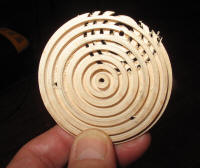
2. Lattice lid for a box
David started with a disc of maple 6mm thick and approx 10cm diameter,
which had a small hole in the centre. He put a compass in this hole
and drew a circle a little way in from the edge. Without adjusting it,
he put the compass on the line he had just drawn then marked where the
compass crossed the line. Then he put the compass on this mark and drew
the next crossing point. He continued doing this around the circle until
he had six evenly spaced crossing points. Then, using a fine drill,
he drilled a hole through every other crossing point, giving three evenly
spaced holes.
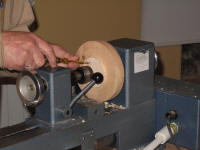 David mounted a wooden faceplate on the lathe, held the
maple disc against it and used the tailstock to centre it. To hold it
in place he screwed it to the faceplate, using pan head screws in the
three holes he had just drilled. (See photo DS11_04).
David mounted a wooden faceplate on the lathe, held the
maple disc against it and used the tailstock to centre it. To hold it
in place he screwed it to the faceplate, using pan head screws in the
three holes he had just drilled. (See photo DS11_04).
To turn the lid he used a chisel he had made from a piece of Ashley
Isles steel that he had shaped to his own design and, to stop the tool
being dragged into the work, he used a flat ‘shelf’ tool rest positioned
at the centre point. He marked a depth of 3mm on the end of the tool
with tippex then started turning. (See photo DS11_05). Holding the tool
flat on the tool rest, he cut a groove 3mm deep and approx. 3mm from
the centre, then cut two more 3mm grooves, 3mm apart. He tidied the
outer edge then cut
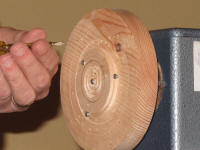 a rebate on the edge. Next he put a screw in the
centre hole, removed the other three screws and re-positioned them so
they were screwed directly into the faceplate, holding the piece in
place on the rebate he had cut on the edge. (See photo DS11_06). Once
it was held firmly in place he continued to turn grooves 3mm apart across
the rest of the piece. He explained that you need to plan the position
of the grooves quite carefully so you can lose the screw holes in one
of the grooves.
a rebate on the edge. Next he put a screw in the
centre hole, removed the other three screws and re-positioned them so
they were screwed directly into the faceplate, holding the piece in
place on the rebate he had cut on the edge. (See photo DS11_06). Once
it was held firmly in place he continued to turn grooves 3mm apart across
the rest of the piece. He explained that you need to plan the position
of the grooves quite carefully so you can lose the screw holes in one
of the grooves.
 Now he turned his attention to the other side. He turned it over
on the faceplate and held it in place with the tailstock in one of the
outer screw holes and screwed it onto the faceplate through the other
three screw holes (See photo DS11_07). He started the lathe and, with
a template rested on the tool rest at centre height, he marked where
the grooves should be then turned them as described previously. (See
photos DS11_08 and 09).
Now he turned his attention to the other side. He turned it over
on the faceplate and held it in place with the tailstock in one of the
outer screw holes and screwed it onto the faceplate through the other
three screw holes (See photo DS11_07). He started the lathe and, with
a template rested on the tool rest at centre height, he marked where
the grooves should be then turned them as described previously. (See
photos DS11_08 and 09).
To finish the lid David takes the two edge screws out and rotates it on the screw in the centre hole until another edge hole is positioned on the centre of the faceplate. He then screws it in place and turns the grooves. This is repeated again for the final section. (See photo DS11_10).
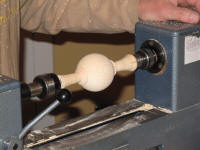
3. How to turn a perfect sphere
For David’s next project he turned a perfect 62mm sphere from an ash blank. To do this he used a home made jig which fits into the lathe bed. The jig is far too detailed to describe here, so if you are interested in turning this project I suggest you buy his book ‘Woodturning Wizardry’.
He mounted between centres a piece of ash that had already been turned
to a rough sphere and had his jig fitted onto the lathe bed, positioned
so the cutting tool just touched the wood on each end of the sphere.
(See photo DS11_11). He started the lathe and moved the rotating part
of the jig from side to side so it took small cuts where it met the
timber, gradually moving it in towards the work after each cut until
eventually it was cutting all the way round.
 He tidied the two sides,
taking care not to cut into the sphere, then cut part of the way through
each side with a thin parting tool and finished the cuts with a saw
so he didn’t get any tear out. (See photo DS11_12). To finish the sphere
he mounted it between centres, holding it in place with a cup on each
side. Using a spindle gouge he carefully turned away the remainder of
the ends, watching the ‘ghost’ image as he worked and taking great care
to ensure he didn’t cut into the sphere. (See photo DS11_13).
He tidied the two sides,
taking care not to cut into the sphere, then cut part of the way through
each side with a thin parting tool and finished the cuts with a saw
so he didn’t get any tear out. (See photo DS11_12). To finish the sphere
he mounted it between centres, holding it in place with a cup on each
side. Using a spindle gouge he carefully turned away the remainder of
the ends, watching the ‘ghost’ image as he worked and taking great care
to ensure he didn’t cut into the sphere. (See photo DS11_13).
4. Harlequin ball
David started by taking a sphere (as turned in the previous project) and marked the positions for the holes. How he did this is too difficult to explain here so, once again, if you are interested in turning this project you will need to buy his book ‘Woodturning Wizardry’.
He mounted the ball in a hollowed out spherical jig, on a faceplate and used tippex to mark a reference point 9mm from the tip of his cutting tool. He turned some holes that were 9mm in diameter and 9mm deep, then he excavated the holes out a little bit on the inside, taking care to ensure the outside part of the holes remained 9mm diameter. (See photo DS11_14).
 To make the pins that go into the holes he uses ‘diamond’ wood. He
mounted a piece in the jaws and centred it using the tailstock. He trued
it up using a small skew chisel then turned it to a 9.25 mm diameter
cylinder. (See photo DS11_15). Next he used his three sided skew chisel
to turn a ball at one end, making sure he didn’t take any more off the
diameter. Then he turned a groove below the ball and tapered it along
its length to a point at the other end. After polishing it he pushed
the ball into one of the holes, explaining that it is an ‘interference’
fit which means that as the hole is slightly smaller on the outside
edge than the spike, it clicks into place. We didn’t get a photo of
the harlequin ball but have a look at photo DS11_16 to see a spiky ball
he had ‘turned earlier’.
To make the pins that go into the holes he uses ‘diamond’ wood. He
mounted a piece in the jaws and centred it using the tailstock. He trued
it up using a small skew chisel then turned it to a 9.25 mm diameter
cylinder. (See photo DS11_15). Next he used his three sided skew chisel
to turn a ball at one end, making sure he didn’t take any more off the
diameter. Then he turned a groove below the ball and tapered it along
its length to a point at the other end. After polishing it he pushed
the ball into one of the holes, explaining that it is an ‘interference’
fit which means that as the hole is slightly smaller on the outside
edge than the spike, it clicks into place. We didn’t get a photo of
the harlequin ball but have a look at photo DS11_16 to see a spiky ball
he had ‘turned earlier’.
5. Double Cone
For this project David mounted a piece of beech measuring 120mm long
by 40mm diameter in the chuck and held it in place with the tailstock.
(See photo DS11_17 for the plan drawing of this). After marking the
centre point and a point 22mm either side of the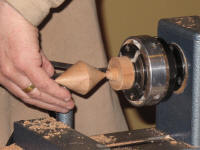 centre, he turned sections
either side of the 22mm marks (marked in pink on the diagram) down to
a 15mm diameter. He then turned a straight line from the centre mark
to each of the outer marks (See photos DS11_18 and 19).
centre, he turned sections
either side of the 22mm marks (marked in pink on the diagram) down to
a 15mm diameter. He then turned a straight line from the centre mark
to each of the outer marks (See photos DS11_18 and 19).
To complete the cone he continued the line he had just turned on the tailstock end until it came to a natural point, then repeated it on the headstock end, taking care to ensure it didn’t snap off or tear out the fibres. (See photos DS11_20, 21 and 22).
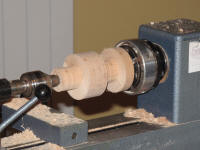
6. Cross streptohedron
David started with a blank that was two pieces of wood glued together
with newspaper between the glue joint so he could separate them later.
This had been turned to a cylinder 68mm diameter by approx. 120mm long
with a spigot on one end. (See photo DS11_23 for the plan
 drawing of
this). He mounted it in the chuck and held it in place with a cup centre
in the tailstock. After practicing on the waste wood at either end to
ensure the measurements were accurate, he used a parting tool to turn
it to the exact measurements shown on the diagram. When it was finished
he used a thin parting tool to part each end off, but to ensure he didn’t
have any tear out he parted most of the way through then finished with
a saw. (See photo DS11_24).
drawing of
this). He mounted it in the chuck and held it in place with a cup centre
in the tailstock. After practicing on the waste wood at either end to
ensure the measurements were accurate, he used a parting tool to turn
it to the exact measurements shown on the diagram. When it was finished
he used a thin parting tool to part each end off, but to ensure he didn’t
have any tear out he parted most of the way through then finished with
a saw. (See photo DS11_24).
He used a Stanley knife to start splitting the glue joint then finished splitting it with the aid of a hammer and kitchen knife. To finish it he turns it round, glues it together then sands and polishes it. (See photo DS11_25).
7. Cross streptohedron box
To turn the cross streptohedron into a box David used another of his famous jigs. This one is a piece of timber which he had hollowed out and filled with ‘filler foam’. He then lined it with a piece of plastic to stop the foam sticking to the box and pressed the curved side of one half of a cross streptohedron into it. He then fixed a collar on the outside of the jig and screwed it in place, to stop the foam expanding too much and forcing the wood out of the jig. (See photo DS11_26).
He turned a hole in the centre of the timber to take a plug he had turned earlier, then glued the plug in place using Titebond. He turned the plug down until it protruded by about 3mm then used a round nose scraper to curve the inside of the edge. The other half of the cross streptohedron is then turned in a similar way to fit onto this.
In conclusion
This was a very interesting demonstration which proved that if you have the ability to make suitable jigs it is within the realms of possibility for any turner to produce seemingly impossible projects. I am already looking forward to David’s return visit next year.
Lorrie Flannery
SWC club member